

Your pressure cooker sits ready with ingredients, but you’re stuck wondering: Should you preheat first or just start cooking? This single decision determines whether your meal turns out perfectly timed or triggers frustrating “burn” messages. Understanding how to preheat pressure cooker properly separates consistent culinary success from kitchen disasters—especially when working with dense ingredients or frozen foods.
Contrary to popular belief, modern pressure cookers like Instant Pots don’t always require preheating, but strategic preheating techniques dramatically improve results in specific scenarios. Whether you’re battling unevenly cooked meats or battling against the clock for dinner, mastering pressure cooker preheating transforms your cooking experience. Let’s cut through the confusion with actionable methods that actually work for your specific cooking needs.
Preheat vs Cold Start: What’s Best for Your Meal?
Traditional pressure cooking wisdom demanded 10-15 minutes of preheating before adding ingredients, but modern appliances have changed the game. Your Instant Pot efficiently builds pressure from a cold start while maintaining accurate cooking times—when conditions are right. The key is matching your preheating approach to your specific cooking scenario, not following blanket rules.
When preheating delivers noticeable benefits:
– Large cuts of meat that need even heat penetration
– Frozen ingredients requiring controlled thawing during cooking
– Precision recipes where timing is critical (like custards or cheesecakes)
– Preventing scorching on delicate sauces or thick stews
When skipping preheating makes more sense:
– Quick-cooking vegetables that overcook easily
– Soups and stews with ample liquid already in the pot
– Modern recipes specifically designed for cold-start pressure cooking
– When you’re short on time and every minute counts
Pressure Build Time Factors You Can’t Ignore
Model Size Impact on Preheating
Your pressure cooker’s capacity directly affects how long it takes to reach working pressure. A 3-quart model typically achieves pressure in 5-10 minutes, while an 8-quart unit needs 15-20 minutes—starting from the moment you select your cooking program. This timeline includes both heating your ingredients and building sufficient steam pressure, not just warming the empty pot.
Pro Tip: Track your specific model’s average pressure build time with room temperature ingredients to set realistic expectations for future cooking sessions. This baseline helps you identify potential issues when build times suddenly increase.
Ingredient Temperature Effects
Starting ingredient temperature dramatically changes pressure build duration. Frozen chicken breasts add 5-8 minutes to pressure time compared to room temperature pieces. Similarly, refrigerated broth extends the process more than piping hot liquid from your kettle. Always account for ingredient temperature when estimating total cooking time—this is where most home cooks miscalculate.
Three Proven Preheating Methods That Actually Work
Method 1: Standard Natural Build (Beginner-Friendly)
This hands-off approach leverages your pressure cooker’s automation for foolproof results:
- Verify sealing components – Ensure your silicone ring is properly seated and the float valve moves freely
- Add minimum liquid – Pour 1 cup of water, broth, or juice into the inner pot (no substitutes)
- Secure lid correctly – Align marks, twist until it locks, and confirm pressure release valve is set to “sealing”
- Select pressure level – Choose “High Pressure” for most recipes unless specified otherwise
- Wait for visual confirmation – The float valve rising indicates full pressure (typically 10-30 minutes)
Expert Note: Your timer only starts counting down after full pressure builds, making this method ideal for beginners who want precise cooking times without manual calculations.
Method 2: Sauté Function Shortcut (Time-Saver)
Reduce total cooking time by 3-5 minutes using your cooker’s built-in sauté function:
- Activate sauté mode – Set to “Normal” or “Medium” heat
- Heat empty pot – Allow 2-3 minutes for the base to warm up
- Add room temperature ingredients – Avoid cold items that counteract the preheating
- Cancel sauté function – Press “Keep Warm/Cancel” before switching modes
- Begin pressure cooking – Select your pressure program immediately after canceling sauté
This method works particularly well for browning meats before pressure cooking, as it combines searing with preheating in one efficient step.
Method 3: External Liquid Preheating (Precision Cooking)
Achieve maximum time savings for recipes requiring exact timing:
- Heat liquid separately – Microwave or stovetop your broth/water until steaming (not boiling)
- Carefully pour into inner pot – Use oven mitts as the pot may be warm
- Add remaining ingredients – Place dense items on top of the hot liquid
- Immediately begin pressure cycle – Select your cooking program without delay
Warning: Never pour scalding liquids into a cold inner pot—this thermal shock can crack the stainless steel insert. Always ensure your pot has had 1-2 minutes of gentle warming first.
Troubleshooting Pressure Build Failures

Steam Leakage Solutions
Continuous steam escaping during preheating indicates serious seal problems that prevent pressure buildup:
- Check sealing ring alignment – Remove and reinstall ensuring no twists or gaps
- Verify valve position – Confirm pressure release valve points directly to “sealing”
- Clean sealing surfaces – Wipe both lid rim and pot edge with a damp cloth
- Replace worn rings – Sealing rings lose elasticity after 12-18 months of regular use
Burn Message Prevention
Avoid the dreaded “burn” message during preheating with these critical steps:
- Maintain minimum liquid – Never use less than 1 cup of thin liquid
- Deglaze thoroughly – After sautéing, add liquid and scrape all browned bits
- Layer ingredients properly – Place liquids first, then proteins, then vegetables on top
- Respect fill limits – Maximum 2/3 full for most foods, 1/2 full for grains or beans
Model-Specific Preheat Times Guide
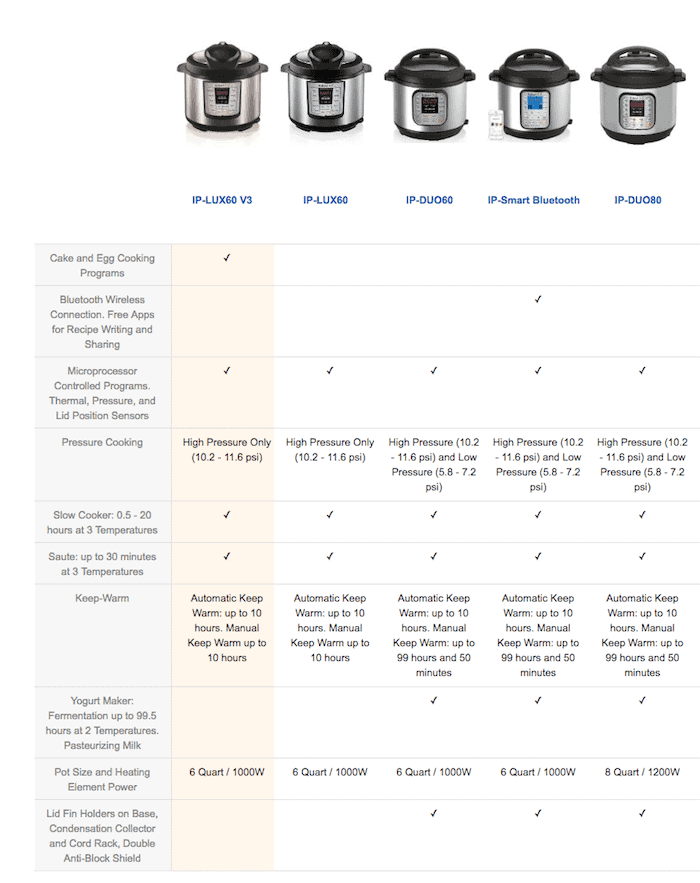
Instant Pot Timing Reference
- 3-Quart Mini: 5-10 minutes from cold start with room temperature ingredients
- 6-Quart Standard: 10-15 minutes typical pressure build time
- 8-Quart Family: 15-20 minutes requiring extra patience
- 10-Quart Commercial: 20-25 minutes for full capacity cooking
Critical Note: These times assume proper liquid amounts and room temperature ingredients. Frozen foods add 5-10 minutes across all sizes—always adjust your expectations accordingly.
Speed Optimization Strategies That Work
Ingredient Preparation Hacks
- Thaw frozen items – Overnight refrigerator thawing saves 5-8 minutes of pressure build time
- Uniform cutting – Smaller, consistent pieces heat faster and more evenly
- Room temperature start – Remove proteins from the fridge 20 minutes before cooking
Liquid Management Techniques
- Use hot liquids when recipes allow – reduces pressure time by 25%
- Avoid thick sauces during pressure build phase – add dairy or tomato-based sauces after cooking
- Measure precisely – excess liquid extends pressure time unnecessarily
Safety Protocols During Preheat
Critical Safety Checks Before Starting
- Inspect sealing ring – Look for cracks, tears, or permanent deformation
- Test float valve – Should move freely without resistance
- Confirm valve position – Double-check it’s set to “sealing” not “venting”
- Verify lid lock – Should click securely into place with no gaps
- Clear steam path – Ensure nothing blocks the pressure release valve
Stop Immediately If: You notice continuous steam for more than 10 minutes, no float valve movement after 20 minutes, burning smells, or error codes on display.
Maintenance for Consistent Preheating Performance
Weekly Maintenance Routine
- Clean sealing ring – Remove, wash with warm soapy water, and dry completely
- Inspect float valve – Check for food debris or damage after each use
- Wipe sealing surfaces – Keep both lid rim and pot edge clean and dry
- Test valve movement – Ensure it glides smoothly up and down
Monthly Deep Clean Procedure
- Disassemble lid components – Remove sealing ring, float valve, and anti-block shield
- Soak parts – Use warm water with mild detergent for 10 minutes
- Clean steam pathways – Use a pipe cleaner through valve channels
- Replace worn parts – Any component showing cracks or stiffness needs replacement
Special Cooking Considerations
High Altitude Adjustments
Above 3,000 feet elevation, add 5-10% to your expected pressure build time. Lower atmospheric pressure requires your cooker to work harder to achieve the same pressure differential—this is especially crucial for canning operations.
Multi-Cooker Mode Differences
- Slow Cook Mode: Minimal preheating needed (gradual temperature increase)
- Sauté Mode: 2-3 minutes rapid heating for browning
- Rice Cooker Mode: Gentle 5-10 minute warm-up cycle
- Air Fryer Lid: Requires 3-5 minutes preheat like conventional ovens
Final Preheat Recommendations for Perfect Results
Master how to preheat pressure cooker by matching your method to your meal type. Use standard natural build for soups and stews with ample liquid, sauté preheating for time-sensitive dishes requiring browning, and external liquid heating for precision cooking where every minute counts. Track your specific model’s timing patterns with different ingredients, maintain sealing components religiously, and always adjust for ingredient temperature.
Remember: Modern pressure cookers eliminate mandatory preheating for most recipes, but strategic preheating elevates your results when cooking dense foods, frozen ingredients, or timing-critical dishes. The next time you face that preheating dilemma, you’ll know exactly which method delivers perfect pressure cooking every time—without the guesswork or frustration.


