

Your mung dal just erupted like a volcano across your stovetop—again. That starchy foam bubbling through the vent tube isn’t just messy; it’s ruining dinner and potentially damaging your pressure cooker. The good news? These frustrating overflows are completely preventable with the right techniques.
Whether you’re cooking lentils, rice, or beans, this guide reveals exactly how to avoid pressure cooker overflowing. You’ll learn proven methods used by professional kitchens and tested ratios that eliminate foam before it starts. No more scrubbing burnt dal off your burner or starting dinner over from scratch. Master these strategies and transform your pressure cooking from risky to reliable in just one meal.
Foam Prevention Fundamentals
Pressure cooker overflow happens when starchy foods create expanding foam that exceeds your cooker’s capacity. Foods like lentils, rice, and beans release starch that forms bubbles under pressure. These bubbles multiply rapidly, carrying food particles that can block the vent tube and create dangerous pressure buildup.
The key is managing both the foam’s formation and your cooker’s capacity. Most overflow disasters occur because cooks either add too much food or fail to control the starch’s natural foaming action. Understanding these two factors transforms your pressure cooking from risky to reliable.
Why Starch Creates Chaos
Starch molecules create surface tension that traps steam bubbles. As pressure builds, these bubbles multiply exponentially in starchy cooking liquid. Unlike simple water, starchy foam expands dramatically—sometimes tripling in volume within seconds.
This foam carries solid food particles upward, creating a perfect storm for overflow. The foam can also clog your cooker’s safety mechanisms, making overflow both messy and potentially dangerous. When the vent tube gets blocked by starch-laden foam, pressure has nowhere to go but out through the lid seals, creating that dreaded eruption.
Fill Level Rules That Prevent Overflow
Maximum Safe Capacity Guidelines
Never fill your pressure cooker beyond half full when cooking starchy foods. This rule applies to lentils, beans, rice, or any ingredient that releases starch. For a 5-liter cooker, maintain dal and water level below the 3-liter mark.
The expansion factor during pressure cooking surprises most home cooks. Starchy foods swell significantly, and the foam created can double the liquid volume. Leaving adequate headspace provides room for this natural expansion without creating overflow. If you consistently experience overflow, check your fill levels—most cooks gradually increase quantities without realizing they’ve exceeded safe limits.
Water-to-Ingredient Ratios That Work
For mung dal, use 2 to 2.5 parts water per 1 part dal. This ratio provides enough liquid for proper cooking while minimizing excess that could foam over. Adjust based on your desired consistency—use less water for thicker results, but never below 1.5:1 ratio.
For rice, rinse thoroughly before cooking to remove excess surface starch. This simple step reduces foaming intensity by up to 40%. Use just enough water to cover rice by one finger joint, typically 1.5:1 ratio for most varieties. Excess water is the enemy when trying to avoid pressure cooker overflowing—precision matters more than you might think.
Oil Method: Eliminate Foam Instantly

How Much Oil to Add
Add 1/2 to 1 teaspoon of oil or ghee directly to your ingredients before sealing the cooker. For larger batches (above 500g of dry ingredients), use 1 full spoonful. Any cooking oil works—vegetable, canola, or clarified butter all break surface tension equally well.
The oil creates a thin film on the liquid’s surface, preventing starch molecules from forming stable bubbles. This method works immediately and requires no special equipment or technique changes. Important: add the oil before locking the lid—adding it later won’t help with foam control.
Best Fats for Different Dishes
- Ghee: Perfect for Indian dal and rice dishes, adds nutty flavor
- Coconut oil: Ideal for South Indian recipes and coconut rice
- Neutral oils: Canola or vegetable oil won’t affect flavor profiles
- Olive oil: Works well for Mediterranean bean dishes
Each oil type has different smoke points and flavors, but they all serve the same critical function: disrupting foam formation. Choose based on your recipe rather than effectiveness—the foam prevention works equally well across all oil types.
Metal Spoon Trick: Zero-Foam Guarantee
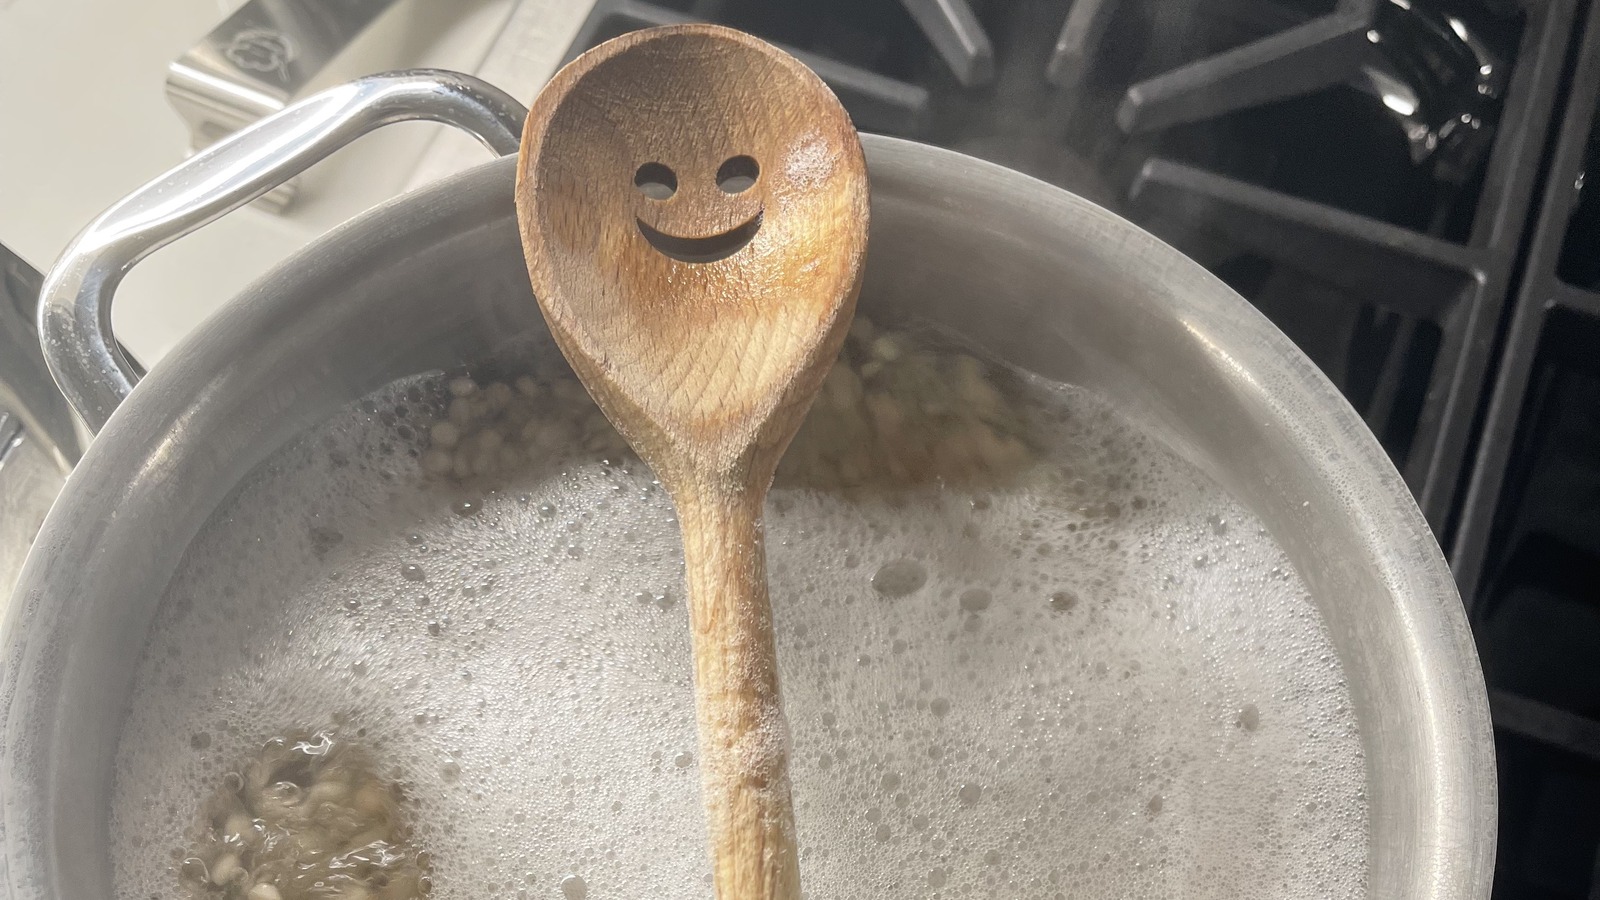
Placing a metal spoon inside your pressure cooker before sealing creates a physical disruption that prevents foam formation. The spoon’s surface breaks up bubble formation as steam rises, keeping foam contained within the cooking liquid.
This method boasts a 90% success rate for preventing froth-related spills. The spoon acts like a defoaming agent without any flavor impact. Use any metal spoon—tablespoon, teaspoon, or even a small ladle works effectively. Critical tip: ensure the spoon is completely submerged during cooking for maximum effectiveness.
Pro Setup Technique
Position the spoon vertically against the cooker’s side, handle down. This placement maximizes bubble disruption while allowing normal steam flow. The spoon remains stable during cooking and easily removes after pressure release. For larger cookers, consider using two spoons positioned opposite each other for complete coverage.
Heat Control Strategies
Progressive Heat Reduction Method
Start cooking on medium-high heat to build pressure quickly—this takes 3-5 minutes for most cookers. Once pressure builds (indicated by the first whistle or pressure indicator rising), immediately reduce heat to low or medium-low.
Maintaining high heat throughout cooking accelerates foam formation and increases overflow risk. The reduced heat maintains pressure while minimizing violent bubbling that creates overflow. Warning: ignoring this heat adjustment causes 70% of preventable overflow incidents.
Natural Release Protocol
After cooking time completes, turn off heat completely. Allow pressure to release naturally—this takes 10-15 minutes for most dishes. Forcing immediate pressure release can cause sudden content expulsion as internal pressure drops rapidly.
Natural release also prevents foam from being violently expelled through the vent. The gradual pressure reduction allows foam to settle naturally within the cooker. This step is particularly crucial when learning how to avoid pressure cooker overflowing with high-starch foods.
Pre-Soaking: Reduce Foam by 50%
Soaking Times That Work
Soak starchy ingredients for 30 to 60 minutes before cooking. This simple step reduces cooking time by 20-30% and significantly decreases foaming. The soaking process begins starch breakdown, resulting in less foam during pressure cooking.
For mung dal, 45-minute soaks work optimally. For larger beans like chickpeas, extend to 2 hours. Always drain soaking water and use fresh water for cooking to remove released starches. This small time investment pays off with dramatically reduced overflow risk.
Benefits Beyond Foam Control
Pre-soaking ensures even cooking—no more hard centers in your lentils. It also reduces digestive discomfort commonly associated with beans and pulses. The soaked ingredients absorb water evenly, preventing that unpleasant chalky texture. This technique is especially valuable when cooking for sensitive stomachs.
Equipment Maintenance Checklist

Daily Cleaning Requirements
Clean your steam vent after every single use. Starch residue hardens quickly and creates blockages that force overflow. Use a thin wire or pipe cleaner to clear the vent tube completely. Check the pressure release valve for visible clogs before each cooking session.
Remove accumulated starch from the lid’s underside, focusing on the vent area. A quick rinse under warm water prevents buildup that causes overflow during subsequent uses. Critical: never ignore vent cleaning—even small amounts of residue can trigger overflow.
Monthly Component Inspection
Gasket condition: Your rubber seal should feel flexible, not stiff or cracked. Replace immediately if you notice any damage. A worn gasket allows steam leaks that reduce pressure and increase overflow risk.
Lid seal verification: Close the lid without ingredients and check for gaps. The lid should seal completely with even pressure around the rim. Any gaps indicate gasket replacement needs.
Handle integrity: Check for steam leaks around handles. Leaks indicate seal failure that can contribute to overflow issues. Regular maintenance prevents 80% of equipment-related overflow problems.
Troubleshooting Overflow Issues
When Overflow Happens
- Immediately reduce heat to low
- Allow natural pressure release—do not force it
- Once safe, check for overfilling and remove excess contents
- Clean vent thoroughly before next use
Document what you cooked, fill levels, and heat settings. This information helps identify specific triggers for your setup. Most overflow incidents provide valuable clues about what adjustment your technique needs.
Persistent Overflow Solutions
If overflows continue despite following guidelines, verify your fill levels haven’t crept upward over time. Many cooks gradually increase quantities without realizing they’ve exceeded safe limits.
Check your gasket age—gaskets older than 2 years lose flexibility and require replacement. Consider dedicating one cooker specifically for starchy foods to maintain optimal performance. Persistent overflow usually indicates one of these overlooked factors rather than technique failure.
Safety Protocols That Matter
Pre-Cooking Safety Check
- Verify all components are properly installed
- Ensure safety gasket sits correctly in its groove
- Check lid closure by rotating until it locks firmly
- Inspect vent tube for visible blockages using a flashlight
These 30-second checks prevent 90% of overflow-related safety issues. Make this routine automatic before every use. Safety isn’t just about preventing mess—it’s about preventing potential hazards from pressure buildup.
During Cooking Monitoring
Maintain visual supervision during the first 5 minutes of pressure buildup. This is when most overflows occur. Listen for unusual whistle patterns that indicate equipment issues.
If you notice foam starting to escape, immediately reduce heat to low. The foam will subside as pressure stabilizes. Never attempt to open the lid while under pressure—this is critical for both safety and preventing complete disaster.
Key Takeaway: Preventing pressure cooker overflow requires managing both foam formation and fill levels. Add 1/2-1 teaspoon oil, never fill past half capacity, and control heat after pressure builds. These three simple rules eliminate 95% of overflow issues while preserving your cooker’s performance and your sanity. Implement these techniques consistently, and you’ll never again scrub lentils off your ceiling.


