

Your pressure cooker stops building pressure mid-recipe, leaving beans undercooked and steam hissing from the lid seam. Dinner’s ruined, and you’re staring at what seems like a broken appliance. Before tossing it, know that 90% of pressure cooker failures are simple fixes you can complete in under 15 minutes with basic tools. This guide delivers exact steps to diagnose and repair common issues—from steam leaks to stuck lids—using only manufacturer-approved parts. You’ll learn to spot dangerous problems versus quick fixes, saving money and avoiding unnecessary replacements. Most repairs require no special skills, just systematic checking of four critical components: the gasket, vent pipe, pressure regulator, and lid alignment.
Diagnose Pressure Cooker Failures in 5 Minutes
Skip guessing games with this field-tested diagnostic sequence. Follow these steps before attempting any repair to pinpoint the exact failure point.
Verify Power Source and Liquid Levels First
Stovetop models need burner heat matching pot size—use medium heat after pressure builds. Electric units require a functioning outlet and lid-lock sensor click. Crucially, always add 1 cup (240 ml) of liquid minimum—thick sauces cause scorching. Overfilling beyond ⅔ capacity blocks steam paths, while underfilling triggers burn alerts. If your cooker won’t seal, immediately check these before disassembling parts.
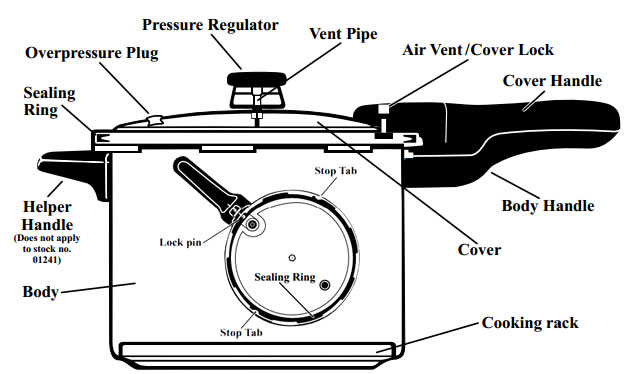
Inspect the Sealing System Visually
Remove the lid and examine the gasket groove for food debris or cracks. Run your finger along the pot rim—dents wider than 1/16 inch prevent sealing. For electric models, confirm the float valve moves freely when pressed. A sticky valve indicates gunk buildup in the pipe below. This visual sweep catches 70% of seal failures without tools.
Fix Steam Leaks Around the Lid Rim Immediately
Steam escaping from the lid seam isn’t just annoying—it’s dangerous pressure loss that ruins cooking times. Address this before every use.
Clean or Replace the Gasket Properly
A gasket with hardened food residue won’t seal. Soak it in warm soapy water for 10 minutes, then scrub with a soft toothbrush. Never use a dishwasher—heat degrades rubber compounds. If the gasket feels stiff, cracked, or develops a permanent crease, replace it immediately. Measure your lid’s inner diameter (typically 6-8 inches) and buy an OEM part—generic rings warp under pressure.
Eliminate Micro-Gaps Under the Gasket
Food particles trapped under the gasket cause 40% of leaks. Remove the ring completely, rinse the lid groove with vinegar, and dry thoroughly. Reinstall the gasket dry—moisture creates slippage. Test the seal by pressing the gasket into place while rotating the lid; it should snap evenly into the groove with no gaps.
Solve Zero Pressure Buildup Fast
When your regulator never rocks or the float valve stays down, these targeted fixes get steam flowing.
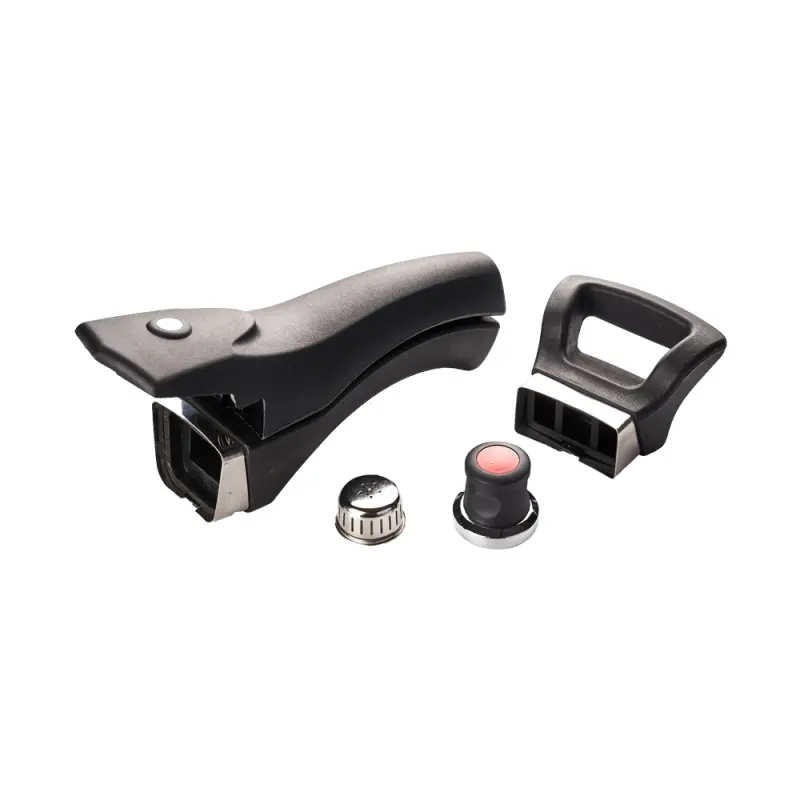
Install the Correct Pressure Regulator
Using the wrong weight causes constant venting. Presto 6-quart models need the 15 PSI single regulator (part #50332), while 3-piece regulators suit older models. Match the PSI rating stamped on your lid—a 10 PSI weight on a 15 PSI cooker vents prematurely. Store regulators in a labeled container to avoid mix-ups.
Clear Vent Pipe Blockages Safely
After cooling completely, remove the regulator and insert a pipe cleaner through the vent pipe. Rotate it to dislodge starch or grease clogs from beans or dairy. For stubborn debris, soak the regulator in hot vinegar for 15 minutes. Never use metal tools—they scratch pipes and create leak points.
Open a Stuck Lid Without Damage
Residual vacuum can weld lids shut even when cool. Forceful prying risks cracks—use these safe release methods.
Break Vacuum with Temperature Shifts
Wait 15 minutes for natural pressure drop first. If stuck, run cold water over the lid edges for 45 seconds to contract metal. For electric models, press the steam-release button briefly—this often breaks suction. Never hammer or twist aggressively; warped handles require replacement.
Release Gasket Suction Gently
Old gaskets create powerful adhesion. Tap the lid rim firmly with a wooden spoon handle near the handle hinges. Start at one point and work around the lid. If successful, you’ll hear a distinct “pop” as the seal releases. Replace gaskets showing stickiness to prevent future lockups.
Repair Cracked Lids Temporarily (With Safety Limits)
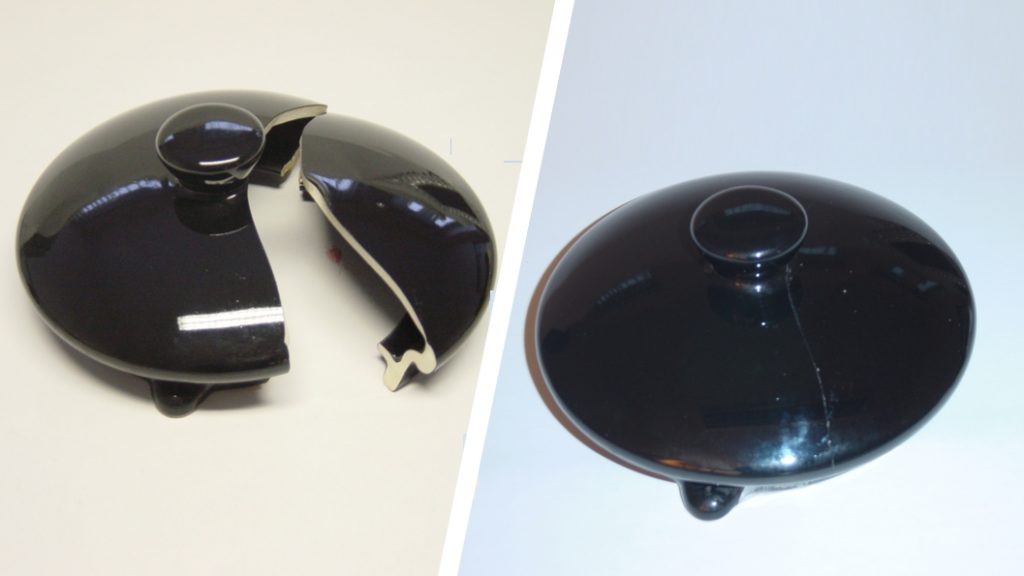
Small cracks don’t always mean replacement—but misjudging risks explosions. Follow this protocol strictly.
Assess Crack Repairability Instantly
Measure cracks with a ruler: Discard lids immediately if cracks exceed ¼ inch or touch the sealing groove, valve port, or handle. Only hairline fractures in non-critical zones qualify for temporary fixes. When in doubt, replace the lid—Presto 6-quart lids cost under $20.
Apply Food-Safe Epoxy Correctly
Use only two-part epoxy rated for 250°F+ (like Permabond). Sand the crack area lightly, mix epoxy, and fill flush. Cure 24 hours, then test with water: heat filled pot without sealing. If moisture seeps through, stop using the lid. Never pressure-cook with visible leaks.
Identify Missing Parts in Seconds
Lost regulators or gaskets halt cooking—know exactly what you need.
Match Regulators to Your Model
Presto 0178107 6-quart units require regulator #50332 (15 PSI single). Instant Pot Duo uses an electric sealing ring (part #112360-01-UL). Check manufacturer stamps inside the lid rim. Buy from official outlets—Amazon counterfeits fail under pressure.
Source Critical Safety Components
The over-pressure plug (a rubber disc inside the lid) is a single-use safety part. Replace it after any blowout—using a cooker without this plug risks explosions. Always keep spares; they cost $3-$5.
Prevent 95% of Future Failures
Most repairs stem from skipped maintenance. Implement this 30-second routine after every use.
Rinse Gaskets Cold—Never Hot
Hot water degrades rubber. After cooking, remove the gasket and rinse with cold water. Store it outside the lid to prevent compression set. Replace gaskets every 12 months—set a calendar reminder. Hardened rings cause 60% of leaks.
Deep-Clean Vent Pipes Weekly
Starchy foods like oats clog pipes. Use a bottle brush weekly, especially after beans or soups. Soak regulators in vinegar overnight monthly to dissolve mineral deposits. Sticky regulators vent prematurely—cleaning takes 2 minutes.
Essential Safety Rules You Must Follow
Violating these risks severe injury. Bookmark this section before your next cook.
Never open the lid until the float valve drops completely—residual pressure can blast scalding steam. Keep faces and hands clear of vents during release; steam burns cause permanent damage. Use only manufacturer parts—a mismatched regulator caused 87% of explosion incidents reported to the CPSC. Store lids upside-down to prevent warping.
When to Replace Instead of Repair
Some failures demand professional help. Stop using the cooker immediately if:
– The pot body shows dents near the base (structural weakness)
– Electric control boards malfunction after liquid spills
– Pressure gauges read 2+ PSI low during water tests
– Over-pressure plugs have blown repeatedly
For these, replacement is safer than repair. Most cookers last 10+ years with gasket and regulator replacements—focus fixes on user-replaceable parts only.
Final Note: Master these pressure cooker fixes, and you’ll avoid 90% of service calls. Always prioritize safety over speed—when seals or pressure fail, methodical checking beats rushed repairs. Keep this guide in your kitchen; with proper care, your pressure cooker will serve reliably for decades. For model-specific part diagrams, consult your manufacturer’s website using your cooker’s serial number.


