

That sinking feeling when steam hisses from your pressure cooker lid instead of building pressure? It usually traces back to one critical mistake: improper closure. Whether you’re using a vintage stovetop model or a modern electric multi-cooker, how to close a pressure cooker correctly separates flawless meals from kitchen disasters. Most users skip essential pre-seal checks, leading to leaks, failed cooking cycles, or dangerous pressure releases.
Mastering this skill takes just 90 seconds but prevents 90% of pressure cooking failures. In this guide, you’ll discover the exact closure sequence for every pressure cooker type, plus the three visual checks professionals use to confirm a perfect seal. Forget confusing manuals—these steps work for Instant Pots, Fagor models, and traditional jiggle-top cookers alike.
Inspect Your Pressure Cooker Before Sealing

Check for Cracks and Missing Components
Run your fingertips along the entire rim and body of your pressure cooker. Feel for dents, warping, or hairline cracks—even minor damage prevents proper sealing and creates explosion risks. Now verify all eight critical components are present and functional:
– Lid with handle (no cracks near locking points)
– Main cooking pot (smooth interior without pitting)
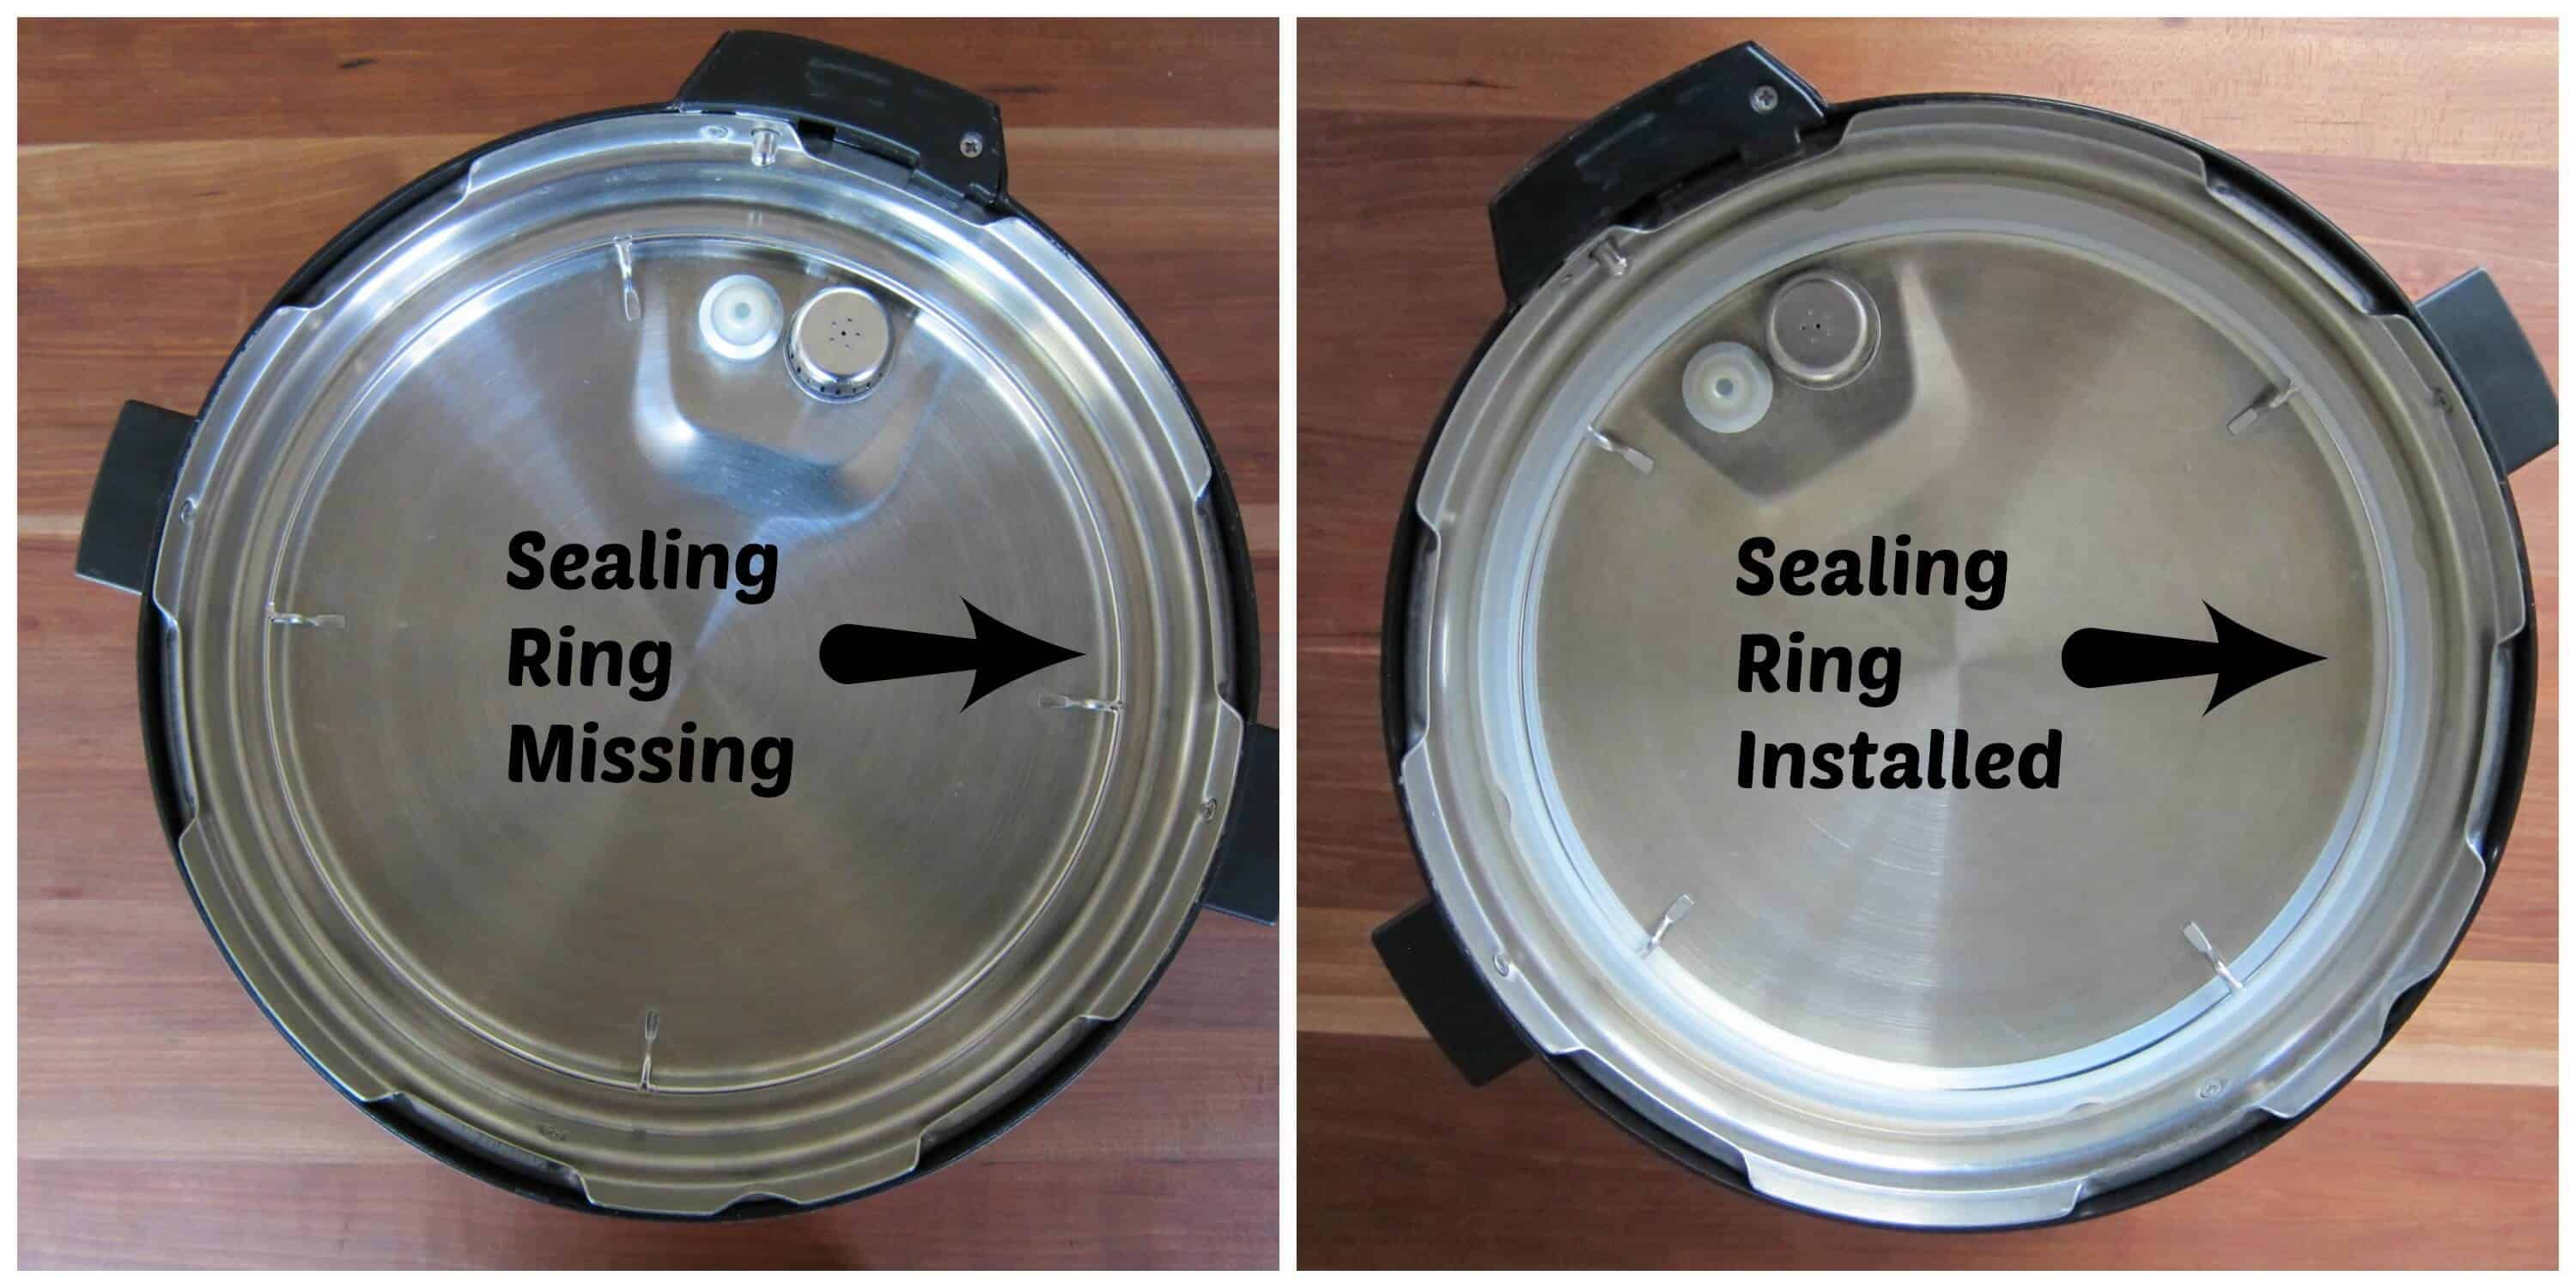
– Rubber gasket/sealing ring (undamaged and correctly seated)
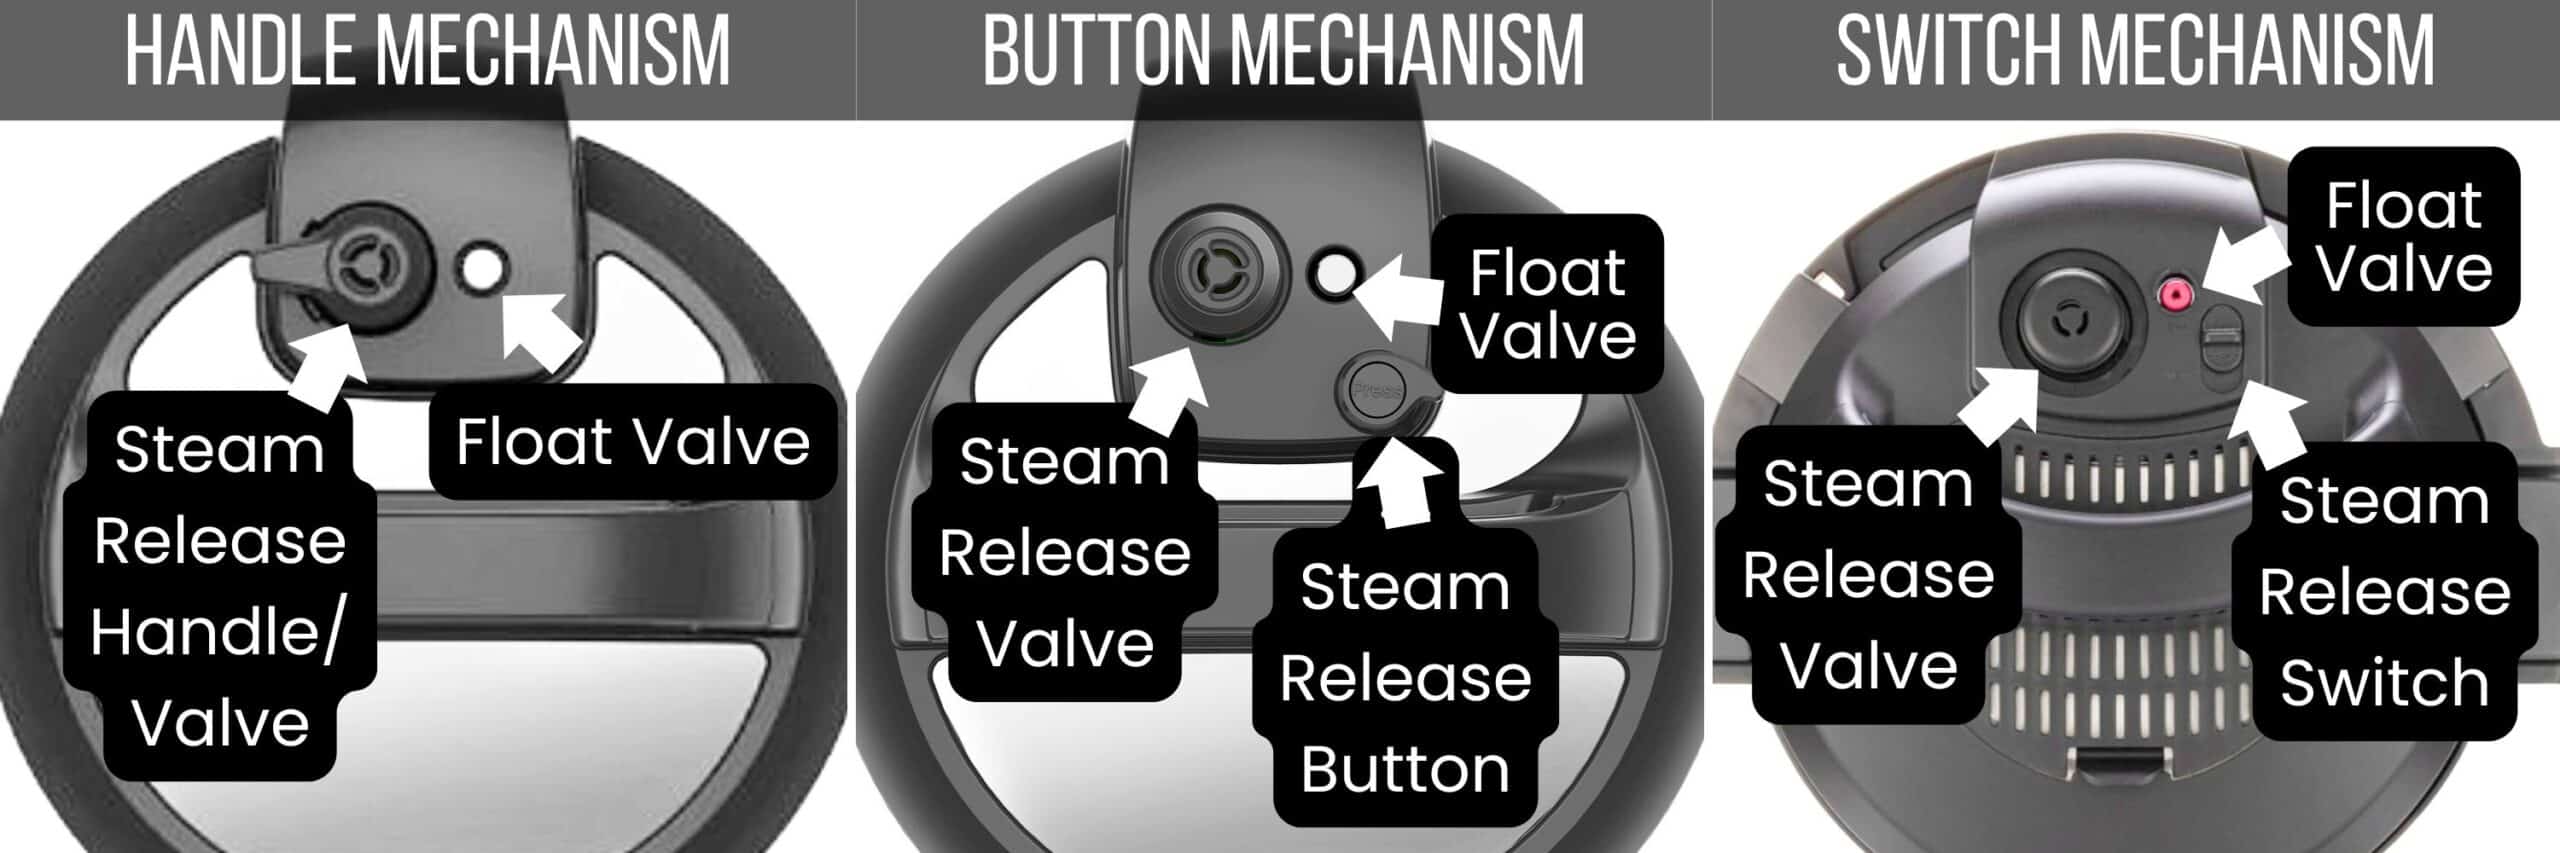
– Pressure regulator (weighted “whistle” or spring-valve intact)
– Steam vent tube (clear of obstructions)
– Safety valve (moves freely when pressed)
– Pressure indicator (rises smoothly when engaged)
– Condensation cup (securely attached if detachable)
Pro tip: If your cooker sits on your shelf for months between uses, soak the gasket in warm water for 5 minutes before inspection—this restores flexibility in dried-out rubber.
Test Gasket Flexibility and Cleanliness
Remove the rubber gasket from its groove and hold it under bright light. Pinch it gently between your fingers—it should spring back immediately without cracks. If it stays indented or feels stiff, replace it immediately (most manufacturers recommend 12-18 month gasket replacements regardless of appearance). Next, scrub both sides with a soft brush to remove trapped food particles. Pay special attention to the inner curve where grease accumulates—this hidden grime causes 70% of seal failures.
Confirm Liquid Levels and Fill Capacity
Add cooking liquid before closing the lid—never after pressurization begins. Use these minimums:
– ½ cup (118 ml) for 5-10 minute recipes (like eggs)
– 1 cup (237 ml) for 15-25 minute dishes (soups, stews)
– 1½ cups (355 ml) for 30+ minute cooks (beans, tough meats)
Critical rule: Never fill beyond two-thirds capacity (or half-full for rice, beans, or oatmeal). Overfilling blocks steam vents and forces food into the sealing mechanism. When in doubt, leave an extra inch of space—your cooker needs room for liquid expansion during pressurization.
Seal Outer-Lid Pressure Cookers Correctly
Align Lid with Steam Vent Tube
Hold the lid by its handle and lower it flat onto the pot rim. The steam vent tube must point directly toward the pressure regulator opening—this alignment is non-negotiable. Look for small arrows molded into the lid and pot handles; match them precisely like puzzle pieces. If your model lacks arrows, mentally note the tube’s position before removing the lid during prep.
Engage Locking Mechanism with Audible Click
Rotate the lid clockwise (typically 1/8 to ¼ turn) while applying gentle downward pressure. Stop when you hear a sharp metallic “click”—this confirms the locking pins have engaged. Test by tugging the lid handle sideways; it should feel immovable. If it spins freely, the gasket is likely twisted—remove and reseat it before retrying.
Install Weighted Regulator Without Forcing
Place the jiggle-top regulator firmly onto the vent tube. It should sit perfectly level with no rocking or tilting. Do not press down hard—gravity alone creates the seal. If the weight wobbles, your vent tube is bent (see troubleshooting section). Never operate without this component—it’s your primary pressure release safety feature.
Secure Inner-Lid Pressure Cookers Without Guesswork
Insert Lid at 45-Degree Angle First
Unlike outer-lid models, tilt the lid at a 45-degree angle and slide the outer edge inside the pot rim. This counterintuitive step allows the locking hooks to clear the pot lip. If you lower it flat first, the lid will jam against the rim, forcing you to restart the process.
Match Notches and Rotate Until Resistance
Locate the alignment notch on the lid (often a small dot or arrow) and match it to the corresponding mark on the pot handle. While pressing down gently, rotate clockwise until you feel firm resistance—this usually takes 30-45 degrees of rotation. The lid should now sit flush with no visible gaps.
Verify Lock Hook Engagement Visually
Peek under the lid handle to confirm the metal locking hook has snapped over the lid lip. This tiny component is the difference between safety and disaster. If you can’t see it clearly, shine a flashlight into the gap. A properly locked lid won’t lift more than 1-2mm when pulled upward.
Confirm Closure with Professional Verification Steps
Perform the Three-Point Visual Check
Before turning on heat, inspect:
1. Lid seam: Run your finger around the edge—no light should be visible between lid and pot
2. Regulator position: Must sit perfectly vertical with no tilt
3. Safety valve: Should protrude slightly (½ inch) indicating readiness
Listen for the Critical Silence Signal
After starting heat, listen for 3-5 minutes. Initial gentle hissing is normal as the gasket swells. But persistent loud hissing means failure—remove from heat immediately and reseat the lid. A properly sealed cooker becomes completely silent once pressurized, with only occasional regulator jiggles.
Close Spring-Valve and Electric Models Properly
Spring-Valve Stovetop Units Require Extra Step
After aligning the lid, press the valve button (usually on the handle) to engage the locking mechanism. Then turn the knob to “SEAL”—most users miss this step, causing immediate steam leaks. The valve should lock firmly in place with no play.
Electric Multi-Cookers Give Audible Confirmation
Lower the lid straight down without rotation, then turn clockwise until the “→ LOCKED” arrow aligns with the handle mark. Do not force it—if you meet resistance before alignment, reposition the lid. When sealed correctly, the unit beeps twice and displays “LID” on screen. Never override this indicator.
Fix These Common Closure Failures Immediately
Lid Won’t Lock? Reseat the Gasket in 10 Seconds
Symptom: Lid spins freely or stops halfway
Cause: Gasket twisted in its groove
Fix: Remove lid, pull gasket completely out, and reseat it while stretching gently to eliminate kinks. The gasket must sit perfectly flat in the groove with no overlapping sections.
Steam Leaking from Edges? Clean the Gasket Groove
Symptom: Hissing sound during pressurization
Cause: Food debris trapped between gasket and lid
Fix: Remove gasket, soak lid in warm vinegar water for 5 minutes, then scrub the groove with an old toothbrush. Dry thoroughly before reassembly.
Regulator Keeps Falling Off? Straighten the Vent Tube
Symptom: Weight won’t stay upright
Cause: Bent steam vent tube
Fix: Use needle-nose pliers to gently straighten the tube while rotating it. Test by placing the regulator on a flat surface—it should sit perfectly vertical.
Non-Negotiable Safety Rules for Closure
Never Force a Resistant Lid
If the lid won’t rotate into place, do not use excessive force. This usually means trapped pressure from a previous cook or food blocking the seal. Release pressure first by running cool water over the lid, then retry. Forcing creates dangerous pressure imbalances.
Always Add Liquid Before Closing
Operating a pressure cooker without liquid melts gaskets and warps pots within 90 seconds. Even “steam” recipes require minimum liquid—the cooker needs moisture to build pressure safely. When in doubt, add ¼ cup extra liquid rather than risking damage.
Keep Face and Hands Clear of Vent Areas
Never lean over the cooker when installing the regulator. Steam burns from pressurized units reach 250°F (121°C)—hotter than boiling water—and cause severe scalding in milliseconds. Always approach from the side.
Close Only on Level Countertops
Closing your pressure cooker on a tilted surface (like near a stove edge) causes misalignment. Place it on your cutting board if counters are uneven—this creates a stable platform for precise lid rotation.
Final safety check: Before turning on the heat, press down firmly on all four sides of the lid. If any section flexes more than 1mm or makes popping sounds, reopen and restart the process. A perfectly sealed pressure cooker feels like a single solid unit—no movement, no gaps, no hissing. Master how to close a pressure cooker correctly, and you’ll unlock faster cooking times, foolproof results, and the confidence to use this powerhouse tool daily. Remember: When the lid clicks, your safety clicks into place.


