

Your pressure cooker sits idle while dinner burns—a sure sign you need to verify if it’s actually building pressure. One failed attempt at tender ribs or mushy rice can ruin your meal prep rhythm, especially when you’re counting on that 30-minute chili miracle. Whether you inherited a vintage stovetop model or own the latest electric multi-cooker, knowing how to check if your pressure cooker is working saves wasted ingredients, time, and kitchen disasters. Skip the guesswork: These field-tested methods confirm your cooker’s readiness in under 10 minutes, using nothing but water and your senses.
Don’t risk undercooked lentils or dangerous steam leaks from a faulty seal. I’ll show you exactly what to watch for during operation—the silent float valve rise, the rhythmic jiggle, and electric display codes that scream “problem.” By the end, you’ll diagnose issues like a pro and cook with unshakeable confidence. Let’s turn uncertainty into your secret kitchen superpower.
Pass the Water Test in 5 Minutes
Forget complicated diagnostics—the water test reveals 90% of pressure cooker failures instantly. This foolproof check uses only water to expose gasket leaks, valve clogs, and electrical glitches before you risk your Sunday roast.
Set Up Your Pressure Cooker Test
Pour 2 cups (480 ml) of plain water into the inner pot—no salt, oil, or additives that alter boiling points. Secure the lid by aligning the arrow markers until you hear a definitive click. For stovetop models, place the weighted valve on the vent pipe; for electric units, set the regulator to HIGH pressure. Turn the burner to high or select “Manual” mode.
Spot Success vs. Failure Signs
Watch for these critical milestones within 5 minutes:
– Initial steam hiss lasting 30–60 seconds (normal pressure building)
– Sudden silence as steam release stops (pressure achieved)
– Float valve fully upright (electric) or weighted valve rocking steadily (stovetop)
– Zero steam escaping around the lid rim (seal intact)
If steam leaks continuously or the valve never rises, your cooker fails. Quick-release the steam after testing—water should remain (not boil dry), and electric displays shouldn’t flash error codes like “noPr.”
Decode Visual Pressure Clues Before Opening

Your eyes catch problems before steam burns your hand. These silent indicators separate functional cookers from ticking time bombs.
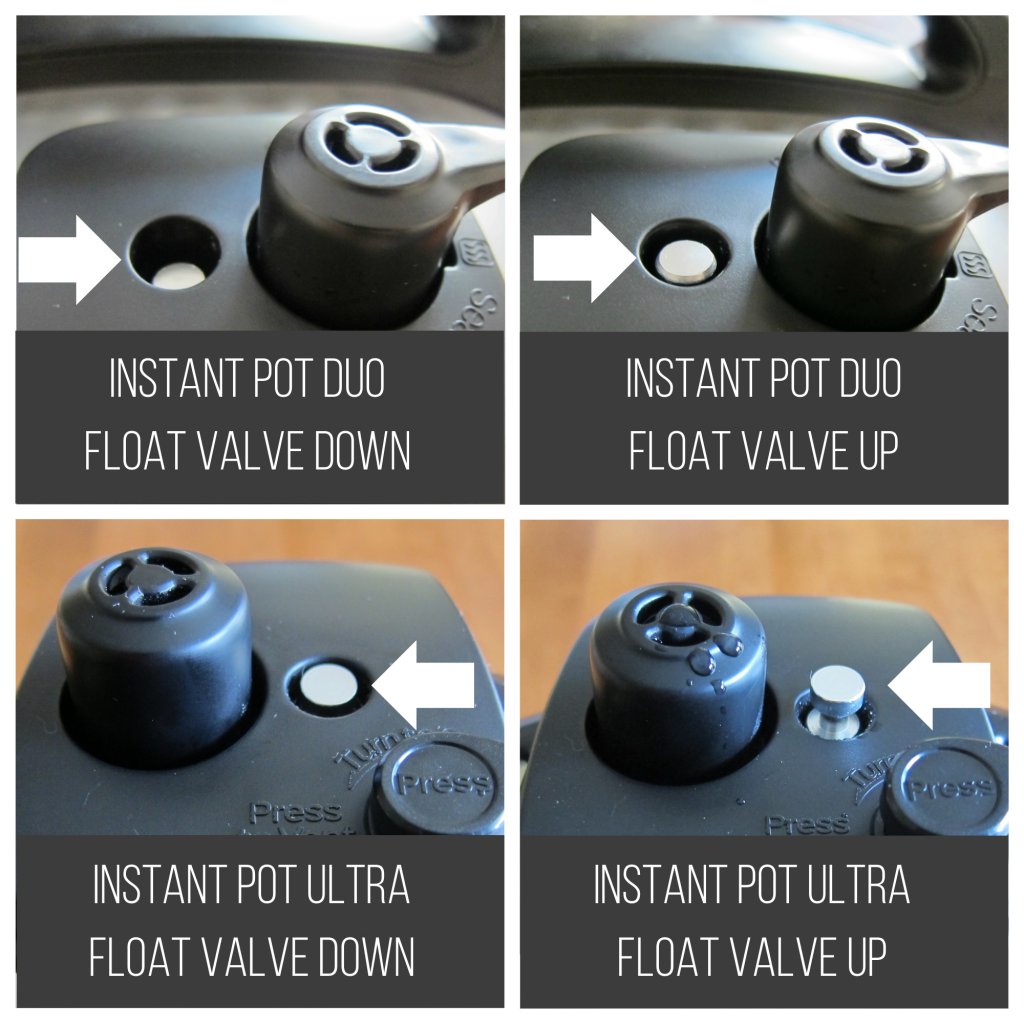
Float Valve Tells the Truth
This small metal pin is your pressure dashboard:
– Down position: Still heating up—wait for steam rise
– Fully upright: Pressure locked and safe to cook
– Stuck halfway: Immediate red flag for gasket damage or valve debris
Never force the lid open if the valve hasn’t dropped completely after cooking. Residual pressure causes explosive steam release.
Lid Tightening Confirms Seal Integrity
As pressure builds, watch the lid visibly tighten against the pot body. A loose lid or visible gaps near the handle means steam escapes—stop heating immediately. On some models, a colored indicator ring shifts from red to green when sealed. If your lid stays wobbly, reseat the gasket or check for food debris in the rim groove.
Identify Critical Sounds During Operation
Pressure cookers “talk” through distinct sounds. Learn this language to prevent burnt dinners or safety hazards.
Healthy Operation Audio Cues
- Stovetop models: Weighted valve rocks rhythmically (1–4 times per minute)—like a metronome for perfect pressure
- Electric units: Single beep when pressure hits target, then quiet hum during cooking
- Initial phase: Brief 30-second hiss as steam purges air from the chamber
Danger Signals Requiring Shutdown
- Nonstop loud whistle: Gasket leak or misaligned valve—cool cooker before inspecting
- Complete silence after 2 minutes: Burner too low or clogged vent—adjust heat immediately
- Rapid beeping: Error state (e.g., “Ovht” for overheating)—cancel cycle and deglaze the pot
Perform Safe Temperature Touch Checks
Your fingers reveal pressure status without opening the lid—critical for stovetop models lacking digital displays.
Where to Touch (and Avoid)
- Pot sides: Should feel too hot to touch (>100°C/212°F) once pressurized
- Lid handle: Warm but holdable—indicates even heat distribution
- Steam vent: Never touch during operation—causes instant burns
If the handle stays cool while the pot body heats, pressure isn’t building. Check gasket alignment before continuing.
Verify Post-Cook Pressure Release Safety
The final test happens after cooking ends. Rushing this step risks scalding injuries from trapped steam.
Confirm Safe Opening Sequence
The float valve must drop completely before you attempt to turn the lid. Test lid rotation gently—if it resists, residual pressure remains. Never force it open. For stubborn lids:
– Wait 10–30 minutes for natural release
– Run cool water over the lid for 30 seconds (stovetop only)
– Engage quick-release valve if recipe allows
Cross-Check Food Doneness
Open the lid and probe your test meal:
– Beans: Mash easily between thumb and forefinger
– Chicken thighs: Shred with fork pressure alone
– Rice: Tender throughout with no hard centers
Undercooked food despite full timer countdowns means pressure fluctuated during cooking.
Fix Common Failures in Under 60 Seconds

When your cooker fails the water test, these targeted fixes solve 80% of issues instantly.
Pressure Never Builds: Symptom-Specific Fixes
| Symptom | Immediate Solution |
|---|---|
| Continuous steam leaks from lid | Remove gasket, wash with soapy water, reinstall evenly |
| “noPr” error on electric display | Add 1 cup water—minimum liquid required |
| Lid won’t lock shut | Align arrows precisely and press down firmly while turning |
| No display lights up | Test outlet with another appliance; check lid sensor click |
Stuck Lid Emergency Protocol
Residual pressure locks the lid—a common panic point. Try these in order:
1. Natural release: Wait 15 minutes—pressure drops as cooker cools
2. Cold water method: Run tap water over lid rim for 30 seconds (stovetop only)
3. Quick release: Turn valve to “venting” ONLY if recipe allows steam release
Prevent Future Failures With Smart Maintenance
A 5-minute monthly tune-up keeps your cooker reliable for years. Skip this, and gasket cracks or valve clogs become inevitable.
Deep Clean Your Critical Components
- Gasket: Remove and soak in warm soapy water; inspect for cracks monthly
- Steam valves: Rinse under running water after every use; clear debris with a toothpick
- Vent pipes: Use a pipe cleaner monthly to prevent mineral buildup
Replace gaskets every 12–18 months—they harden and lose elasticity over time. Store the lid upside down on the pot to prevent warping and odor absorption.
Model-Specific Quick Checks
Instant Pot Electric Models
Press “Manual” with 2 cups water. Confirm:
– Float valve rises within 8 minutes (not 15+)
– Timer starts countdown automatically (not stuck on “On”)
– “Keep Warm” activates after cooking (no “LID” error)
Stovetop Jiggler Models
Adjust burner until weighted valve rocks once every 15–60 seconds. Too fast? Reduce heat. Silent? Increase slightly. Steam should puff intermittently—not blast continuously.
Spring-Valve Stovetop Units
Watch for the metal pin to rise fully until a colored ring appears. A partially raised pin means insufficient pressure—clean the valve stem or increase heat gently.
Final Confidence Builder: Run the water test monthly and before holiday meals. Your pressure cooker should hiss briefly, fall silent for 5+ minutes, and maintain steady pressure without leaks. If it passes, you’ve mastered the art of pressure cooking—no more ruined dinners or kitchen anxiety. Now go make that fall-apart brisket you’ve been dreaming about.


