

You’ve chopped vegetables, seasoned meat, and are ready to transform ingredients into a delicious meal—only to discover your pressure cooker lid won’t close properly. That familiar click you rely on for safe cooking remains frustratingly absent. This common kitchen crisis hits hardest when you’re racing against time or committed to meal prepping for the week. The good news? Most pressure cooker lid closure failures stem from simple, fixable issues rather than irreversible damage to your appliance.
Your pressure cooker refuses to function when the lid won’t seal correctly, putting dinner plans on hold and creating unnecessary stress. Understanding why this happens and knowing exactly how to fix it transforms kitchen panic into confidence. This guide delivers practical, step-by-step solutions to get your pressure cooker working again—whether you need a quick five-minute fix or must determine when professional help is truly necessary.
Why Your Pressure Cooker Lid Won’t Close: 5 Common Culprits
Lid Misalignment: The Most Frequent Offender
Your pressure cooker requires precise rotational alignment between lid and base indicators for proper closure. When arrows or markers don’t match perfectly, the locking mechanism simply won’t engage. The critical mistake many make is forcing the lid shut when resistance appears—this damages the locking system permanently. Proper technique involves pressing down evenly while slowly rotating the lid until you hear the definitive click of engagement. If you encounter resistance before hearing that click, stop immediately and reassess alignment rather than applying more force.
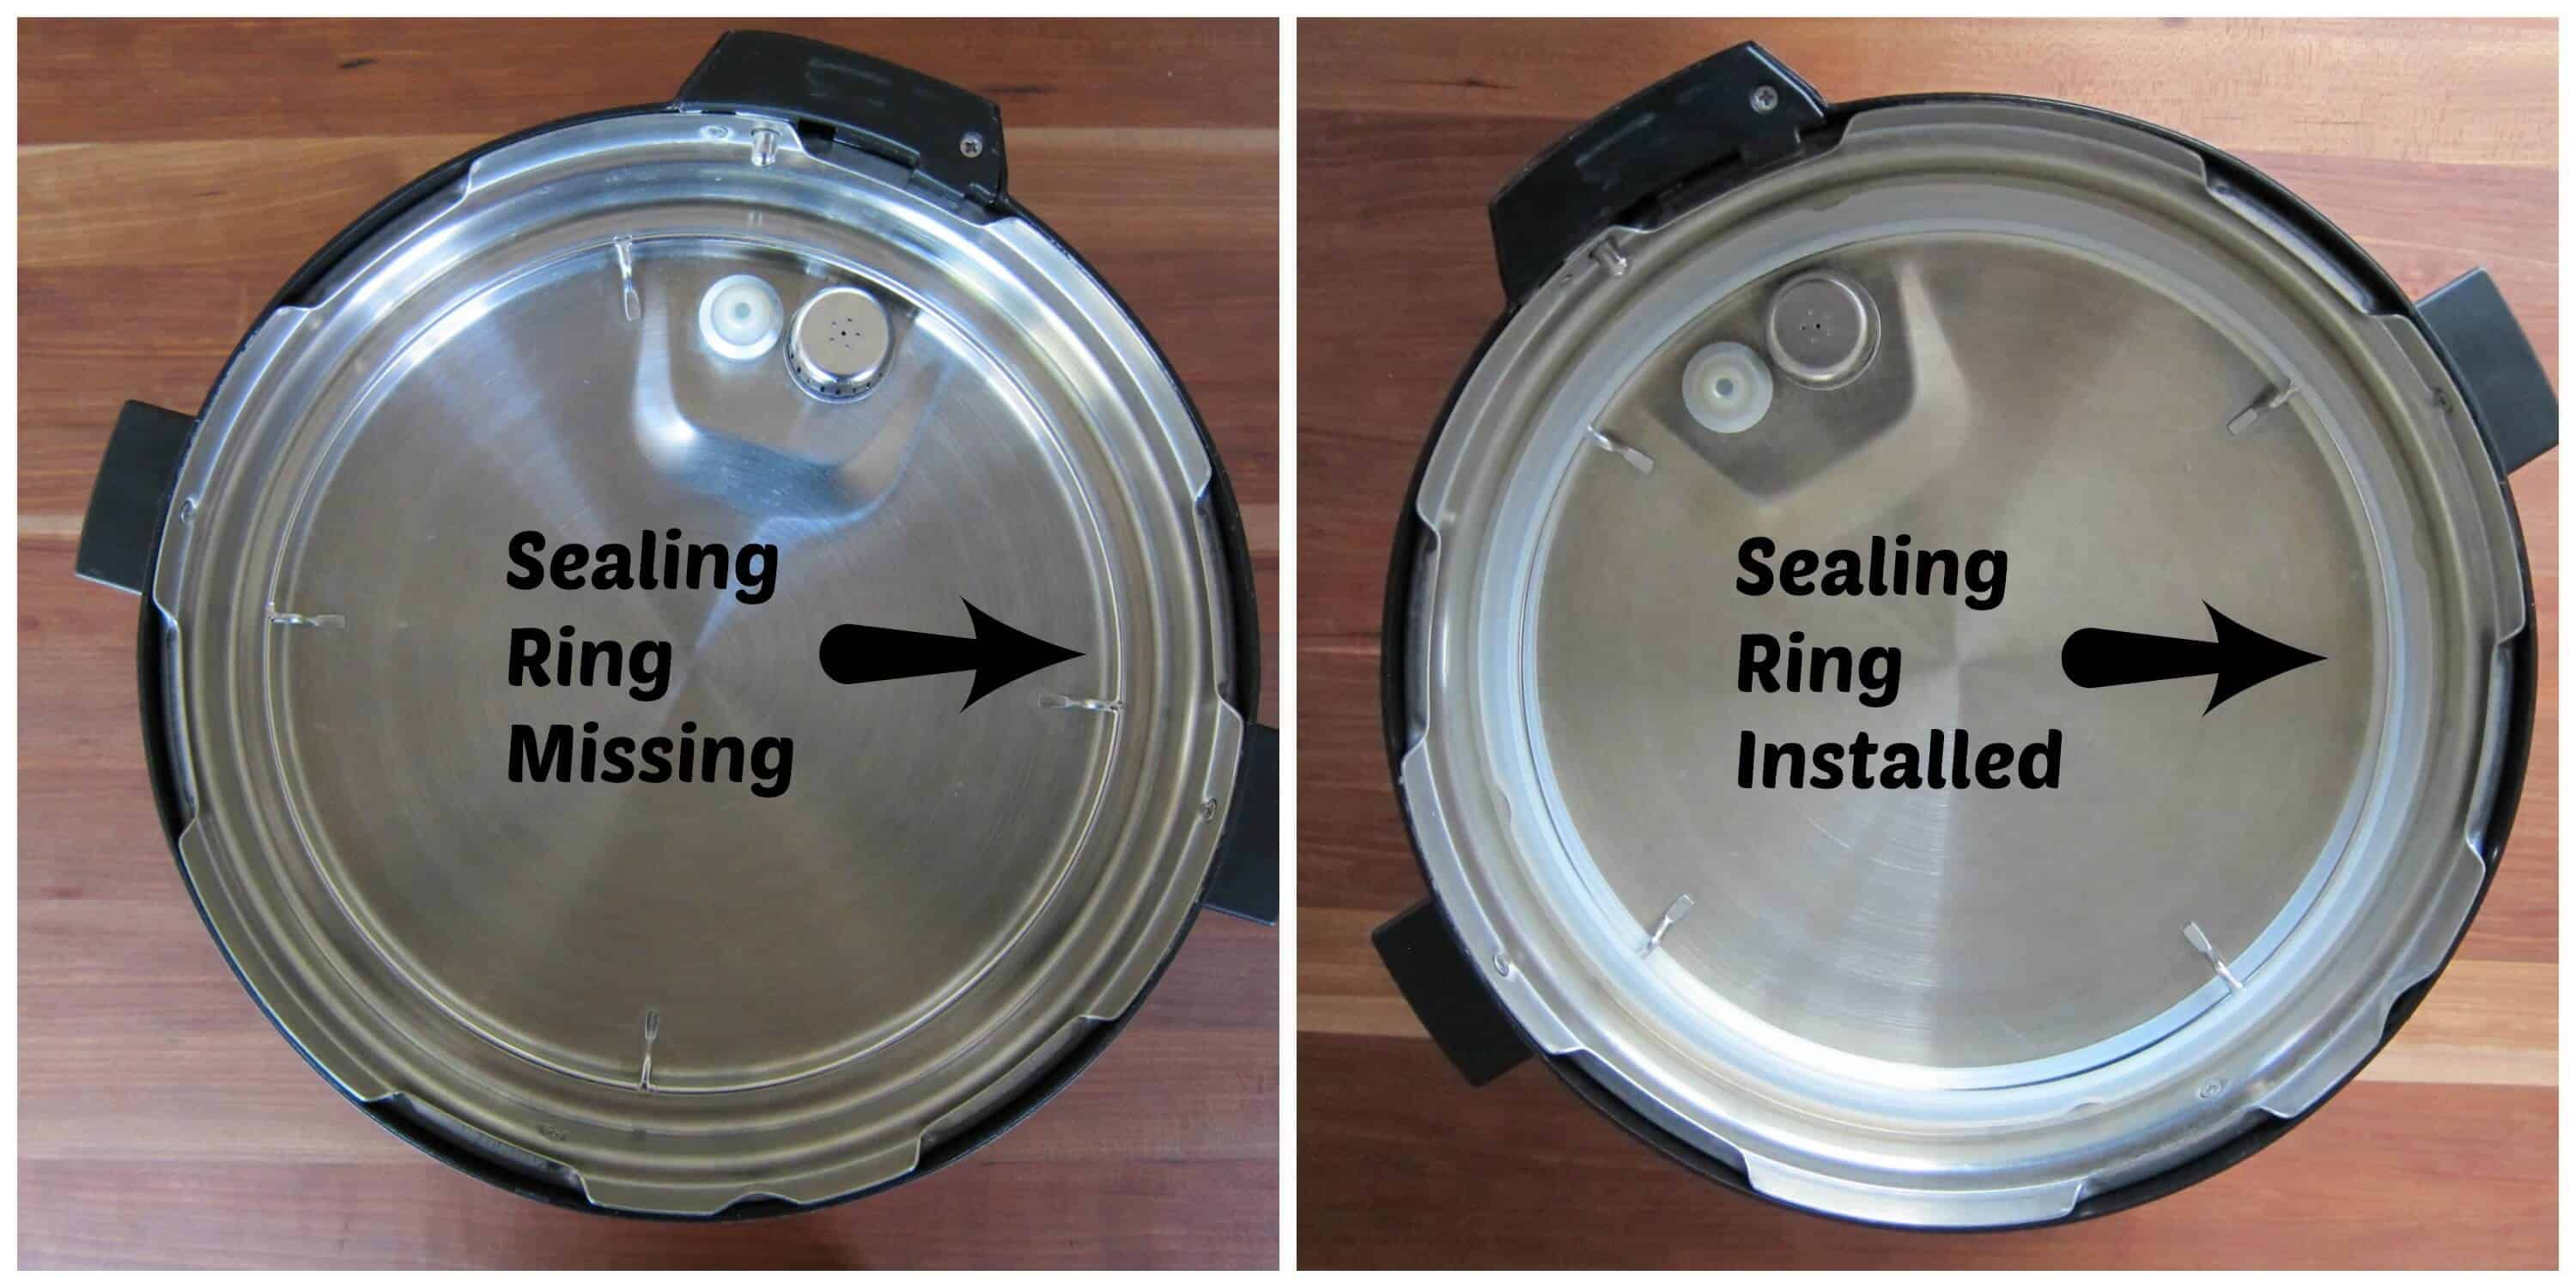
Sealing Ring Failure: When Your Silicone Seal Betrays You
The sealing ring’s condition directly impacts lid closure capability. Over time, repeated heat cycles cause material breakdown through multiple failure modes: permanent stretching, compression set (flattened areas), cracks, tears, or food residue accumulation. Even rings that appear intact may have lost elasticity needed for proper sealing. Manufacturers universally recommend replacing sealing rings annually regardless of visible condition—a simple $10-15 investment that prevents most closure failures. Incorrect positioning within the sealing groove also creates closure resistance that mimics more serious mechanical problems.
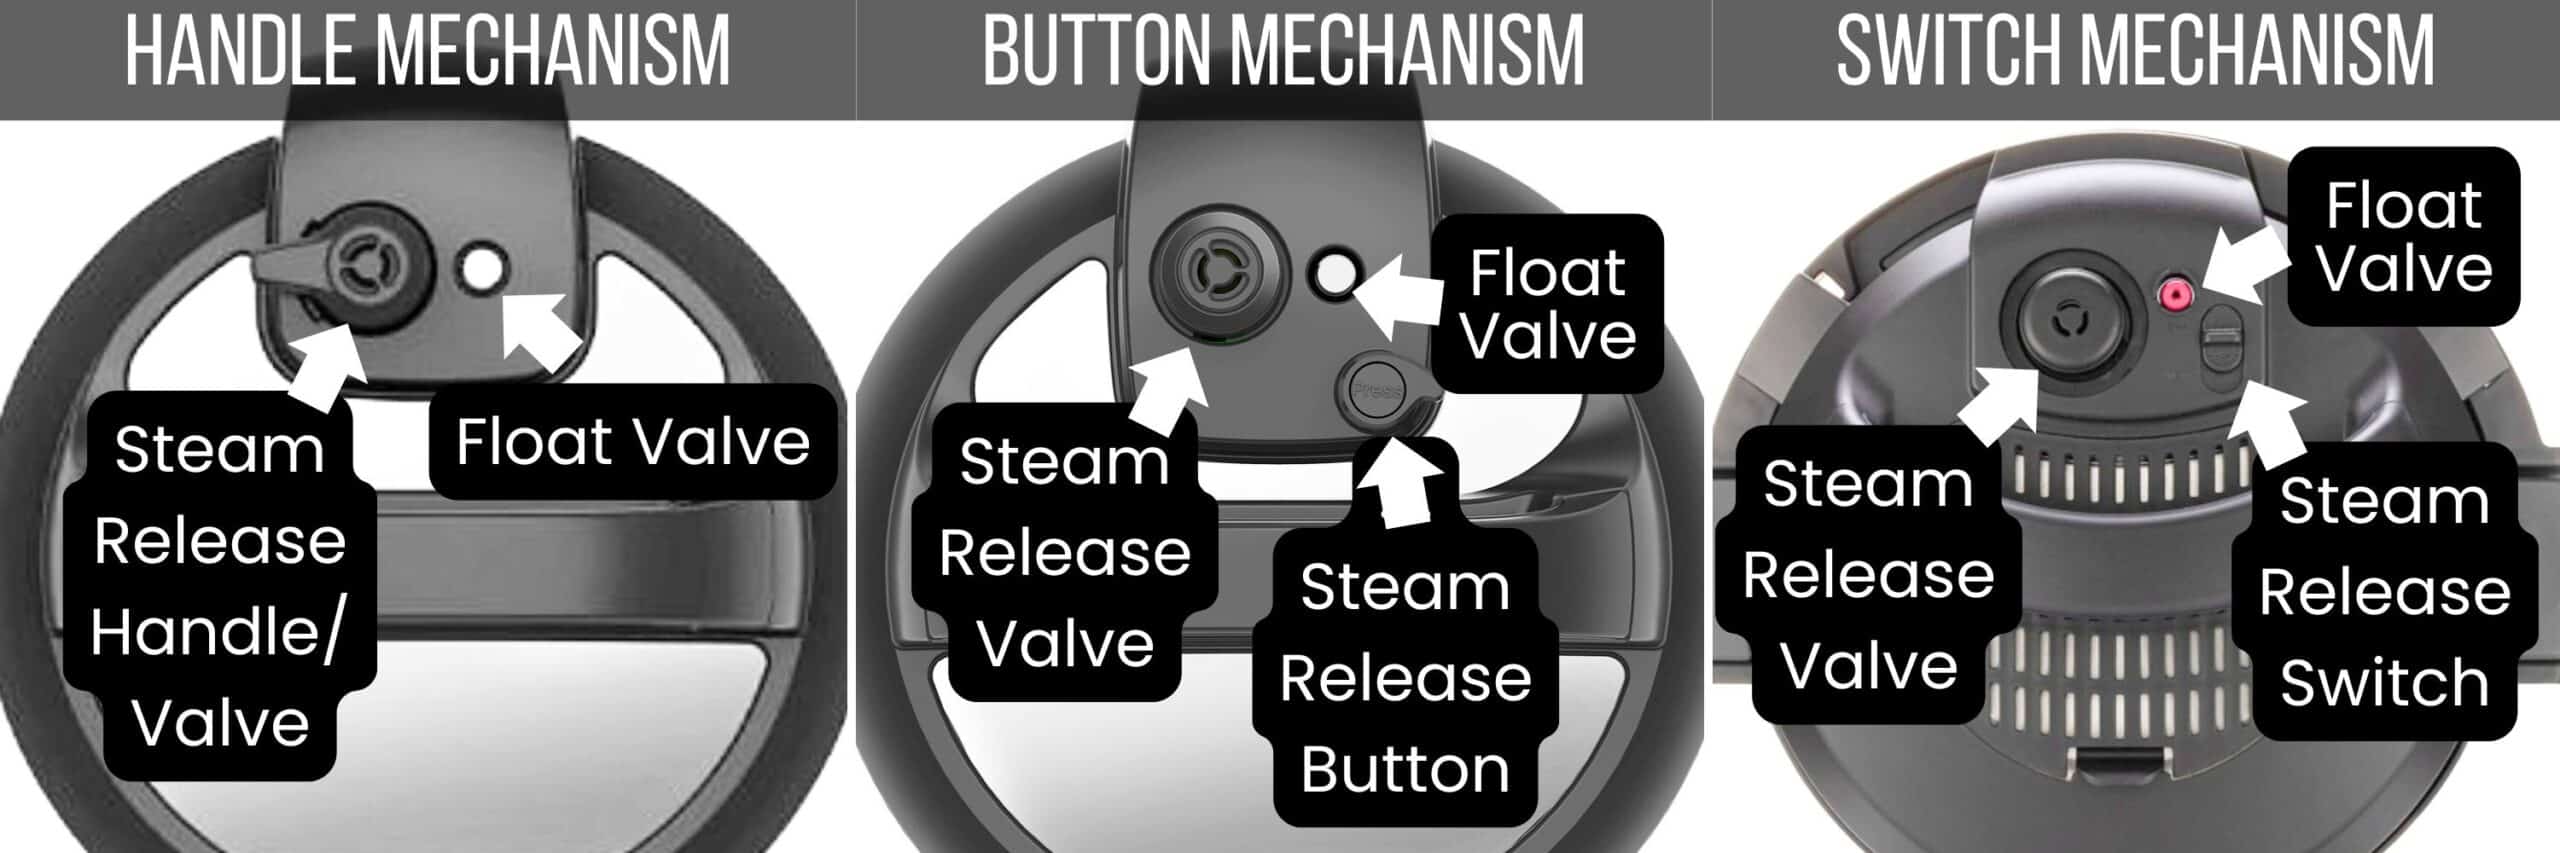
Float Valve Malfunctions: The Silent Blocker
When the float valve sticks in the elevated position, your pressure cooker physically prevents lid closure as a safety measure. Food debris, dried sauces, or mechanical wear impede the valve’s free vertical movement. This small component serves dual purposes as both safety indicator and pressure regulator, requiring smooth up-and-down motion for proper operation. Gently test valve movement before attempting closure—if it doesn’t glide freely, cleaning or replacement becomes necessary before your lid will seal correctly.
3-Minute Visual Inspection to Diagnose the Problem
Checking Your Sealing Ring Condition
Remove the sealing ring completely and examine it under good lighting. Look for visible cracks, tears, or areas that appear stretched beyond original dimensions. Check for permanent flattening where the ring has lost its rounded profile—a condition called compression set that destroys sealing capability. Run your fingers along the entire circumference to detect subtle damage invisible to the eye. Wipe the ring thoroughly with warm water and mild soap to remove accumulated oils and food residues that compromise performance.
Cleaning Critical Sealing Surfaces
Contaminated surfaces create invisible barriers preventing proper lid engagement. Wipe the lid rim with a damp microfiber cloth to remove food particles lodged in microscopic grooves. Clean the pot rim thoroughly, paying special attention to the sealing surface where the ring makes contact. Use a soft-bristled brush to dislodge dried sauces or burnt residues from the sealing groove. Inspect the float valve area for obstructions and ensure unobstructed movement before attempting closure.
The Definitive Water Test: Isolating the Real Issue
Step-by-Step Water Test Procedure
Perform this diagnostic test when standard closure attempts fail. Add exactly two cups of cold water to your inner pot—no food, no seasonings, just plain water. Attempt lid closure using proper alignment technique. If the lid closes successfully with only water present, your original issue relates to food load, liquid levels, or contamination during actual cooking. If closure fails with plain water, you’re dealing with a mechanical problem requiring component attention. This simple test eliminates variables to pinpoint whether the problem stems from your cooking process or the appliance itself.
5 Immediate Fixes for Pressure Cooker Lid Closure Problems
Perfecting Your Lid Alignment Technique
Master the precise closure method your specific model requires. Match the alignment arrows between lid and base exactly before applying downward pressure. Press down evenly with both hands while rotating slowly in the direction indicated by manufacturer markings. Stop immediately if you feel resistance before hearing the locking click—reposition and try again rather than forcing it. Different models require varying degrees of rotation, so consult your manual if unsure about your specific unit’s requirements.
Essential Cleaning Protocol for Instant Results
Daily maintenance prevents most closure issues. After each use, wipe sealing surfaces with a damp cloth before residues dry and harden. Hand wash the sealing ring with mild soap—avoid dishwasher cycles that accelerate silicone degradation. Clean the float valve area weekly by gently wiping with a soft cloth dampened with vinegar solution. Store the sealing ring in a relaxed position rather than compressed to maintain elasticity. These simple habits extend component life significantly beyond typical warranty periods.
Liquid Level Adjustments That Make a Difference
Insufficient liquid prevents proper steam generation needed for pressure buildup, while excessive liquid causes overflow that contaminates sealing surfaces. Most models require 1-2 cups minimum liquid—check your specific unit’s requirements. When cooking frozen foods, add warm water to prevent thermal shock that affects dimensional tolerances. For thick sauces or starchy foods prone to foaming, increase liquid ratios to prevent burn errors that damage sealing surfaces. Proper liquid management solves closure issues before they start.
When Replacement Is Your Best Option

Sealing Ring Replacement Made Simple
Purchase manufacturer-original parts only—third-party rings often have dimensional differences causing persistent problems. Remove the old ring completely before installing the new one. Most models require installation with the flat side down—consult your manual if unsure. Press the ring firmly into the groove all the way around, checking for twists or gaps. Test closure before first cooking use to verify proper installation. Set a calendar reminder to replace your ring annually regardless of appearance—it’s the single most effective preventive measure.
Prevent Lid Closure Problems Before They Start
The Maintenance Schedule That Works
Implement this simple routine to avoid 80% of closure issues. Wipe sealing surfaces clean immediately after each use while components are still warm (but cool enough to handle safely). Inspect your sealing ring weekly for damage or contamination buildup. Perform a deep clean of all lid components monthly, including disassembling the float valve area when possible. Replace the sealing ring annually without exception—this small investment prevents most frustrating closure failures. Proper maintenance extends your pressure cooker’s functional life well beyond typical expectations.
Proper Storage Practices for Longevity
Store your pressure cooker with the lid inverted rather than nested on the base to prevent seal compression. Keep the sealing ring separate from the lid in a relaxed position—never store it compressed in the groove. Avoid stacking heavy items on stored components that could cause deformation. Maintain a dry storage environment to prevent moisture-related degradation of silicone components. These simple storage practices preserve critical sealing surfaces and dramatically extend component lifespan.
Model-Specific Troubleshooting Tips
Instant Pot Variations: Model-Specific Fixes
Newer Instant Pot models incorporate improved alignment systems with clearer visual indicators, making proper closure easier. Older designs may develop wear-related issues in the locking mechanism after years of use. Check for model-specific troubleshooting guides on the manufacturer’s website—many offer video demonstrations of proper closure technique for your exact model. If you own multiple Instant Pot units, test closure components between them to isolate whether the issue resides in the lid or base.
Pressure Cooker Lid Closure Decision Tree
When your lid won’t close at all, immediately check alignment markers and clean all sealing surfaces. If the lid closes with water only but not with food, you’re dealing with a food load or contamination issue. When closure fails completely even with plain water, structural damage or critical component failure likely exists. For intermittent problems that come and go, replace your sealing ring immediately—it’s the most common culprit behind inconsistent performance.
Final Takeaways
Most pressure cooker lid closure failures resolve with proper alignment technique and thorough cleaning of critical components. That $10-15 annual investment in a new sealing ring prevents the vast majority of frustrating kitchen standstills. When structural damage occurs—visible cracks, bent rims, or broken locking mechanisms—replacement often provides better value than repair, especially for units under $100.
Remember this critical rule above all: never force closure. Resistance indicates a problem requiring attention, not brute force. Proper maintenance and timely component replacement keep your pressure cooker functioning reliably for years of safe, efficient cooking. With these proven solutions, you’ll transform lid closure failures from dinner disasters into minor, quickly resolved inconveniences.


