

Your NuWave Pressure Cooker isn’t just for fast meals—it secretly moonlights as a professional-grade slow cooker that transforms tough cuts into fork-tender masterpieces without cluttering your kitchen. Forget buying a separate crockpot when this single appliance delivers the same low-and-slow magic for fall-apart brisket, silky chili, or creamy stews. By mastering how to use NuWave pressure cooker as a slow cooker, you’ll unlock energy-efficient cooking that uses 75% less power than traditional slow cookers while delivering superior results. In this guide, you’ll discover exactly how to activate the slow cook function, adapt your favorite recipes, avoid common pitfalls, and transform your NuWave into the hardest-working appliance in your kitchen.
Activate Slow Cook Mode Correctly

Find and Press the Dedicated Slow Cook Button
Locate the Slow Cook button prominently positioned on your NuWave control panel—no confusing menu navigation required. Press it once to activate the function, and watch as the display lights up with the default temperature setting. This dedicated button eliminates guesswork, putting precise slow-cooking control at your fingertips without requiring pressure cooking knowledge.
Select the Perfect Temperature Setting
Your NuWave offers three scientifically calibrated temperature zones that replace vague “low/high” crockpot settings:
– Low (190°F): Ideal for unattended 8-10 hour cooks like overnight pot roast
– Medium (200°F): Perfect sweet spot for 6-8 hour weekday meals
– High (220°F): Accelerates cooking for 4-6 hour weekend projects
Cycle through these options by pressing the “Temp” button until your desired setting appears—each temperature delivers distinct results for different ingredients.
Program Precise Cooking Durations
Use the + and – buttons to set cooking times from 30 minutes to 20 hours in 30-minute increments. Crucially, the timer only starts counting down once the unit reaches your selected temperature (typically 15-20 minutes after pressing Start). This prevents undercooking during the warm-up phase—unlike traditional slow cookers that count down immediately.
Essential Setup Steps for Slow Cooking
Swap to Glass Lid Immediately
Never skip this: Remove the pressure lid and secure the tempered glass lid instead. The pressure lid traps excessive moisture, preventing the gentle evaporation essential for proper slow cooking. The glass lid allows heat retention while letting you monitor progress without releasing significant warmth—critical for achieving restaurant-quality texture.
Position Pressure Release Valve Correctly
Turn the pressure release valve fully to “Vent” before starting. This creates a controlled steam escape path that mimics traditional slow cookers’ vented design. An improperly positioned valve (in “Sealing” mode) risks pressure buildup and uneven cooking—always double-check this step.
Measure Liquid Precisely
Unlike pressure cooking, slow cooking requires minimal liquid due to the sealed environment:
– Use ½ to 1 cup total for most recipes
– Liquid should only kiss the bottom of the pot
– Reduce traditional slow cooker liquids by 25-30% to prevent soupy results
Overfilling causes excessive moisture retention—the #1 reason for watery dishes when learning how to use NuWave pressure cooker as a slow cooker.
Prep Ingredients for Maximum Flavor
Brown Meats First Using Sear Function
Unlock deep, complex flavors by utilizing the Sear/Sauté function before slow cooking:
1. Heat 1 tbsp oil using Sear/Sauté mode
2. Brown meats 3-5 minutes per side until caramelized
3. Switch directly to Slow Cook without cleaning
Those browned bits deglaze into the cooking liquid, creating richer sauces than crockpots achieve.
Layer Ingredients Strategically
Build flavor layers by positioning ingredients correctly:
– Bottom layer: Dense root vegetables (carrots, potatoes) needing longest cook time
– Middle layer: Proteins and aromatics (onions, garlic)
– Top layer: Delicate vegetables (zucchini, peas) added later
This prevents mushy vegetables while ensuring even cooking—critical since NuWave heats more efficiently than traditional slow cookers.
Time Add-Ins Perfectly
Protect delicate ingredients with precise timing:
– Dairy/cheese: Stir in during last 30-60 minutes to prevent curdling
– Fresh herbs: Add in final 30 minutes to preserve flavor
– Seafood: Gently fold in during last 15-30 minutes
NuWave’s precise temperature control means ingredients cook faster than in conventional slow cookers.
Convert Traditional Recipes Successfully
Reduce Liquid Using the 25% Rule
Cut all liquids by 25-30% compared to standard slow cooker recipes. NuWave’s superior insulation minimizes evaporation, so traditional recipes become watery disasters. For example:
– If a crockpot recipe calls for 4 cups broth → Use only 3 cups in NuWave
This simple adjustment prevents the #1 conversion mistake.
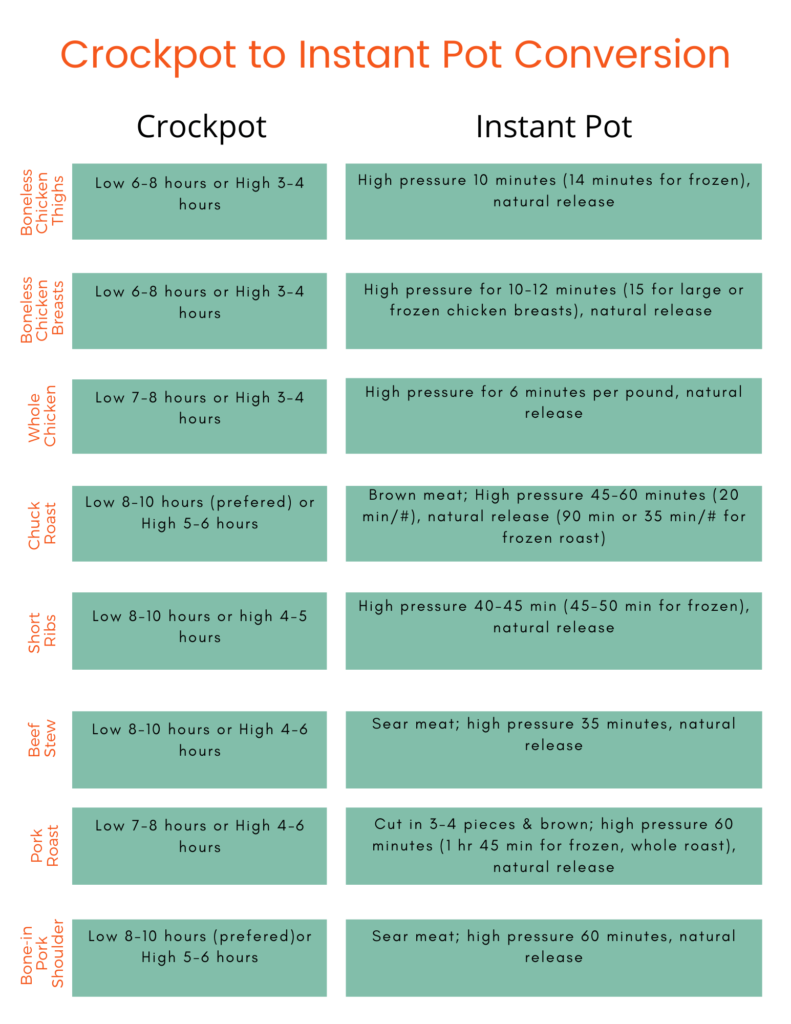
Translate Crockpot Settings Accurately
Use this foolproof conversion chart:
– Crockpot Low → NuWave Low
– Crockpot High → NuWave Medium
– Need faster results → NuWave High
Never use NuWave’s High setting for traditional Low recipes—this causes overcooked edges while centers remain underdone.
Adjust Cooking Times Proactively
NuWave’s precise heating shortens traditional times:
– Low setting: Reduce by 1 hour (e.g., 8-hour recipe → 7 hours)
– High setting: Reduce by 30-45 minutes
Always check doneness 30-60 minutes early during your first attempt—set phone reminders to avoid overcooking.
Troubleshoot Common Slow Cook Problems
Fix Watery Sauces Instantly
Problem: Excess liquid pooling at the bottom
Solution: Remove glass lid and press Sauté for 10-15 minutes to reduce
Prevention: Reduce initial liquid by 25% and avoid overfilling pot beyond ⅔ capacity
Stop Uneven Cooking Permanently
Problem: Mushy edges with undercooked centers
Solution: Stir halfway through cooking and cut ingredients to uniform 1-inch pieces
Prevention: Layer dense vegetables at bottom and ensure adequate liquid coverage
Resolve Non-Starting Timer Issues
Problem: Display shows “On” but timer won’t start
Check these:
– Glass lid properly seated (no gaps)
– Pressure valve fully in “Vent” position
– Inner pot correctly inserted into base
Reset by unplugging for 30 seconds if settings don’t take.
Advanced Slow Cooking Techniques
Master Combination Cooking Method
Create restaurant-quality results with this pro sequence:
1. Sear meats using Sauté function
2. Deglaze with ¼ cup wine/broth to lift browned bits
3. Slow cook at Medium for 6 hours
4. Reduce sauce on Sauté for 10 minutes before serving
This layered approach develops deeper flavors than single-mode slow cookers.
Cook Complete Meals Using Trivet Hack
Place the included trivet to create two cooking zones:
– Bottom: Potatoes simmering in ½ cup broth
– Trivet: Chicken breasts elevated above liquid
– Result: Perfectly cooked chicken with tender potatoes in one pot
The trivet prevents steaming while allowing flavor infusion.
Critical Safety Protocols
Avoid Dangerous Lid Mistakes
Never use the pressure lid for slow cooking—it traps excessive steam causing potential overflow. Always:
– Confirm glass lid is secured
– Verify pressure valve is in “Vent”
– Position unit 6+ inches from cabinets for steam clearance
This prevents scalding hazards from trapped steam release.
Ensure Food Safety Compliance
Your food must reach 140°F within 2 hours to stay out of danger zones. Verify with a thermometer during initial cooks, especially when using Low setting. Always thaw ingredients completely before starting—never add frozen items to cold liquid.
Cleaning and Maintenance Essentials
Post-Cook Cleaning Sequence
- Unplug and let unit cool 30+ minutes
- Remove inner pot (dishwasher safe on top rack)
- Wipe heating element with damp microfiber cloth
- Hand-wash glass lid with mild soap (avoid abrasive pads)
Never immerse the main unit in water or spray cleaners directly onto controls.
Prevent Odor Retention
Store the glass lid inverted on the cooker base to prevent stale smells. Place a paper towel between lid and base if storing long-term. Always dry the pressure lid completely before storing to avoid mold.
Pro Tips for Foolproof Results
Scale Recipes Without Guesswork
- Halving recipes: Reduce time by 15-20% (e.g., 6-hour cook → 5 hours)
- Doubling recipes: Maintain original time (NuWave’s efficiency compensates)
- Always stir when increasing volume to ensure even cooking
Create Your Timing Cheat Sheet
Track these critical add-in times:
– Rice/Pasta: Last 30-45 minutes + ½ cup extra liquid
– Leafy greens: Final 10-15 minutes
– Cream cheese: Last 30 minutes, stir vigorously to incorporate
Write these on a fridge magnet for quick reference during cooking.
Mastering how to use NuWave pressure cooker as a slow cooker eliminates appliance clutter while delivering better results than standalone crockpots. Remember these non-negotiables: always use the glass lid, keep the valve vented, reduce liquids by 25%, and check early. Start with forgiving recipes like beef stew or chili to build confidence, then progress to layered meals using the trivet. Within weeks, you’ll wonder how you ever managed without this versatile powerhouse—transforming tough cuts into tender perfection while saving cabinet space and 75% of the energy. Your NuWave isn’t just a pressure cooker; it’s your new secret weapon for slow-cooked excellence.


