

Your electric multi-cooker sits on the counter like a mysterious black box. You’ve heard it can replace six appliances, cook meals in minutes, and even make yogurt. But right now, it’s just taking up space while you wonder which button does what. Learning how to use electric multi cooker properly transforms this countertop powerhouse from intimidating appliance to your most valuable kitchen tool.
Getting started with this powerhouse appliance doesn’t require culinary school training. Once you understand its basic functions, you’ll transform from hesitant beginner to confident multi-cook master. This guide walks you through everything from your first water test to advanced techniques like pot-in-pot cooking, showing you exactly how to use electric multi cooker to its full potential.
Essential First Steps Before Cooking
Initial Test Run Procedure
Before cooking your first meal, run a simple steam cycle with just water. Add 2 cups of water to the inner pot, seal the lid, and select the steam function for 2 minutes. This crucial step removes manufacturing residues and confirms your unit works properly. You’ll see steam escape during quick release—this is normal and confirms the safety mechanisms function correctly. Skipping this test could lead to unexpected issues with your first actual meal.
Manual Mastery Required
Read your entire user manual cover to cover before attempting any recipes. Each multi-cooker model has unique features, safety mechanisms, and capacity limits that vary between brands. The manual reveals your specific model’s maximum fill lines, required liquid minimums, and which functions can be combined. Many users who skip this step encounter preventable frustrations like “Burn” messages or pressure failures that could have been avoided with proper preparation.
Counter Space Reality Check
These appliances demand permanent counter space—especially 8-quart models that stand 15 inches tall. Measure your space before unboxing. Many users find they can’t store multi-cookers in standard cabinets due to height restrictions. Plan for a dedicated spot near an outlet, as most power cords are frustratingly short. Consider this when deciding between 6-quart and 8-quart models—the larger size creates more meals but requires significantly more space.
Mastering Basic Operation Steps
Prepare Ingredients First
Chop vegetables, measure spices, and prep proteins before touching any buttons. This mise en place approach prevents the “what do I do next” panic once cooking starts. Group ingredients by when they’ll be added—aromatics for sautéing, liquids for pressure, delicate items for finishing. Having everything ready ensures you don’t leave the appliance unattended during critical transitions like deglazing or pressure release.
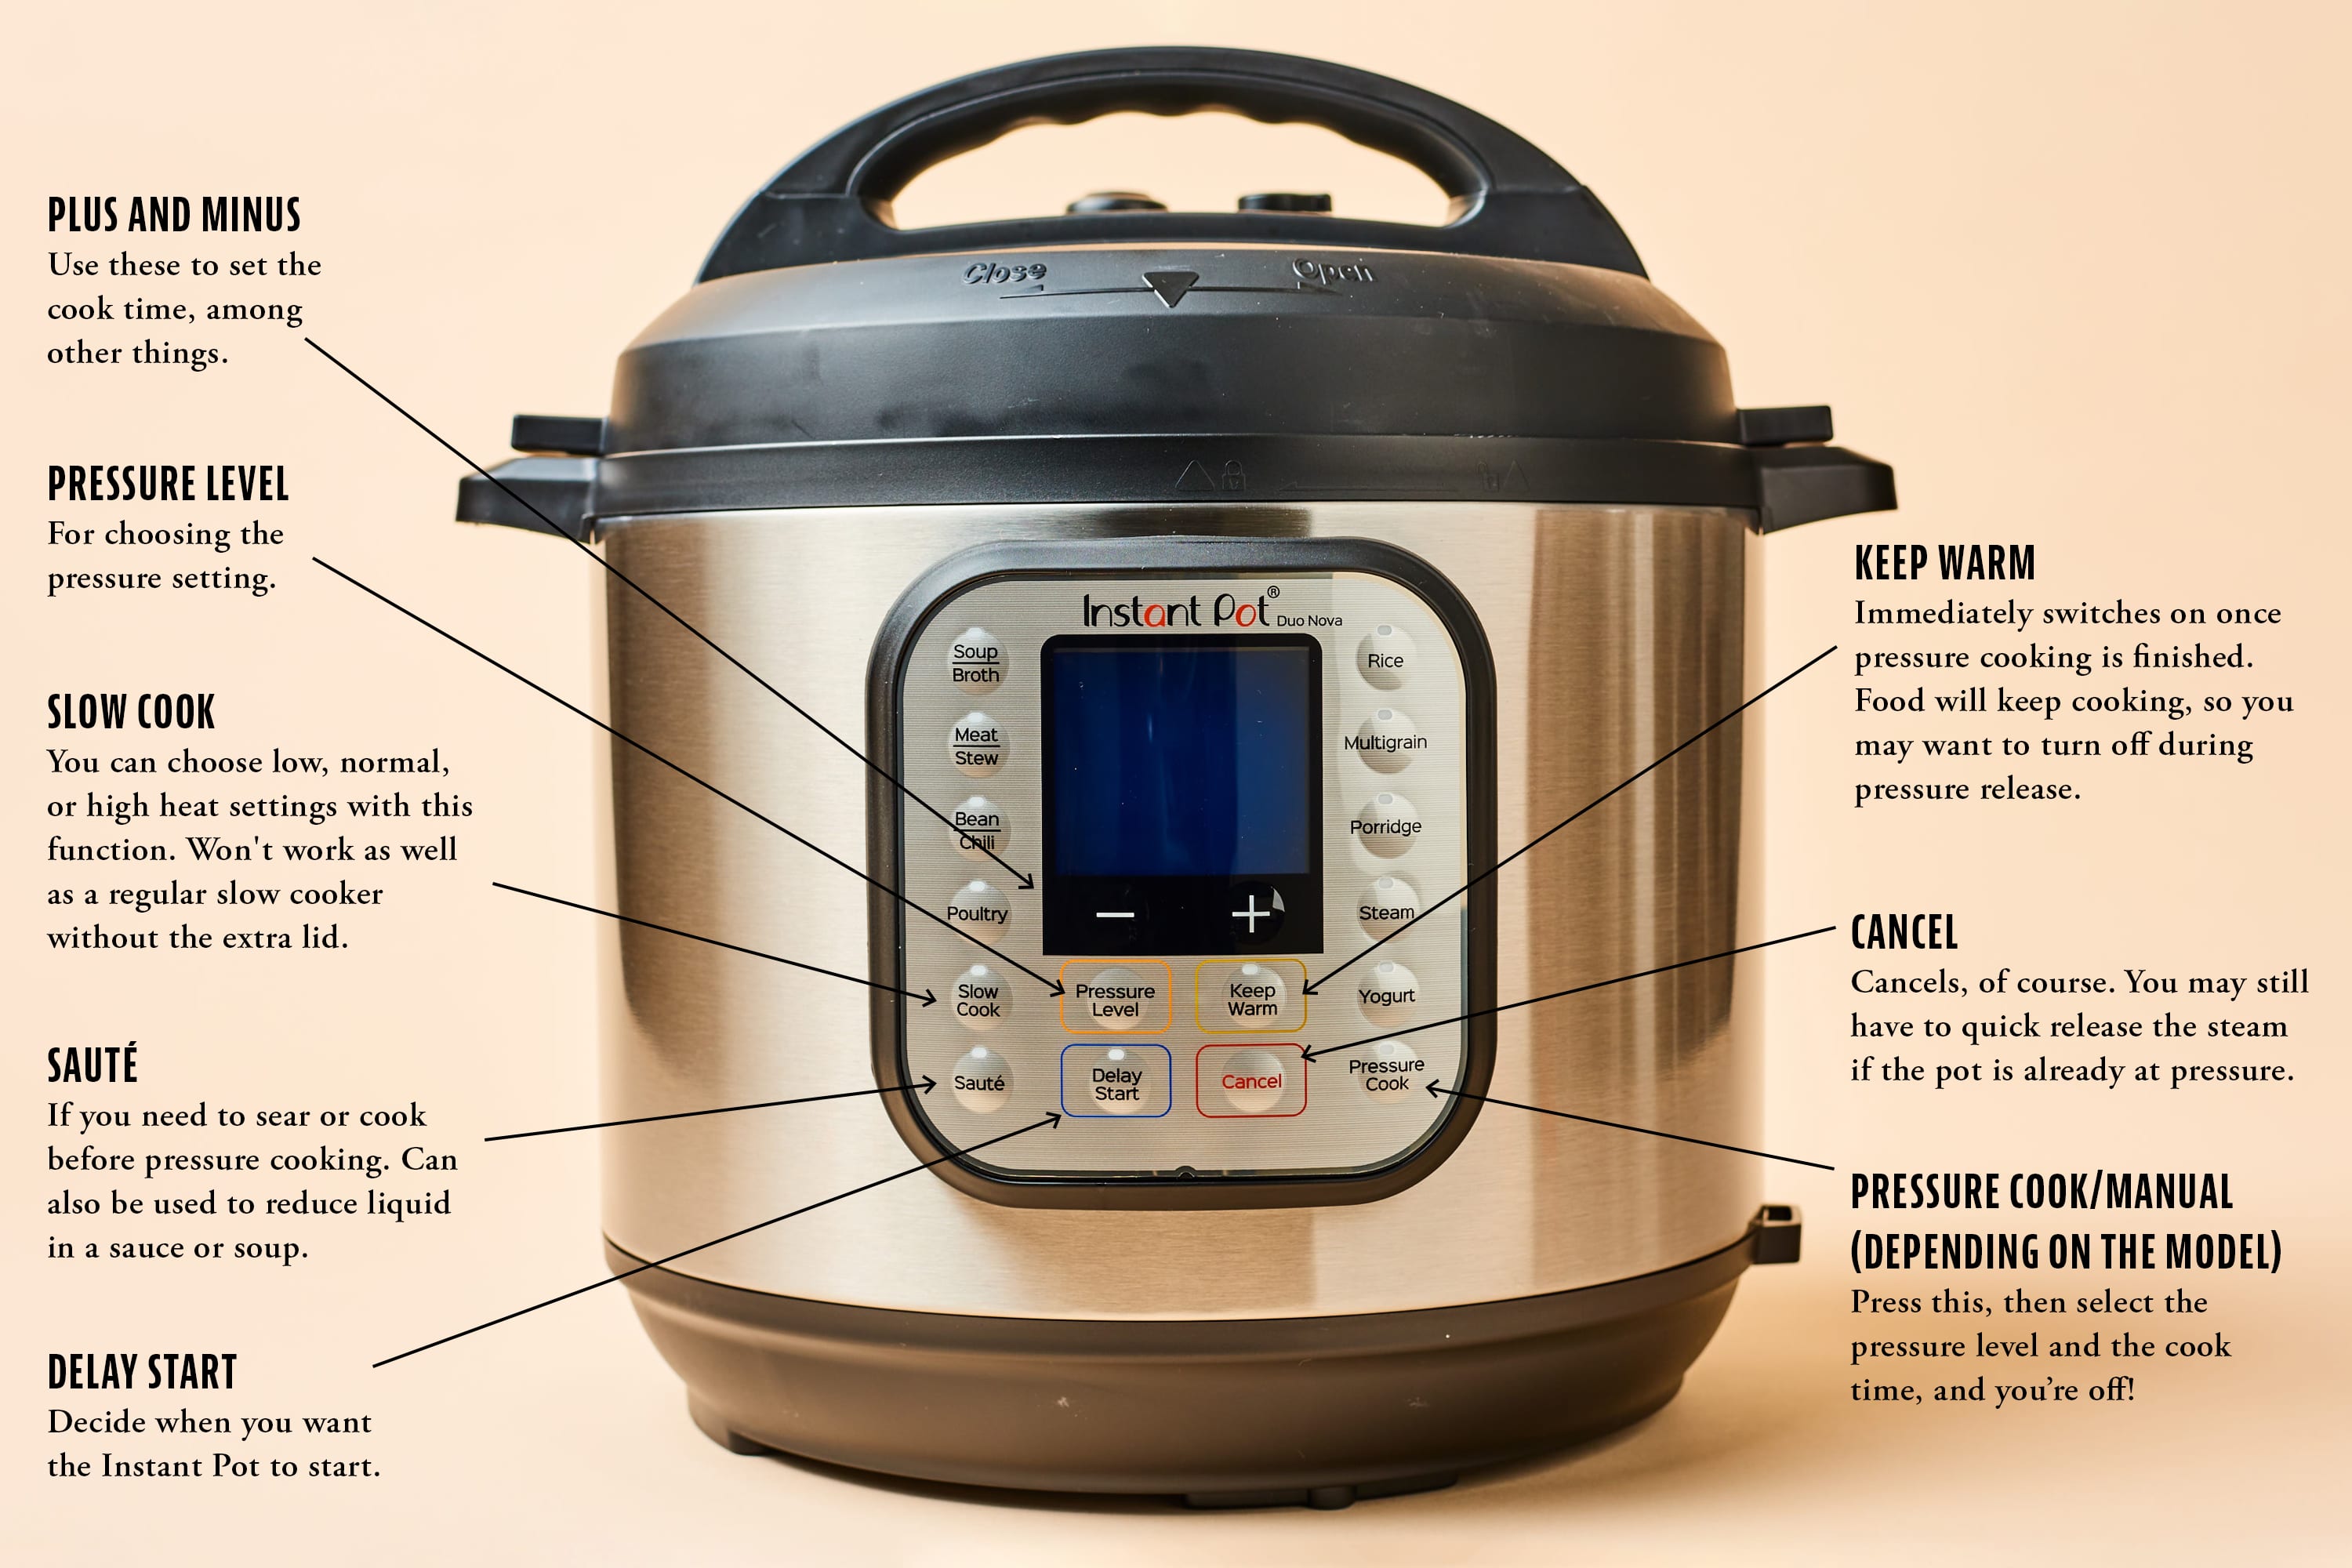
Set Parameters Correctly
Use the control panel to select your cooking method first, then adjust time and temperature. Most recipes use high pressure, but delicate foods like fish benefit from low pressure. Time settings range from 1 minute for vegetables to 90 minutes for tough cuts of meat. When in doubt, undercook—you can always add more time after quick releasing. Never set parameters while ingredients are cooking—wait for the appliance to finish preheating first.
Layer Ingredients Strategically
Place longest-cooking items at the bottom: root vegetables, tough meats, and dried beans. Add quicker-cooking ingredients in layers above. Never exceed the 2/3 fill line for general foods or 1/2 line for beans and grains. Overfilling creates dangerous pressure situations and poor results. For best flavor development, layer aromatics like onions and garlic at the bottom to infuse the entire dish.
Secure Lid Properly
Check the sealing ring sits evenly in its groove—twisted rings cause pressure failures. Ensure the pressure release valve points to “sealing” for pressure cooking or “venting” for slow cooking. You’ll hear a satisfying click when the lid locks correctly. If the lid doesn’t seal, double-check these three elements before starting—preventing pressure issues saves time and frustration later.
Pressure Release Methods Explained
Natural Pressure Release (NPR)
Let pressure drop naturally over 10-30 minutes. Use NPR for foamy foods like beans, grains, or soups to prevent messy spurts. Food continues cooking during this time, so factor it into your total cooking time. Natural release is essential for dishes where texture matters—like perfectly tender pulled pork that would turn mushy with quick release.
Quick Pressure Release (QPR)
Turn the valve to venting using a long spoon or oven mitt—never bare hands. QPR works best for vegetables and delicate proteins that overcook easily. Expect vigorous steam for 2-5 minutes. Position the steam away from cabinets and people to prevent damage or burns. Always use QPR with caution—it’s the most dangerous part of multi-cooker operation if not handled properly.
Core Functions Breakdown
Pressure Cooking Perfection
Pressure cooking transforms tough cuts into tender meals in 30 minutes instead of hours. The sealed environment reaches 250°F, breaking down collagen rapidly. Perfect for pot roasts, dried beans, and whole chickens. Always use at least 1 cup of liquid for steam generation—this prevents the dreaded “Burn” message and ensures proper pressure building.
Slow Cooking Convenience
The slow cook function maintains steady temperatures between 190-300°F for “set it and forget it” meals. Unlike traditional slow cookers, multi-cookers sear first, then switch modes automatically. Ideal for stews, pulled pork, and chili that benefit from long, gentle heat. You can leave slow cooker meals unattended for 8+ hours without worrying about overcooking.
Rice Without Guesswork
The rice function automatically cycles pressure and temperature for consistent results. White rice uses a 1:1 ratio, brown rice needs 1:1.25. Add fat for non-stick results—1 tablespoon butter per cup of rice prevents sticking and adds flavor. No more burnt bottoms or mushy grains—this function delivers perfect rice with zero monitoring.
Prevent Common Beginner Mistakes
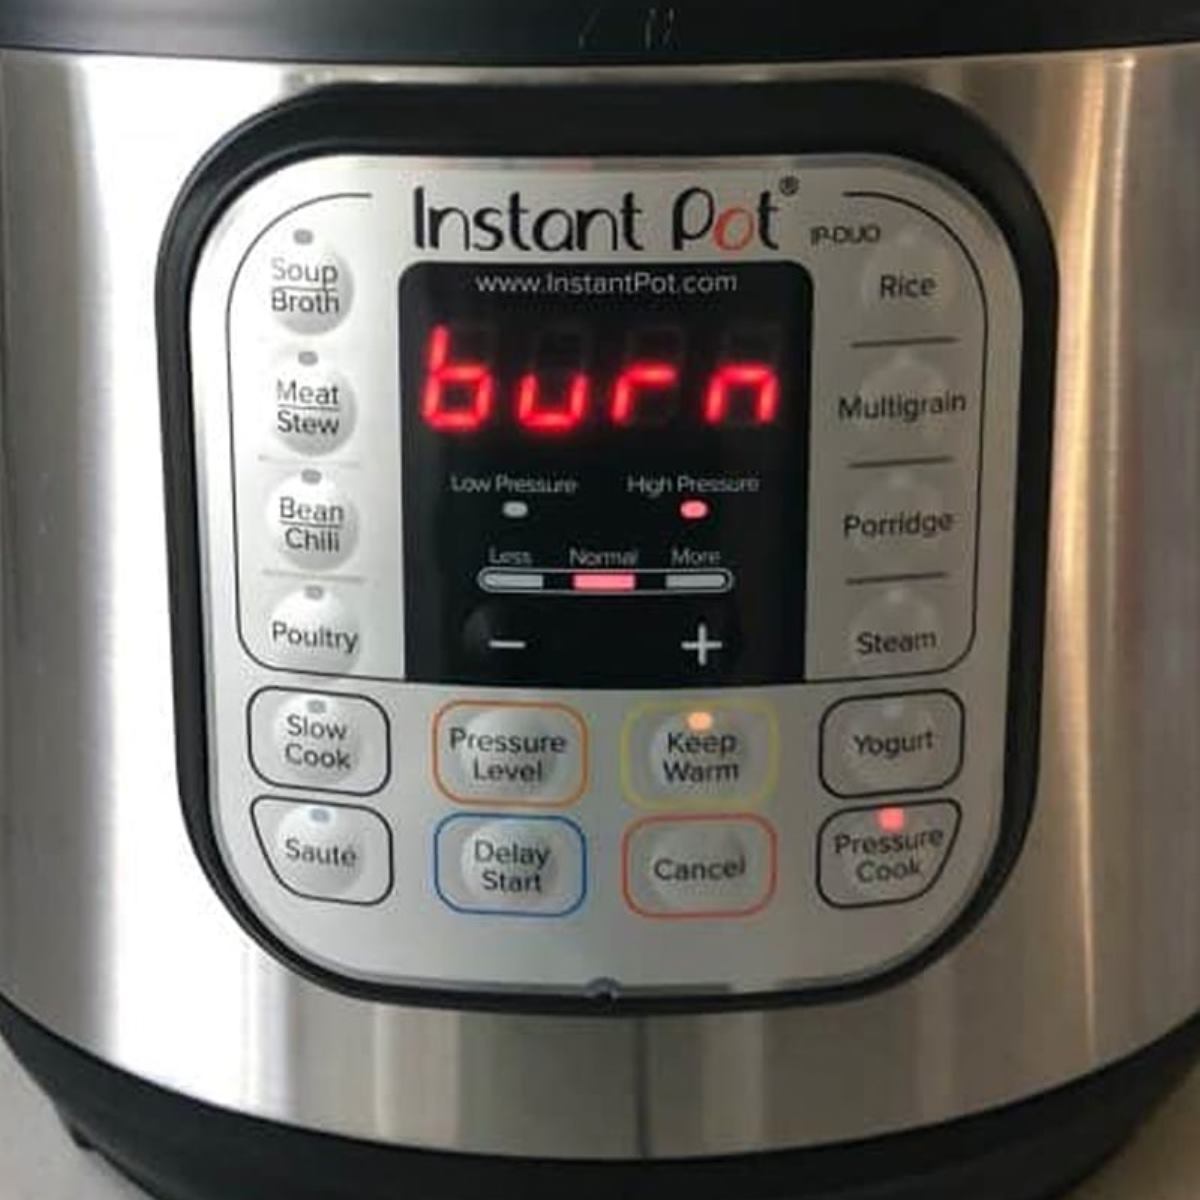
Burn Message Solutions
The dreaded “Burn” message appears when food sticks or liquid levels drop too low. Prevent this by deglazing after sautéing—add a splash of broth and scrape browned bits. Ensure minimum liquid requirements and avoid tomato products directly on the pot bottom. Pro tip: Use pot-in-pot cooking for recipes with thick sauces to eliminate burn risks entirely.
Fill Line Violations
Overfilling causes dangerous pressure build-up and poor results. Respect the 2/3 line for most foods, 1/2 line for beans and grains. These limits account for expansion during cooking—especially critical for rice and pasta. When in doubt, underfill—it’s better to have extra space than risk a safety hazard.
Pressure Building Failures
If pressure won’t build, check three things: sealing ring placement, valve position, and liquid levels. A missing or twisted ring prevents sealing. The valve must point to “sealing,” not “venting.” Ensure at least 1 cup of thin liquid for steam generation. Most pressure issues stem from these simple oversights that take seconds to correct.
Cleaning and Maintenance Routine
Daily Cleaning Protocol
Remove the inner pot and wash with soap and water—it’s dishwasher safe but hand washing extends lifespan. Pop out the sealing ring and anti-block shield from the lid after each use. These components trap food particles and odors that affect future meals. Critical step: Wash the anti-block shield thoroughly—this small part prevents clogs in the pressure release system.
Storage Best Practices
Store with the lid inverted or slightly ajar to prevent sealing ring compression and odor retention. Keep the power cord accessible since most are too short for convenient placement. Consider a second sealing ring—use one for savory foods, another for yogurt and rice to prevent flavor transfer between cooking sessions.
Quick Recipe Frameworks
Weeknight Beef and Broccoli
Sauté beef strips with garlic and ginger, add sauce mixture, pressure cook 3 minutes, quick-release, then add broccoli and sauté 3 minutes. Total time: 15 minutes for restaurant-quality results. This method demonstrates how to use electric multi cooker for fast, flavorful weeknight meals without complicated techniques.
5-Minute Risotto
Sauté onions and rice, deglaze with wine, add broth, pressure cook 5 minutes with 5-minute natural release. Stir in cheese and butter for creamy texture without constant stirring. This recipe showcases the multi-cooker’s ability to simplify traditionally difficult dishes through precise pressure control.
Realistic Expectations and Timeframes
Actual Cooking Times
Despite marketing claims, electric multi-cookers aren’t “instant.” Total time includes:
– Preheating/pressure building: 10-20 minutes
– Programmed cooking time: varies by recipe
– Pressure release: 10-30 minutes natural or 2-5 minutes quick
Understanding these phases helps set realistic expectations when learning how to use electric multi cooker effectively. The appliance saves active cooking time but doesn’t eliminate total meal preparation time.
Your electric multi-cooker transforms from intimidating appliance to indispensable kitchen companion once you master these fundamentals. Start with simple recipes like steamed vegetables or rice to build confidence. Within weeks, you’ll wonder how you ever managed without this versatile powerhouse.
The key is starting small and building complexity gradually. Your first perfect pot of rice will lead to impressive dinner party dishes. Soon, you’ll batch-cook Sundays and eat well all week—all from one convenient appliance that earns its permanent counter space. With these essential techniques, you’ve got everything you need to confidently use your electric multi-cooker for faster, easier, and more delicious meals.


