

Steam hisses from your pressure cooker as you wonder if those 15 minutes at full pressure truly destroyed every bacterial spore on your mushroom jars. Unlike everyday cooking, sterilization demands scientific precision—121°C (250°F) sustained for 15 minutes under 15 psi pressure—to eliminate heat-resistant microbes that boiling water can’t touch. One degree below target or one minute too short, and contamination ruins your entire batch. This guide transforms your ordinary kitchen pressure cooker into a reliable sterilization tool for mushroom cultivation, home labs, and fermentation projects by revealing the exact protocols professionals use.
Forget guesswork: You’ll master pressure validation methods, load configuration secrets, and emergency protocols that prevent dangerous failures. Most importantly, you’ll learn how to prove sterilization succeeded using affordable indicators—because in microbiology, “looks clean” isn’t good enough.
Why Your Pressure Cooker Must Hit Exactly 121°C at 15 PSI
Sterilization fails when temperature drops below 121°C, even briefly. At sea level, water boils at 100°C—enough to kill active bacteria but not dormant spores. Adding 15 psi pressure forces water to boil at 121°C, the minimum temperature that destroys Bacillus and Clostridium spores. Your pressure cooker’s gauge must hold steady at 15 psi; a drop to 14 psi lowers temperature to 120°C, creating a “cold spot” where spores survive.
Timing Pitfalls That Cause Contamination
Never start your timer when pressure builds—only when 15 psi is sustained. Heat-up and venting consume 10–15 minutes before true sterilization begins. For mushroom grain jars, extend to 20 minutes due to dense substrate. Liquids require 5 extra minutes per quart to ensure core temperature penetration. Crucially, natural cooling must complete before opening; forcing pressure release creates vacuum that sucks contaminants into jars.
Pressure Cooker Setup: The 5 Non-Negotiable Requirements

Your cooker needs specific features to sterilize reliably. Jiggler-weight models lack precision—a calibrated pressure gauge is mandatory to confirm 15 psi. Without it, you’re gambling with contamination.
Must-Have Sterilization Kit Components
- 6+ quart capacity to prevent boil-overs during extended cycles
- Borosilicate glass jars only (Pyrex)—regular glass shatters under pressure
- Aluminum foil lids (never sealed containers—they explode)
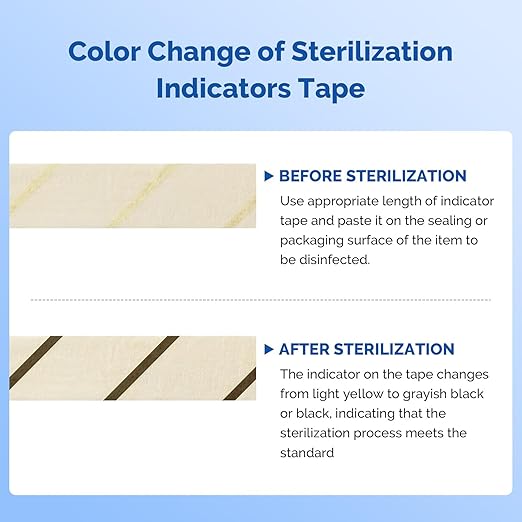
- Autoclave tape that turns black at 121°C (place strips inside and outside jars)
- Distilled water only (mineral deposits from tap water clog vents)
Pro Tip: Wrap jar rims in foil to prevent water intrusion during cooling. Condensation is the #1 cause of post-sterilization contamination.
Pre-Sterilization Safety Checklist: Avoiding Steam Explosions
Skip these steps and you risk severe burns. Before adding water:
1. Verify gauge reads zero when cool (if not, replace immediately)
2. Inspect the gasket for cracks—hardened rubber won’t seal
3. Flush safety valves with water to prevent blockage
4. Clean residue from sealing surfaces with vinegar
5. Fill with 1–2 cups distilled water (never exceed 2″ depth)
Critical Mistake: Overfilling water causes boil-overs that coat jars in contaminants. Underfilling creates dry heat that won’t sterilize. Measure precisely.
Step-by-Step Sterilization: The Mushroom Grower’s Protocol
Loading for Zero Cold Spots
Stack jars upright on the trivet with 2 inches between each. Overcrowding traps cold air—steam must circulate freely around all surfaces. For liquid cultures, fill jars only ⅔ full and tilt at 45° to maximize surface area. Always place autoclave tape strips vertically on jar sides to verify heat penetration.
The 45-Minute Sterilization Sequence
- Heat on high until steady steam flows (5–8 minutes)
- Vent steam for 10 minutes to purge air pockets (critical step!)
- Place weight to build pressure to 15 psi
- Start timer ONLY when gauge hits 15 psi (15–20 minutes)
- Turn off heat and wait 20+ minutes for natural pressure drop
- Open ONLY when gauge reads zero—never force the lid
Warning: Opening prematurely causes jars to implode from sudden pressure change. Wait 5 full minutes after zero PSI.
Why Validation Is Non-Negotiable (And How to Do It Cheaply)
90% of home sterilization failures happen because growers assume success. Autoclave tape confirms temperature but not microbial kill. For true verification:
– Chemical indicators: Tape that darkens only at 121°C+
– Biological indicators: $0.50 spore strips (Geobacillus stearothermophilus) incubated 48 hours post-cycle
– DIY test: Sterilize a nutrient broth jar—if it clouds after 3 days, sterilization failed
Expert Note: Run validation tests monthly. Gasket wear causes gradual temperature drops that tape won’t catch.
Mushroom Substrate Special Protocol: Double Sterilization
Grain spores resist single cycles. For 99.9% kill rate:
1. Sterilize jars for 20 minutes at 15 psi
2. Cool 24 hours at 25°C (allows surviving spores to germinate)
3. Repeat sterilization for another 20 minutes
Time-Saver: Sterilize grain in myco bags instead of jars—they heat faster and eliminate cold spots from dense grain beds.
Emergency Fixes for Common Sterilization Disasters

| Problem | Immediate Action | Prevention |
|---|---|---|
| Pressure won’t build | Turn off heat, check gasket/valve | Clean valves weekly with pipe cleaner |
| Jars cracked after cycle | Discard substrate—contaminated | Preheat jars; never add cold items to hot cooker |
| Tape didn’t change color | Resterilize immediately | Extend venting time to 15 minutes |
| Wet jars after cooling | Dry 24h in still air before inoculation | Wrap rims in foil; tilt jars during loading |
Safety Shutdown: What to Do When Pressure Spikes
If pressure exceeds 17 psi:
1. TURN OFF HEAT IMMEDIATELY
2. Never open the lid or force-cool
3. Stand back from steam vents
4. Wait 30+ minutes for natural pressure drop
Do not unplug electric cookers—residual heat maintains pressure. Only attempt manual venting if safety valves fail completely.
Maintenance Schedule to Prevent Catastrophic Failure
- After each use: Wash with vinegar to dissolve mineral deposits
- Monthly: Test gauge accuracy against boiling water (should read 0 PSI at 100°C)
- Every 6 months: Replace rubber gasket (hardened seals cause pressure leaks)
- Annually: Soak safety valves in CLR cleaner for 24 hours
Critical: Never use a cooker with pitting or dents in the chamber—structural weakness risks explosion.
Why Your Pressure Cooker Isn’t for Medical Use (And When to Upgrade)
Home units achieve 99.9% sterilization (SAL 10⁻³)—sufficient for mushrooms or home labs. But medical applications require 99.9999% kill rate (SAL 10⁻⁶), which demands automated logging and tighter temperature control. Upgrade to a lab autoclave if:
– You process surgical tools
– Regulatory compliance is required
– You need documented sterilization logs
Reality Check: A $150 pressure cooker handles 95% of home uses. Save $2,000+ by validating properly instead of buying professional gear prematurely.
Final Sterilization Checklist Before Every Cycle
- Gauge reads zero when cold
- Gasket is supple with no cracks
- Safety valves move freely
- Jars spaced 2+ inches apart
- Distilled water at 1–2 cup level
- Autoclave tape applied to all items
- Venting time completed before timing
Your pressure cooker becomes a sterilization powerhouse when you respect these non-negotiable parameters. Remember: At 120°C, spores survive; at 121°C, they die. That single degree difference between success and contamination is why validation isn’t optional—it’s the only thing standing between you and a ruined mushroom harvest. Start small with grain jars, validate every cycle, and within weeks you’ll sterilize with laboratory-grade confidence.


