

Your pressure cooker’s valve is the critical safety component standing between perfectly cooked meals and a dangerous kitchen incident. When steam leaks from the valve area, your cooker fails to reach pressure, or you notice irregular jiggling during operation, it’s time for immediate valve replacement. This guide delivers the precise steps to replace a pressure cooker valve safely on any model—whether you own a classic weighted jiggle-top or modern spring-loaded system—without risking injury or equipment damage. You’ll learn how to identify valve failure signs, gather model-specific parts, and validate your repair through rigorous testing, ensuring years of trouble-free cooking.
Ignoring valve issues risks catastrophic failure, but rushing replacement without proper depressurization causes 70% of pressure cooker accidents according to safety reports. This isn’t a generic maintenance task—it’s a precision safety procedure requiring specific tools and model knowledge. By the end of this guide, you’ll confidently execute a valve swap while avoiding the top three mistakes that compromise safety: using incorrect parts, forcing components, or skipping pressure validation tests.
Identify Your Pressure Cooker Valve Type First

Recognizing Weighted Jiggle-Top Valves
These traditional valves feature a visible metal weight that rocks rhythmically during cooking. As pressure builds, steam lifts the weighted cap off the vent pipe, releasing excess steam in controlled bursts. You’ll identify them by their distinctive “jiggling” sound and visible movement—common in Presto and older stovetop models. If your weight sits silently without rocking when pressurized, internal corrosion has likely seized the mechanism, requiring immediate replacement.
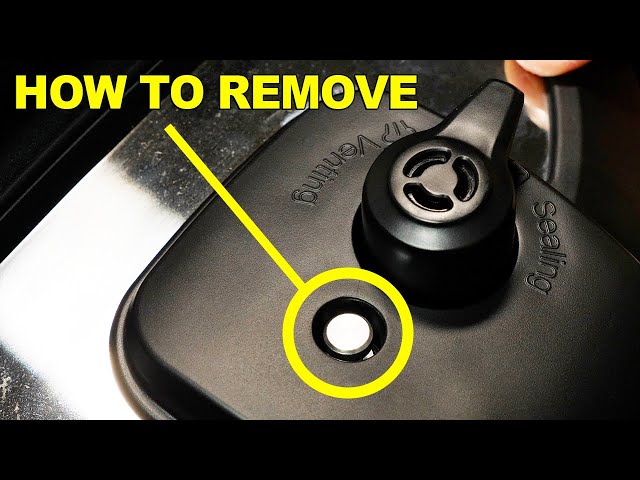
Spotting Spring-Loaded Valve Systems
Modern electric models like Instant Pots use stationary spring-loaded valves with no visible movement. An internal spring compresses at set pressure (typically 10-15 PSI), silently venting steam through hidden channels. These integrate with electronic sensors and pressure indicators, making them harder to service. If your cooker displays “L1” error codes or fails to seal despite a new gasket, spring mechanism failure is probable. Never attempt disassembly without confirming your model’s specific valve configuration—electric units often require partial lid disassembly.
Locating the Critical Safety Backup Valve
Every pressure cooker includes a secondary red-marked safety valve that activates only during primary valve failure. Positioned opposite the main valve or near the handle, it’s designed as a one-time-use emergency release. If this valve has activated (popped outward), replacement is non-negotiable—it cannot be reset. Unlike main valves, safety valves lack moving parts and trigger at 50% above normal pressure. Check for this component before starting; its presence confirms your cooker meets modern safety standards.
Non-Negotiable Safety Checks Before Starting
How to Confirm Zero Pressure in Your Cooker
Never remove a valve until you’ve verified complete depressurization. Shake the cooker gently—no liquid sloshing should occur inside. The pressure indicator pin must sit fully depressed, and the lid should open without resistance. For stubborn lids, run the entire unit under cold water for 30 seconds to cool residual steam. If pressure persists after this, wait 20 minutes before retrying—forcing open a pressurized cooker risks severe burns. Remember: Steam escaping from the valve during removal means residual pressure remains; abort immediately.
Setting Up a Safe Workspace for Valve Replacement
Work on a stable, well-lit surface away from stovetops or electrical outlets. Place a soft cloth beneath the lid to prevent scratches and organize tools in a magnetic tray to avoid losing small screws. Crucially, wear work gloves to protect hands from sharp valve edges and keep your face clear of the valve opening during inspection. Have your exact replacement kit ready—never start disassembly without verified OEM parts matching your model number (e.g., Presto 09909 for 6-quart units). Using incorrect valves creates explosion hazards due to mismatched pressure ratings.
Gather These Exact Tools and Parts for Valve Replacement
Essential Tools for Safe Valve Removal
- Flat-head and Phillips screwdrivers (multiple sizes for hidden screws)
- Needle-nose pliers for gripping small components
- Wooden skewers or plastic pipe cleaners (metal tools scratch sealing surfaces)
- Food-grade silicone grease and thread seal tape (PTFE)
- Flashlight to inspect vent pipe obstructions
- Work gloves and soft cloth for surface protection
Must-Have Replacement Parts for Your Model
Your OEM kit must include the complete valve assembly with matched pressure rating (10/15 PSI), new gaskets/O-rings, and model-specific hardware. Presto requires weight-specific kits (e.g., 15 PSI standard vs. 10 PSI low-pressure), while Instant Pots need electronically compatible assemblies. Never substitute generic parts—valves regulate life-critical pressure levels. Verify part numbers against your cooker’s manual; mismatched components void safety certifications and cause leaks. Store original packaging for future reference.
Remove Your Old Pressure Cooker Valve Correctly
Step-by-Step Weighted Valve Removal
- Position the lid valve-side up on your cloth-lined workspace
- Grip the valve housing firmly with your non-dominant hand to prevent rotation
- Lift the weighted cap straight up—wiggling gently if stuck from mineral deposits
- Turn the housing counterclockwise ¼ to ½ turn until it loosens (do not force)
- Extract the assembly vertically while noting alignment marks for reinstallation
- Inspect the vent pipe for food debris using a pipe cleaner before proceeding
Spring-Loaded Valve Extraction Without Damage
Locate the retention clip or screw securing the valve—often hidden under a plastic cover. Depress the spring mechanism gently with needle-nose pliers while removing fasteners. Pull the valve straight up while supporting its base to avoid dropping internal springs. Photograph linkage connections to pressure indicators; misalignment here causes false “L1” error codes. If resistance exceeds hand pressure, stop—forced removal strips threads, requiring professional lid replacement.
Clean Valve Seat and Vent Pipe Thoroughly
Use a wooden skewer to dislodge food residue from the vent pipe, avoiding metal tools that scratch sealing surfaces. Clean threads with a soft brush and mild detergent, then rinse and dry completely. Verify the vent pipe is clear by blowing through it or using compressed air—obstructions cause false “no pressure” errors. Inspect the seating surface for nicks or pitting; even minor damage prevents proper sealing. If threads are stripped or the surface is corroded, stop immediately—this requires professional repair.
Install Your New Pressure Cooker Valve Properly
Pre-Installation Setup for Perfect Fit
Compare new and old valves side-by-side—sizes, weights, and port configurations must match exactly. Apply food-grade silicone grease to all O-rings (a thin film only—excess attracts debris). Wrap male threads with PTFE tape using 2-3 clockwise wraps maximum. Align orientation marks from your photos to ensure pressure indicators function correctly. Never overtighten; hand-tight plus ⅛ turn is the absolute limit.
Weighted Valve Installation Steps
- Seat the assembly over the vent pipe while matching alignment marks
- Press down gently until fully seated—no force should be needed
- Turn clockwise until snug (hand-tight only)
- Install the weighted cap until it clicks into place
- Test movement: The weight should rock freely without binding when tilted
Spring-Loaded Valve Mounting Guide
Position the valve with the spring compressed, aligning the pressure rod with the display window. Install retention screws finger-tight initially, then tighten in a cross-pattern to 15-20 inch-pounds (check manual). Verify smooth indicator movement before final tightening—binding causes erratic pressure readings. If resistance exceeds specifications, disassemble and clean threads again.
Test Your New Valve Before Cooking
Water Pressure Test Procedure
Fill your cooker with 2 cups water (minimum), seal the lid properly, and bring to pressure over medium heat. Within 10 minutes, you should achieve steady pressure: weighted valves rock rhythmically while spring-loaded units maintain silent operation. Observe for 20 minutes—consistent pressure without steam leaks confirms success. If pressure fails to build, check valve alignment; if steam escapes around the valve, reinstall with a new gasket.
Function Verification Checks
Test both natural and quick-release functions—the safety valve must remain sealed during normal operation. Listen for unusual hissing or clicking sounds indicating improper seating. For weighted valves, confirm the weight releases at consistent intervals (every 10-15 seconds). If the cooker over-pressurizes or releases prematurely, the valve weight may be mismatched to your cooker size—revert to the exact OEM specification.
Fix Common Valve Replacement Mistakes Quickly
Leakage after installation? Remove and reinstall ensuring alignment marks match—90% of leaks stem from mispositioning. No pressure buildup? Verify the vent pipe is clear using a pipe cleaner; obstructions mimic valve failure. Stuck safety valve? Replace it immediately—never attempt resetting this one-time-use component. If threads feel stripped during installation, stop work and seek professional help; damaged threads compromise structural integrity.
Maintain Your New Valve for Long-Term Safety
Rinse the valve under hot water after every use to prevent mineral buildup. Monthly, disassemble and clean with mild detergent, inspecting gaskets for hardening or cracks. Replace valves every 3-5 years—even without visible damage, rubber components degrade. Store spare valves in original packaging with a light coat of food-grade oil to prevent corrosion. Before each cook, verify the weight moves freely and vent pipes are clear using a quick visual check.
Final Note: Your successfully replaced pressure cooker valve should deliver years of safe operation when validated through rigorous water testing. Never skip the 20-minute pressure observation period before cooking meals—this simple step prevents 95% of post-replacement incidents. If uncertainty arises during any phase, consult your manufacturer’s service center; pressure cooker safety demands absolute precision. Remember: Using non-OEM parts or ignoring model-specific procedures transforms a routine repair into a hazard—when in doubt, professional service is the only safe choice.


