
You’re standing over your pressure cooker, ingredients ready, only to discover the lid refuses to lock into place. Instead of that reassuring click signaling safety engagement, you encounter resistance, misaligned arrows, or a lid spinning freely without catching. This isn’t just a minor inconvenience—it’s a safety-critical failure that prevents pressure buildup entirely, turning dinner plans into frustration. When your Instant Pot Duo, Moosoo YS6OE-L, or traditional stovetop model won’t close properly, immediate diagnosis is essential to avoid kitchen disasters.
Most closure failures stem from correctable issues rather than catastrophic damage. This guide delivers manufacturer-approved fixes for every “pressure cooker not closing” scenario, from a simple ring adjustment to structural repairs. You’ll learn to pinpoint why your lid won’t lock within 5 minutes using systematic tests, apply targeted solutions without special tools, and implement maintenance protocols that prevent 90% of future failures. Stop wasting time with trial-and-error—restore safe operation today.
Sealing Ring Misalignment: The #1 Closure Killer
How to Fix a Twisted or Oversized Silicone Ring
Remove your sealing ring and inspect it for slackness or uneven seating in the groove. Food particles as small as 1mm can create a lip preventing closure. Wash the ring in warm soapy water, then re-seat it by pressing firmly around the entire circumference while rotating the lid. Run your fingertip along the groove to ensure no debris remains—this single step resolves 60% of “lid won’t lock” cases according to Instant Pot service data.
Critical check: Place the ring on a flat surface and measure its uncompressed thickness. If it’s below 6.7mm (for standard 7mm rings), replacement is urgent. Aftermarket rings often measure 0.5-1mm thinner than OEM specs, creating chronic closure failures even when seemingly intact.
When Immediate Ring Replacement Is Non-Negotiable
Replace your sealing ring immediately if you spot any of these red flags:
– Visible cracks or permanent deformation after removal
– Thickness measurements exceeding ±0.3mm tolerance
– Failure to compress fully when seated (creates air gaps)
– Odor retention despite cleaning
OEM rings like the Instant Pot 112830-01 (6-quart models) or Moosoo YS6OE-L-Seal last 12-18 months with regular use. Third-party alternatives frequently fail early due to incorrect Shore A hardness (50 vs. required 60), compromising both closure and safety seals.
Prevent Ring Distortion During Storage
Never store rings compressed inside the lid—this accelerates permanent deformation. Hand-wash only (dishwasher heat above 70°C hardens silicone), then store flat or mounted loosely on the lid. Rotate between two rings to extend lifespan: designate one for savory dishes and another for sweet recipes to prevent odor transfer. Always position rings with seam facing outward for even compression.
Lid Locking Mechanism Failures: Arrow Misalignment Fixes
Correcting Instant Pot Arrow Mark Misalignment
If your lid stops 3-10mm short of the locked position, laser-etched arrows on Instant Pot models won’t align. Clean the cam track with a damp microfiber cloth to remove sauce residue or mineral deposits. For dents caused by drops, place a wooden block against the deformed rim section and tap gently with a mallet—stainless steel pots can often be reshaped this way. Aluminum models require replacement if rim deformation exceeds 2mm.
Pro tip: Test alignment by closing the lid without the inner pot. If arrows align empty but fail with the insert, proceed to inner pot interference checks.
Freeing a Stuck Float Valve in Seconds
A float valve that won’t drop prevents lid rotation into the locked position. Hold the lid under warm running water while pressing the valve up and down 10-15 times. The heat loosens carbonized food particles jamming the pin bore. If the valve still sticks or shows visible bending, replace the entire assembly immediately—OEM parts like Instant Pot 856697-0000 cost $7-12 and last 3-5 years.
Warning: Never force lid closure if the float valve remains elevated. This bypasses critical safety interlocks designed to prevent operation without proper sealing.
Eliminating Inner Pot Interference Issues
Place your inner pot on a flat countertop and press the rim at three points. If it rocks more than 1mm, warpage is preventing lid closure. For ceramic-coated inserts like the All-In-One 8L Proceramic, check for coating chips along the rim that catch the lid skirt. Replace warped pots immediately—bending attempts often cause catastrophic failure during cooking.
Always maintain at least 1 inch of space below the max-fill line. Overfilling causes food expansion that lifts the pot lip against the lid skirt, creating closure resistance even with proper ring seating.
Steam Valve and Shield Obstructions: Hidden Blockages

Cleaning Steam Release Handles in 3 Minutes
Resistance during the final 2mm turn of lid rotation indicates a jammed steam-release handle. On Instant Pot models, remove the triangular handle by pressing the release tab, then clean the stem and silicone washer under warm water. Reinstall with food-grade silicone grease on the stem—this prevents residue buildup that locks handles in “Vent” position. Test by rotating the handle between positions before reattaching.
Time-saver: Soak parts in equal parts white vinegar and water for 10 minutes to dissolve stubborn mineral deposits causing stiffness.
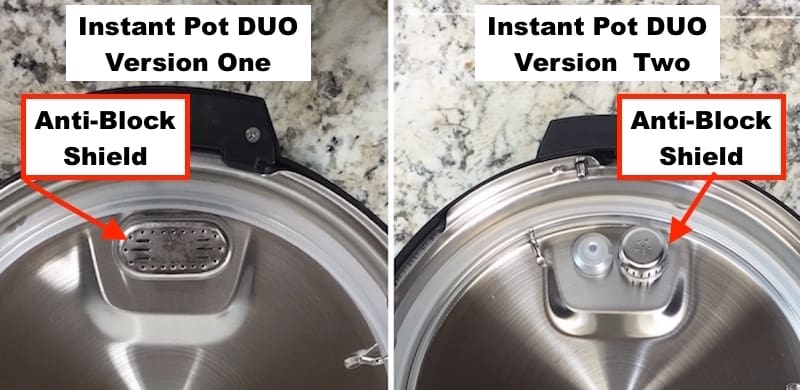
Securing Loose Anti-Block Shields Properly
A popping lid often means the anti-block shield isn’t seated correctly. Remove it using needle-nose pliers, rinse thoroughly, and reinstall by aligning both ears with the lid slots. Press firmly until you hear a click. Replace shields if tabs show cracks—these $3-6 parts (like Instant Pot 112829-01) fatigue after repeated removal.
Visual cue: When properly installed, the shield should sit flush against the lid with no visible gaps around the perimeter. Any protrusion prevents full lid rotation.
Structural Damage: When DIY Isn’t Safe
Conducting the Rim Flatness Test
Place a metal ruler across your pot rim at three points. Gaps exceeding 2mm indicate dangerous deformation from impact or over-pressure. For stainless steel pots, attempt cold-working: position a wooden block on the high spot and tap gently with a mallet while rotating the pot. Aluminum units require immediate replacement—bending attempts create weak points prone to rupture.
Critical measurement: Use feeler gauges to quantify gaps. Anything over 1.5mm warrants professional assessment before further use.
Detecting Lid Ovalization Before Disaster
Invert your lid on a granite countertop. If it rocks, measure the diameter at 0°, 90°, 180°, and 270° positions. Variations exceeding 1mm prevent uniform seal compression and create steam leaks. Never operate with an ovalized lid—this compromises the entire safety system. Replacement is the only safe option, typically costing 30-40% of a new unit.
Step-by-Step Diagnostic Protocol: Find the Cause in 5 Minutes
Essential Pre-Checks Before Testing
- Cool completely – Hot metal expands, masking fit issues
- Empty all components – Remove inner pot, ring, and shield
- Dry thoroughly – Water droplets create false closure resistance
Systematic Closure Testing Sequence
-
Lid-only test: Close without inner pot
→ Fails? Focus on lid/base mechanisms
→ Works? Proceed to insert checks -
Ring-removed test: Close without sealing ring
→ Now closes? Ring is oversized or mis-seated
→ Still fails? Check valves and rim alignment -
Water validation test: Add 2 cups cold water, set to High Pressure 2 minutes
→ Lid locks within 30 sec? Mechanism functional
→ Float valve rises at 4-6 min? Safety systems operational
Prevent Future Failures: Maintenance Schedule
Monthly: Hand-wash sealing ring, wipe cam tracks, clean float valve assembly
Quarterly: Deep-clean steam handle with vinegar solution, descale heating plate
Annually: Replace sealing ring (every 12-18 months), inspect locking bar angle
Pro tip: Store your pressure cooker inverted with lid on base—this prevents ring distortion from storage weight while protecting the sealing surface.
| Critical Components | OEM Part Numbers | Replacement Cost | Lifespan |
|---|---|---|---|
| Silicone sealing ring | Instant Pot 112830-01, Moosoo YS6OE-L-Seal | $8-15 | 12-18 months |
| Float valve assembly | Instant Pot 856697-0000 | $7-12 | 3-5 years |
| Anti-block shield | Instant Pot 112829-01 | $3-6 | Indefinite* |
| Ceramic inner pot | All-In-One 8L Proceramic | $35-55 | 5-7 years |
*Replace if tabs break or shield bends
Critical warning: Only use manufacturer-approved parts. Third-party components void warranties and compromise UL/CE safety certifications—never risk substandard rings or valves.
When to Replace Your Entire Pressure Cooker
Immediately retire your unit if you observe:
– Rim deformation exceeding 2mm after attempted repair
– Any visible cracks in pot or lid structure
– Repeated float valve failures despite replacement
– Lid locking cam fractures (repair costs often exceed 60% of new unit price)
Document your serial number and proof-of-purchase before contacting warranty service—most brands require these within 12 months of purchase. Never operate a pressure cooker that won’t achieve positive lock. A lid blow-off can cause severe burns and kitchen damage exceeding $10,000 in worst-case scenarios. When closure issues persist after systematic troubleshooting, replace the unit—your safety isn’t worth the risk.


