
Your stovetop rice keeps turning out gummy or burnt while you juggle dinner chaos. But the Instant Pot transforms this temperamental staple into a 15-minute miracle—no monitoring, no boil-overs, and zero guesswork. By locking in precise steam pressure, it delivers restaurant-quality grains with a satisfying chew that stays perfect for meal prep or tonight’s stir-fry. You’ll master exact water ratios, avoid common pitfalls like scorched bottoms, and unlock pro tricks for flavor-packed rice that reheats like fresh. Let’s turn your Instant Pot into a rice powerhouse.
Forget the days of sticky pots and unevenly cooked grains. The sealed pressure environment eliminates evaporation variables that ruin stovetop rice, while built-in sensors cut heat the moment grains reach ideal tenderness. Whether you’re batch-cooking brown rice for salads or whipping up jasmine for curry, this method guarantees separation and texture every single time. And the best part? It works flawlessly for beginners using the “Rice” button or experts tweaking manual settings.
Why Pressure Cooking Beats Stovetop for Perfect Rice
Traditional stovetop rice fails because steam escapes through lid gaps, burner intensity fluctuates, and humidity alters absorption. Your Instant Pot solves this by trapping 100% of steam in a sealed chamber, forcing uniform liquid penetration into every grain. The temperature never exceeds 250°F under pressure—hot enough to cook fast but cool enough to prevent scorching. This explains why users consistently report “separate, chewy grains” instead of the mushy clumps common on stovetops. Crucially, the natural pressure release (NPR) phase acts like a built-in resting period, letting residual steam finish cooking without waterlogging. Skip NPR, and you’ll face soggy disasters.
How White and Brown Rice React Differently Under Pressure
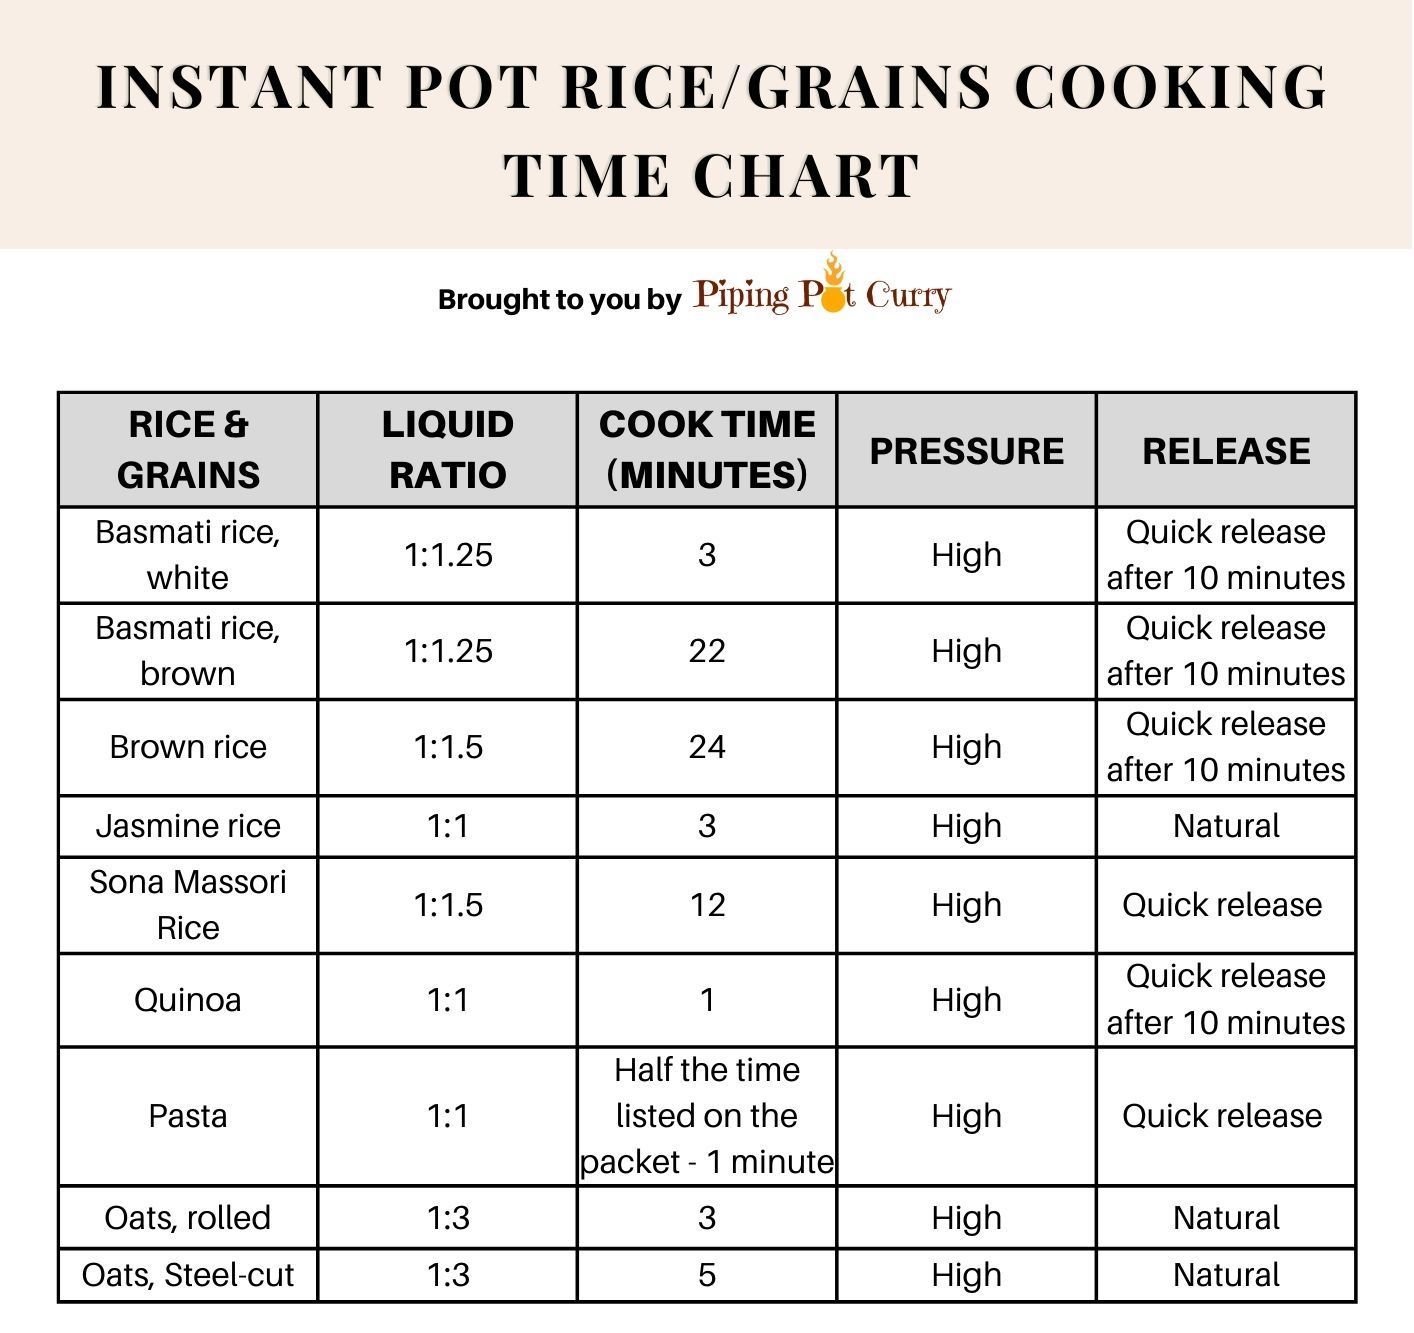
White rice’s polished surface absorbs liquid rapidly, needing just 3 minutes at high pressure. But brown rice’s fibrous bran layer resists softening, requiring 22 minutes at high pressure to achieve tenderness without chalkiness. Both use the same 1:1 water ratio, but brown rice demands the “Multigrain” or “Manual” setting—the gentler “Rice” button won’t generate enough sustained heat. Never skip NPR for either type; 10 minutes of resting ensures moisture redistribution. Rush this, and white rice turns gluey while brown rice stays crunchy at the core.
Exact Water-to-Rice Ratios for Flawless Results
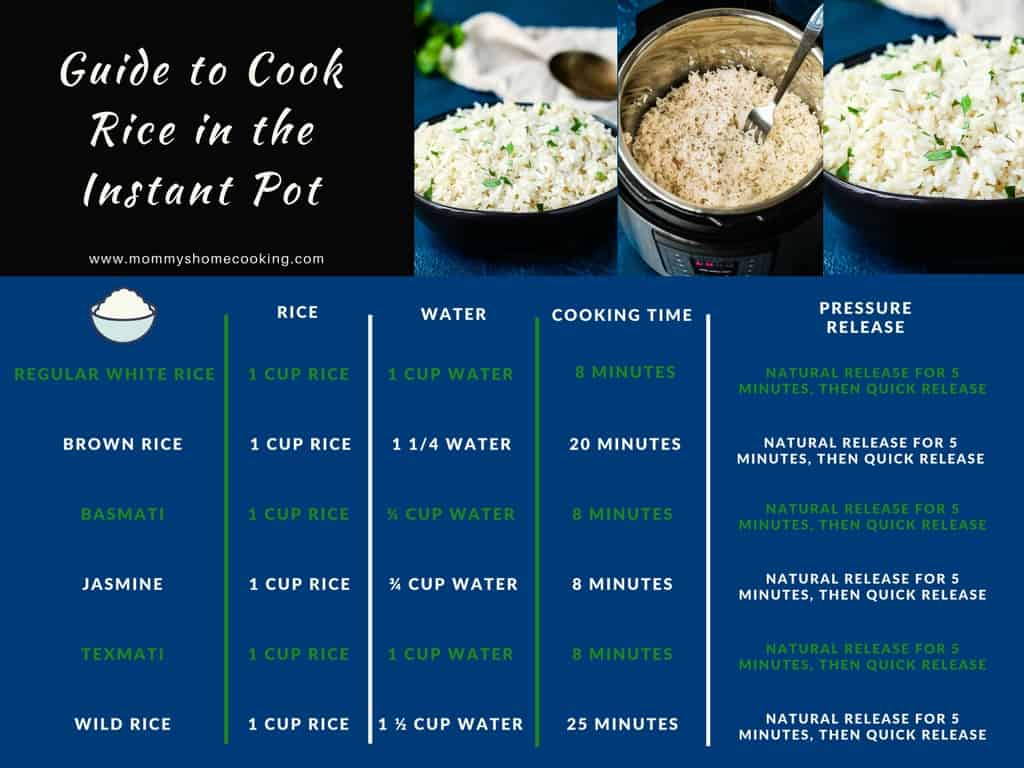
Forget confusing 1.5:1 or 2:1 ratios—consensus testing confirms 1:1 liquid-to-rice is the golden standard for Instant Pot success. Pour equal volumes of rinsed rice and liquid (water or broth) into your pot, and you’ll get consistently fluffy results. For flavor-infused batches like turmeric basmati, increase liquid to 1.08x (e.g., 3¼ cups for 3 cups rice) to compensate for added spices.
Critical Ratios by Rice Type
| Rice Variety | Liquid Ratio | 2-Cup Example | Pro Adjustment Tip |
|---|---|---|---|
| White (jasmine/basmati) | 1 : 1 | 2 cups : 2 cups | Add ¼ tsp salt + 1 Tbsp oil |
| Brown | 1 : 1 | 2 cups : 2 cups | Use “Multigrain” setting |
| Broth-based white | 1 : 1.08 | 3 cups : 3¼ cups | Opt for low-sodium broth |
Warning: One outlier source suggests 1:1.75 for long-grain white, but 90% of tests prove this creates mush. Stick to 1:1 for foolproof texture.
How to Cook White Rice in Instant Pot: Step-by-Step
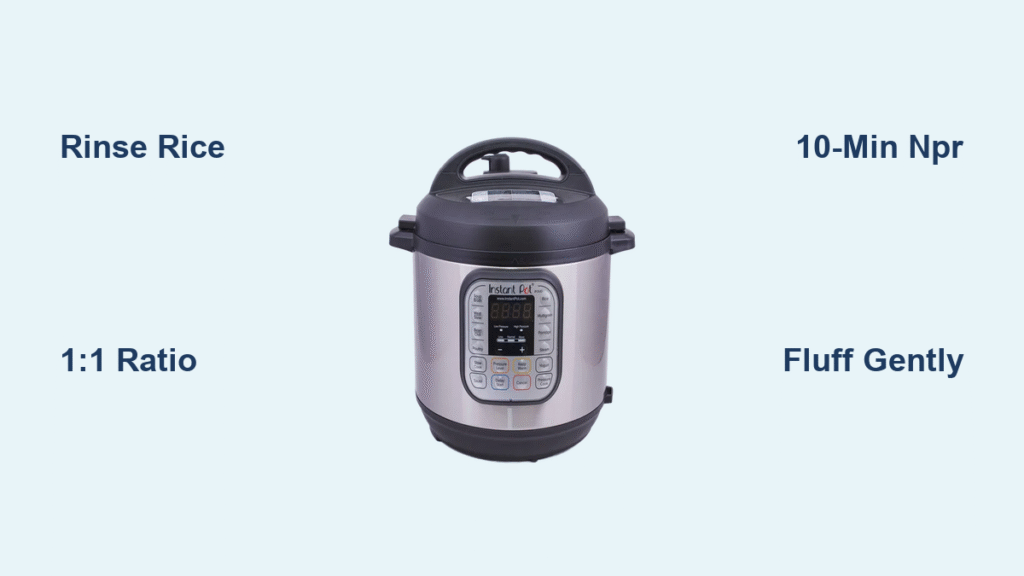
Rinse Until Water Runs Clear
Dump rice into a fine-mesh strainer and swish under cold water for 30–60 seconds. Rub grains between your palms until runoff turns transparent—this removes surface starch causing gumminess. Drain thoroughly; excess water throws off ratios.
Load and Level Without Stirring
Transfer rice to the stainless insert. Add measured liquid, salt, and oil (if using). Gently swirl the pot in circles—never stir—to distribute grains evenly. Stirring damages grains and creates uneven pockets that cook poorly.
Seal and Select the Right Setting
Lock the lid, ensuring the float valve is down, and set the steam valve to SEALING. Choose:
– “Rice” button for foolproof 12-minute auto-low pressure (ideal for beginners)
– Manual/HIGH pressure for 3 minutes for optimal texture (our top recommendation)
– Manual/LOW pressure for 15–17 minutes for firmer grains
Execute the Non-Negotiable 10-Minute NPR
When the timer beeps, walk away for exactly 10 minutes. This NPR phase completes cooking using trapped steam. Peeking or quick-releasing now causes sogginess. After 10 minutes, flip the valve to VENTING to release any leftover pressure.
Fluff Gently for Separated Grains
Open the lid away from your face to avoid steam burns. Slide a fork through rice from top to bottom—no vigorous stirring—to aerate without mashing. Serve immediately or spread on a baking sheet to cool for meal prep.
How to Cook Brown Rice Without Mushy Grains
Skip the “Rice” Button for Better Texture
Brown rice requires aggressive high pressure to soften its bran hull. Select Manual or Multigrain mode at HIGH pressure for 22 minutes—the “Rice” setting’s lower heat leaves grains undercooked. Rinse only briefly if desired; the bran layer minimizes excess starch, so skipping won’t cause gumminess.
Time Your Natural Release Precisely
After the 22-minute cook cycle, enforce a strict 10-minute NPR. Brown rice’s density means residual steam continues working during this phase. Quick-releasing too soon traps moisture, yielding a porridge-like consistency. Total time from start to finish: 40 minutes (8 minutes pressurization + 22 minutes cooking + 10 minutes NPR).
Instant Pot Size Rules: Avoid Overflow and Scorching
Never exceed half your pot’s depth with uncooked rice and liquid. Foaming during pressurization can clog the steam valve if overloaded, triggering “BURN” errors. Minimum batches prevent scorching—too little rice sits directly on the hot base.
Batch Limits for Perfect Cooking
| Pot Size | Minimum Rice | Ideal Range | Danger Zone |
|---|---|---|---|
| 3-qt Mini | 1 cup | 1–2 cups | >2 cups |
| 6-qt Standard | 1½ cups | 1½–3 cups | <1½ cups or >3 cups |
| 8-qt Large | 2 cups | 2–4 cups | >4 cups |
Pro tip: For 6-qt pots, always use ≥1½ cups rice. Smaller batches scorch; larger ones foam over. Remember: 1 cup dry rice = 3 cups cooked.
Flavor Boosters: One-Pot Aromatics and Spices
Sauté First for Depth of Flavor
Use Sauté mode before adding rice: Heat 1 Tbsp oil, then cook 1 minced garlic clove or shallot for 30 seconds until fragrant. Add rice and liquid—this toasts grains slightly, enhancing nuttiness.
Tested Spice Combinations
- Indian Basmati: ¼ tsp turmeric + pinch coriander + 1 tsp salt per 3 cups rice
- Tex-Mex Style: ½ tsp chili powder + lime zest stirred in after cooking
- Middle Eastern: 1 star anise + 3 crushed cardamom pods + ¼ tsp white pepper
Finish with fresh herbs like cilantro or scallions—they’ll wilt perfectly from residual heat without turning brown.
Storage & Freezing: Keep Rice Fresh for Days
Cool Rapidly to Stop Cooking
Spread hot rice on a rimmed baking sheet for 10 minutes. This halts carry-over cooking that makes grains mushy in containers. Transfer to airtight containers; refrigerate up to 3 days.
Freeze Like a Pro for Instant Meals
- Spread cooled rice on a baking sheet; freeze 15 minutes to prevent clumping
- Portion into 1–2 cup freezer bags (ideal for single servings)
- Press flat for stackable storage; keeps 3 months
- Reheat frozen portions with 2 Tbsp water—microwave 2 minutes or steam 5 minutes
Fix Common Rice Problems in 5 Minutes
| Problem | Immediate Solution | Prevention Tip |
|---|---|---|
| Wet/sticky rice | Quick-release steam after NPR | Always enforce full 10-minute NPR |
| Scorched bottom | Add ¼ cup water; restart NPR | Never cook <1½ cups in 6-qt pot |
| Undercooked center | Pressure cook HIGH 2 more minutes | Level rice evenly before sealing |
| Mushy grains | Drain excess liquid; crisp in skillet | Reduce liquid by ¼ cup next time |
Timing Cheat Sheet: White vs Brown Rice
| Rice Type | Pressure Level | Cook Time | NPR Time | Total Time |
|---|---|---|---|---|
| White | HIGH | 3 min | 10 min | ~18 min |
| White | LOW | 15 min | 10 min | ~28 min |
| Brown | HIGH | 22 min | 10 min | ~40 min |
Total time includes 8–10 minutes for pressurization. Brown rice requires HIGH pressure—LOW won’t soften the bran.
Perfect Instant Pot White Rice Recipe (4 Servings)
You’ll need:
– 2 cups white jasmine or basmati rice, rinsed until water runs clear
– 2 cups water or low-sodium broth
– ½ tsp kosher salt
– 1 Tbsp avocado oil (prevents sticking)
Follow these steps:
1. Rinse rice in a fine-mesh strainer under cold water for 45 seconds. Drain well.
2. Combine all ingredients in the 6-qt Instant Pot insert. Swirl gently to level—do not stir.
3. Lock lid, set steam valve to SEALING.
4. Select Manual/HIGH pressure for 3 minutes.
5. When timer beeps, wait 10 minutes before quick-releasing any remaining steam.
6. Fluff gently with a fork. Serve hot or cool for storage.
Final tip: Day-old Instant Pot rice is fried rice gold—grains stay distinct and reheat flawlessly. Freeze portions flat for instant weeknight meals.


