

Your pressure cooker displays “HEAt” while dinner grows cold. The unit builds pressure perfectly—steam hisses from the valve, the float valve pops up—but that crucial countdown timer refuses to budge. This pressure cooker timer not working nightmare affects thousands of home cooks daily, turning reliable appliances into expensive countertop decorations. Whether you’re staring at a flashing “–:–” display or watching “On” remain indefinitely, these failures share predictable causes and solutions.
This guide delivers immediate diagnostics for your stalled timer, distinguishing between simple user errors and genuine hardware failures. You’ll learn to perform the definitive water test, identify sensor malfunctions, and determine when professional repair becomes necessary—potentially saving hundreds in unnecessary replacements. Let’s solve your pressure cooker timer not working issue step by step.
Pressure Cooker Timer Failure Symptoms Decoded
Pressure Achieved, Timer Never Starts
Your cooker reaches full pressure—the float valve pops up, steam escapes rhythmically—but the display stubbornly shows “Heat” or “On” without switching to countdown mode. This represents the most common pressure cooker timer not working pattern across Instant Pot, NuWave, and other multi-cookers.
The unit continues heating indefinitely, risking burned food and potential safety hazards. Users report complete water evaporation occurring after 35 minutes of continuous heating without timer activation, indicating the pressure sensor isn’t communicating with the control board. This is your critical warning sign—the appliance thinks it hasn’t reached pressure despite clear evidence to the contrary.
Unable to Set Timer Manually
Control panels become completely unresponsive when attempting to program cooking time. Instead of accepting your input, the display shows “–:–” or flashes the delay indicator repeatedly. This symptom particularly affects NuWave Model 33101 units around 7 months of operation.
The buttons feel normal when pressed, but the system refuses to register any time settings. This suggests control board failure rather than simple button malfunction. Critical distinction: If other functions work but timer programming fails, you’re likely dealing with a software glitch rather than complete board failure.
Quick Visual Inspection Steps You Can Do Now
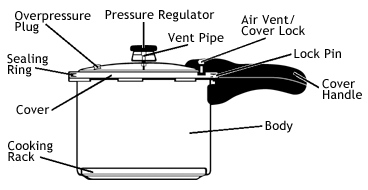
Check Pressure Release Valve Immediately
Immediate Action: Remove the pressure release valve and hold it to the light. Food particles, mineral deposits, or debris commonly obstruct the valve mechanism, preventing proper pressure buildup that triggers the timer.
Cleaning Process:
– Rinse under warm running water
– Use a soft brush to clear visible debris
– Ensure the valve moves freely when jiggled
– Check the valve seat inside the lid for obstructions
Inspect Sealing Ring Condition Thoroughly
Critical Check: Remove the silicone sealing ring and examine it carefully. A degraded or improperly seated ring causes slow pressure buildup, potentially confusing the sensor system. Look for cracks, deformation, or food residue preventing proper sealing.
Replacement Indicators:
– Visible cracks or tears
– Permanent deformation preventing proper seating
– Hardening or brittleness of silicone material
– Persistent food odors despite thorough cleaning
Standard Water Test Protocol for Timer Diagnosis
Perform This Essential Diagnostic Test
You Need: 1-3 cups of plain water, no food or seasonings. This eliminates variables from recipes or ingredients.
Setup Process:
1. Add water to inner pot (minimum 1 cup)
2. Ensure sealing ring properly seated
3. Lock lid completely until it clicks
4. Verify pressure release valve in “Sealing” position
5. Select “Manual” or “Pressure Cook” mode
What to Watch During Testing
Normal Operation Timeline:
– 0-10 minutes: “HEAt” or “On” displays during initial heating
– 10-15 minutes: Float valve pops up, steam release stops
– 15+ minutes: Timer should automatically begin countdown
Failure Indicators:
– “HEAt” remains beyond 20 minutes
– Water completely evaporates without timer activation
– No audible pressure indicators despite heating
– Steam continuously escapes from sides of lid
Pro Tip: Time your test with a kitchen timer. If water evaporates completely before the countdown starts (typically within 35 minutes), your pressure detection system has failed.
Pressure Sensor Diagnosis Without Special Tools
Understanding Sensor Function
The pressure sensor acts as your cooker’s “brain,” telling the control board when safe pressure levels are achieved. When this sensor fails, the unit continues heating indefinitely, waiting for a signal that never comes. This is the most common cause of pressure cooker timer not working issues.
Sensor Location: Typically mounted on the underside of the lid or within the main housing, connected via electrical contacts to the control board.
Testing Without Specialized Equipment
Visual Inspection Method:
– Unplug unit and allow complete cooling
– Remove inner pot and examine sensor area
– Look for corrosion, food debris, or bent contact pins
– Check electrical connections for looseness or damage
Functional Test Using Water:
– Perform standard water test
– Listen for clicking sounds near sensor area when pressure builds
– Note if unit shuts off heating element when manually releasing pressure
Control Board Solutions When Timer Fails
Power Cycling Reset Method
Immediate Fix Attempt: Unplug the pressure cooker for minimum 10 minutes. This allows the control board to fully reset, potentially clearing software glitches causing timer issues.
Step-by-Step Process:
1. Unplug unit from wall outlet
2. Wait exactly 10 minutes (longer doesn’t improve results)
3. Plug back in and attempt normal operation
4. If successful, repeat test to verify consistency
Moisture Damage Assessment
Warning Signs:
– Control panel displays random characters
– Buttons respond inconsistently
– Unit powers on/off unexpectedly
– Display flickering or dimming
Drying Protocol:
– Unplug immediately if moisture suspected
– Remove inner pot and invert unit for 48 hours
– Place in warm, dry location with good airflow
– Avoid rice or desiccant methods (they don’t work for this type of damage)
Safety Protocol During Timer Failures
Immediate Risk Assessment
Never Ignore These Signs:
– Burning smells during operation
– Control panel becoming extremely hot
– Unit continuing to heat after manual cancellation
– Smoke or electrical odors
Emergency Shutdown:
– Unplug unit immediately (don’t rely on controls)
– Never attempt to open lid while under pressure
– Allow complete cooling before inspection
– Document failure symptoms for warranty claims
Food Safety Concerns
Undercooked Food Risks: Timer failures can leave food in the “danger zone” (40-140°F) for extended periods, promoting bacterial growth. When in doubt, discard food rather than risk illness.
Testing Food Safety:
– Use instant-read thermometer to verify internal temperatures
– Re-cook questionable food using alternative methods
– When timer fails, assume food reached unsafe temperatures
Warranty and Repair Pathways
Manufacturer Support Process
Standard Coverage: Most brands provide 12-month warranty covering manufacturing defects, including sensor and control board failures. Documentation from your troubleshooting attempts strengthens warranty claims.
Contact Process:
– Locate model and serial numbers (usually on bottom)
– Have purchase receipt ready
– Document failure symptoms with dates
– Take photos of error displays if possible
When Replacement Becomes Necessary
Decision Factors:
– Unit age beyond warranty period
– Repair costs exceeding 50% of replacement price
– Multiple component failures
– Discontinued model with unavailable parts
Preventive Maintenance Schedule
Monthly Inspection Routine
Sealing Ring Care:
– Remove and wash with warm, soapy water
– Check for cracks, deformation, or odors
– Replace immediately if any damage found
– Keep spare ring on hand for emergencies
Valve Cleaning Protocol
After Each Use:
– Remove pressure release valve completely
– Rinse under warm water, checking for debris
– Ensure smooth valve movement
– Clean valve seat inside lid thoroughly
Model-Specific Troubleshooting

NuWave Model 33101 Specific Fixes
Unique Symptoms:
– Delay function flashes continuously
– “–:–” display prevents timer setting
– Control panel total unresponsiveness
– Failure typically occurs at 7 months operation
Special Considerations:
– This model shows higher early failure rates
– Warranty claims process more streamlined
– Control board replacement most common fix
Quick Decision Guide for Pressure Cooker Timer Not Working
Fix or Replace Decision Matrix
Fix Immediately:
– Sealing ring degradation (easy replacement)
– Valve blockage (simple cleaning)
– Power cycling reset successful
Professional Evaluation Needed:
– Consistent sensor failure symptoms
– Control board moisture damage
– Intermittent timer operation
Replace Unit:
– Out of warranty with major component failure
– Multiple system failures
– Repair costs exceed replacement value
Key Takeaway: When your pressure cooker timer not working issue strikes, start with simple diagnostics like the water test and visual inspections. Most timer failures stem from pressure sensor issues or control board malfunctions that either require professional repair or reveal the need for replacement. Regular maintenance—especially monthly sealing ring checks and post-use valve cleaning—prevents 90% of timer failures. If basic troubleshooting fails, professional evaluation becomes necessary for safety and warranty compliance. Remember that persistent timer issues often indicate deeper component problems that shouldn’t be ignored, as they can compromise both food safety and appliance longevity.


