
Tired of spending hours cooking meals that end up mediocre? Your Moosoo pressure cooker can transform tough cuts of meat into succulent masterpieces in under an hour, but only if you know how to use it properly. Many new owners make critical mistakes during their first attempts—overfilling the pot, using the wrong pressure release method, or overlooking simple safety checks that could lead to disappointing results or even safety hazards.
With the right guidance, you’ll unlock the full potential of your YS60Y-L-P or Smart Pot model within days. This practical guide cuts through the confusion and delivers exactly what you need to know to safely operate your Moosoo pressure cooker from unboxing to serving your first perfect meal. Let’s transform that intimidating kitchen appliance into your most valuable cooking tool.
Unbox and Setup YS60Y-L-P
Before you plug in your new pressure cooker, proper setup prevents frustration and ensures safety during your first cooking session. The YS60 series designation indicates your model has a 6-quart capacity, suitable for 4-6 person households.
Remove All Packaging Materials
Take inventory of your YS60Y-L-P components: inner pot, lid assembly, condensation collector, measuring cup, rice paddle, soup ladle, and steaming rack. Carefully remove all protective films from the control panel and check for plastic wrap covering the heating element. Manufacturers often tuck small accessories beneath the inner pot, so lift it out completely to verify nothing’s missing.
Clean Every Component
Wash the stainless steel inner pot, lid, and all accessories in warm soapy water before first use. Pay special attention to the silicone sealing ring—remove it from the lid groove and wash separately to eliminate manufacturing residues that could affect your first meal’s flavor. Rinse thoroughly and dry all components completely, as moisture can interfere with the pressure building process.
Check Critical Components
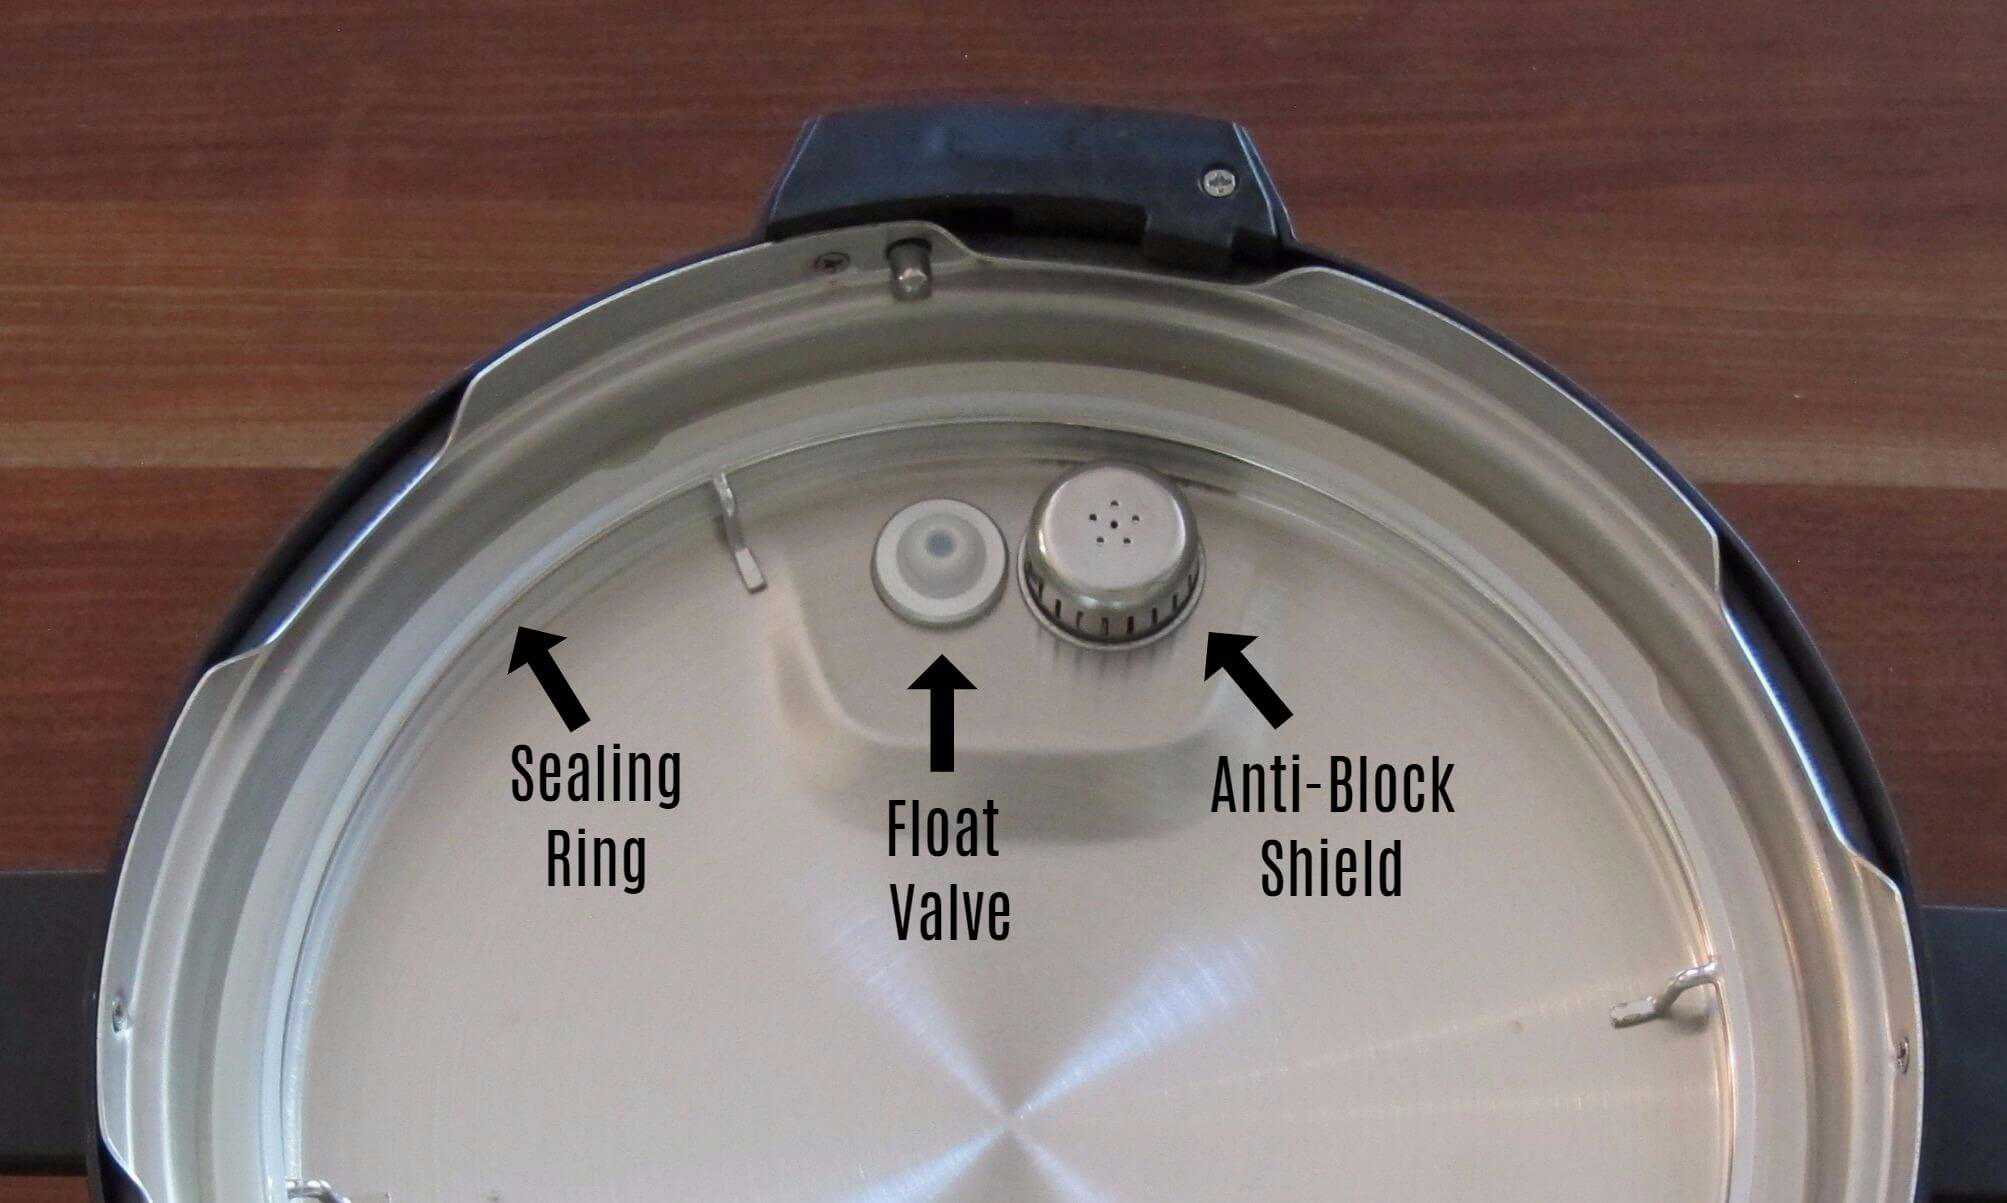
Verify three essential safety features before your first cooking cycle: ensure the sealing ring sits properly in its groove without twists, confirm the pressure release valve moves freely between positions, and check that the float valve (small metal pin near the valve) springs up and down without sticking. These components work together to maintain safe pressure levels during cooking.
Essential First-Time Safety Steps
Your Moosoo pressure cooker incorporates multiple safety systems, but they only function correctly when properly maintained and used according to established protocols.
Verify Sealing Ring Placement
The silicone sealing ring creates the airtight environment necessary for pressure cooking. Press it firmly into the metal ring holder until it sits snugly without gaps or twists. A compromised seal allows steam to escape, preventing the cooker from reaching proper pressure. If the ring shows cracks or feels brittle, contact Moosoo support immediately—this component is critical for safe operation.
Test Pressure Release Valve
The valve on your lid should move smoothly between “Sealing” and “Venting” positions with a distinct click. If it feels sticky, run warm water over it while gently moving it back and forth to remove any manufacturing residue. Never force a stuck valve, as this indicates it needs cleaning or replacement before safe operation.
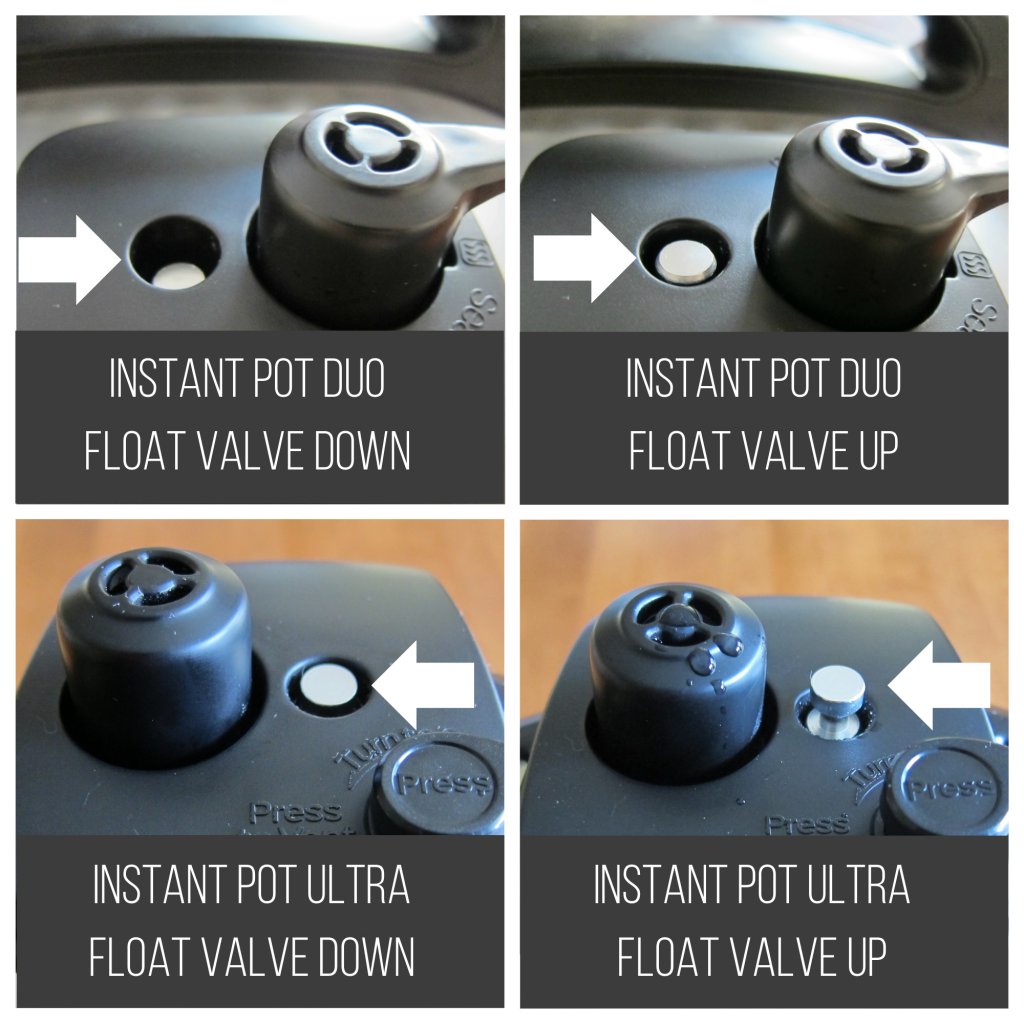
Confirm Float Valve Function
That small metal pin near the pressure release valve should spring up when pressed and drop back down freely. This valve indicates when your cooker has reached pressure and prevents the lid from opening prematurely. Use a toothpick to gently clear any debris if it’s not moving freely, as a stuck float valve prevents proper pressure indication.
Basic Operation Sequence
Master this six-step process to use your Moosoo pressure cooker correctly for any recipe, from simple rice to complex stews.
Step 1: Add Ingredients Correctly
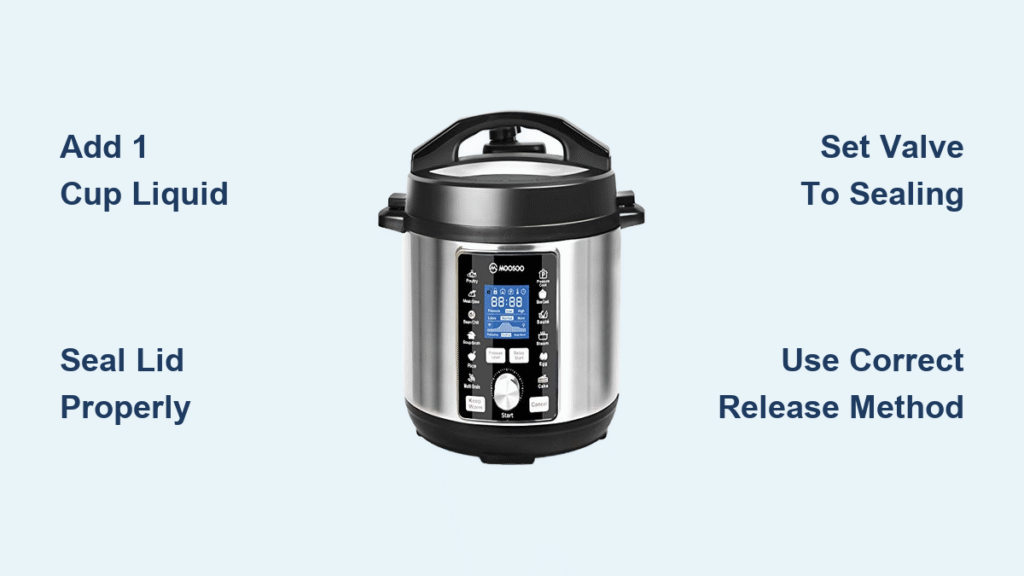
Always add at least 1 cup of liquid first—your YS60 model needs this minimum amount to create sufficient steam for pressure building. Place food in the inner pot while staying below the 2/3 full line for most foods or 1/2 full for expanding ingredients like rice or beans. Overfilling can cause clogs in the pressure release system.
Step 2: Secure the Lid Properly
Align the arrow marks on the lid and base, then turn clockwise until you hear a distinct click. The lid handle should sit directly over the cooker handle. If resistance occurs, check for obstructions and ensure the sealing ring is properly seated—forcing a misaligned lid risks damaging the safety mechanisms.
Step 3: Set Pressure Release Valve
For pressure cooking, turn the valve to “Sealing.” For slow cooking or keeping food warm, set it to “Venting.” This small but crucial detail determines whether your cooker builds pressure—many beginners overlook this step and wonder why their food isn’t cooking properly.
Step 4: Select Cooking Program
Your YS60Y-L-P offers preset programs like “Rice,” “Meat/Stew,” “Bean/Chili,” and “Manual.” For initial use, stick with presets—they’ve been optimized for timing and pressure levels. Manual mode provides full control but requires more experience to master.
Common First-Meal Mistakes
Avoid these predictable errors that ruin meals and create safety hazards for new pressure cooker users.
Overfilling the Inner Pot
The most frequent beginner mistake is exceeding the maximum fill lines. Rice swells, beans foam, and stews bubble significantly under pressure—always leave room for expansion. When in doubt, fill less rather than more. You can always cook a second batch if needed.
Insufficient Liquid
Your Moosoo needs steam to create pressure, and steam comes exclusively from liquid. Always add at least 1 cup of thin liquid (water, broth) regardless of recipe size. Thick sauces or tomato paste alone won’t generate enough steam for proper pressure building.
Wrong Pressure Release Method
Using quick release for tough cuts of meat results in chewy, dry texture. Conversely, natural release for delicate vegetables creates mush. Match the release method to your food: natural release (10-20 minutes) for meats and beans; quick release for vegetables and rice.
Troubleshooting Common Issues
Address these frequent problems that new Moosoo pressure cooker users encounter.
Unit Won’t Reach Pressure
If your cooker heats but the float valve never pops up, check these critical issues: insufficient liquid (add minimum 1 cup), improperly seated sealing ring (remove and reinstall), valve set to Venting (turn to Sealing), or food stuck on the bottom (clean and restart).
Steam Leaks Around Lid
Small wisps of steam during initial heating are normal, but steady leaks indicate problems: food debris on the sealing ring (remove, wash, reinstall), ring installed upside down (flat side goes up), warped or damaged ring (replace immediately), or inner pot not centered (reposition carefully).
Maintenance for Longevity
Extend your pressure cooker’s documented 4+ year lifespan with these simple maintenance habits.
Daily Cleaning Routine
After each use: remove and wash the inner pot, wipe the heating element (when cool) with a damp cloth, clean the condensation collection cup, check the sealing ring for food debris, and verify the pressure valve moves freely. Neglecting these steps leads to premature failure of critical components.
When to Replace Parts
Unlike some brands, Moosoo doesn’t offer replacement parts for major components. However, you can extend your cooker’s life by replacing consumable items: replace the sealing ring annually or if cracked/stretched, replace the inner pot if scratched or warped, and clean the condensation cup regularly to prevent mold buildup.
Model-Specific Considerations
Understand your specific model to avoid confusion during setup and operation.
YS60Y-L-P Features
This standard model includes basic presets and manual control with a simple button interface. Focus on mastering manual mode—it offers more versatility than presets once you understand timing requirements for different foods.
YS60K-L Smart Pot Differences
The Smart Pot variant offers app connectivity and additional presets but follows the same basic operation sequence. The documented heating failure after 4 years applies to both models, emphasizing the importance of proper maintenance regardless of smart features.
Maximize Your First Month
Accelerate your learning curve with these practical strategies for new Moosoo pressure cooker owners.
Keep a Cooking Log
Track what works: liquid ratios for different foods, natural versus quick release preferences, cooking times for favorite recipes, and seasoning adjustments needed. This log becomes invaluable as you expand your pressure cooking repertoire.
Build Confidence Gradually
Week 1: Stick to rice, beans, and simple stews
Week 2: Try chicken thighs and vegetables
Week 3: Experiment with pasta dishes
Week 4: Attempt your favorite slow cooker recipes
Pro Tips from Experience
Pre-heat meats by searing first for better flavor development, layer ingredients with longer-cooking items on the bottom, use broth instead of water for instant flavor boosts, and account for carryover cooking as food continues to cook during natural pressure release.
Your Moosoo pressure cooker will revolutionize weeknight cooking when used correctly. Start simple with basic recipes, master the fundamentals of pressure building and release, and gradually expand your repertoire. With consistent maintenance—including regular sealing ring inspections and pressure valve cleaning—you’ll enjoy reliable performance for years, even though manufacturer support is limited after the 1-year warranty period. The key to success lies in understanding these operational principles from day one and respecting the appliance’s safety mechanisms.


