

You just brought home your first pressure cooker and it’s sitting on your counter like a mysterious spaceship that might explode. Take a deep breath—modern pressure cookers are safer than your smartphone and can cut your cooking time by two-thirds. This guide walks you through exactly how to use a pressure cooker for beginners, from unboxing your appliance to serving perfectly cooked meals that’ll impress even your pickiest dinner guests. In just one week, you’ll transform from nervous newbie to confident pressure-cooking pro.
Modern pressure cookers work by trapping steam to increase internal pressure, raising the boiling point from 212°F to 250°F. This super-heated steam penetrates food fibers at lightning speed, turning tough cuts of meat tender in minutes instead of hours. Contrary to those scary stories from the 1970s, today’s models have multiple safety features including automatic pressure release valves and locking lids that won’t open until pressure is completely released. Whether you bought an Instant Pot or a stainless steel stove-top model, you’re about to discover why pressure cooking is the best kitchen upgrade you’ll make all year.
Why Modern Pressure Cookers Won’t Explode (And How They Actually Work)
Your pressure cooker isn’t a time bomb—it’s a precision engineering marvel that uses basic physics to cook food faster. When you seal the lid, steam builds up inside the pot, increasing pressure to 10-15 psi. This raises the boiling point of water from 212°F to 250°F, allowing food to cook at higher temperatures without burning. The result? A tough beef chuck roast transforms from chewy to fork-tender in 45 minutes instead of 3 hours.
Modern safety features make pressure cooking safer than conventional stovetop cooking. Multiple redundant valves automatically release excess pressure, while interlocking lids physically prevent opening until pressure drops to zero. Electric models like Instant Pots even monitor temperature 100 times per second and shut off automatically if anything seems off. These aren’t your grandmother’s pressure cookers—they’re designed by engineers who understand your fear of kitchen explosions.
Choosing Your First Pressure Cooker: Electric vs Stove-Top Showdown
6-Quart vs 8-Quart: Which Size Fits Your Kitchen?
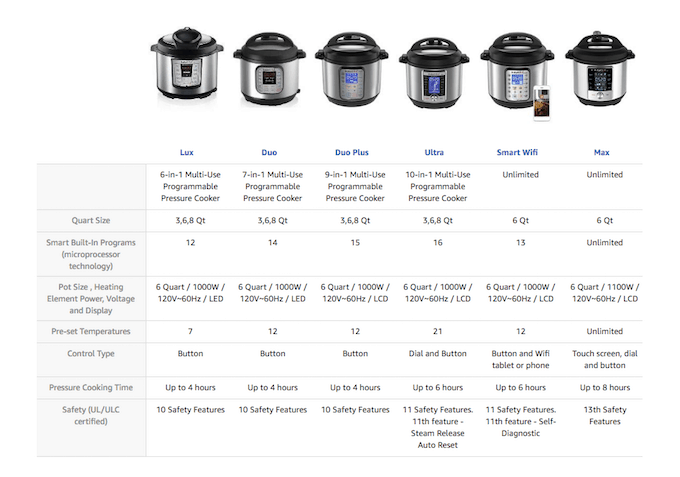
For most beginners, a 6-quart electric pressure cooker is the sweet spot—it handles whole chickens up to 4 pounds and serves 2-4 people comfortably. If you’re cooking for a family of 4+ or love batch cooking, jump to 8-quart. Never exceed the ⅔ fill line for most foods or ½ full for foamy items like beans and rice, as overfilling is the #1 cause of steam leaks for beginners.
Electric Models: The Set-and-Forget Advantage
Electric pressure cookers like the Instant Pot Duo are perfect for beginners because they automatically regulate pressure and temperature. Just add ingredients, press a button, and walk away—no monitoring required. They take slightly longer to reach pressure (5-15 minutes) but eliminate the learning curve of managing burner temperatures. Look for models with stainless steel inner pots and dual pressure settings (high/low) for maximum versatility.
Pre-Use Safety Checklist: 5 Steps to Prevent Steam Leaks
Before every cooking session, spend 30 seconds on these critical safety checks:
- Gasket inspection: Remove the rubber seal, rinse under warm water, and check for cracks or food debris
- Valve check: Ensure the float valve moves up and down easily with gentle pressure
- Steam path verification: Confirm the steam-release valve isn’t clogged with mineral deposits
- Body scan: Look for dents or warping on the pot that could prevent a proper seal
- Fill verification: Double-check you’re below maximum fill lines and have added at least 1 cup of liquid
Why Liquid Requirements Are Non-Negotiable
Every pressure cooker needs a minimum of 1 cup of thin liquid (water, broth, etc.) to generate sufficient steam. Compact models may work with ¾ cup, but never attempt “dry” cooking—without adequate moisture, you’ll trigger burn messages or damage your cooker. For longer cooking times (over 30 minutes), add an extra ¼-½ cup of liquid to account for evaporation.
First-Time Setup: From Unboxing to Perfectly Sealed Lid
Step 1: Season and Brown for Maximum Flavor
Add 1-2 tablespoons of oil to your pot and use the “Sauté” function (electric) or medium-high heat (stove-top). Brown meats until golden—this caramelization creates deep flavors you can’t get otherwise. Deglaze the pot with ¼ cup broth or wine, scraping up all browned bits to prevent “Burn” messages on electric models.
Step 2: Load Ingredients Like a Pro
Layer ingredients strategically: dense vegetables like carrots go on the bottom, meats in the middle, delicate items like broccoli on top. Always stay below the maximum fill line—this prevents dangerous clogs and ensures even cooking. For steaming, place food in a steamer basket with at least 1 cup of liquid below.
Step 3: Seal and Pressurize Without Panic
For electric cookers: twist the lid until it clicks into place, set the valve to “Sealing,” select your program, then set the time. The unit heats for 5-15 minutes until the pressure indicator pops up. For stove-tops: align the lid arrows, twist to lock, close the pressure valve, then heat on high until steam flows steadily before reducing to maintain pressure.
Mastering Pressure Release: Natural vs Quick Release Explained
Natural Release (NR): The Secret to Perfect Meats
Turn off the heat or press “Cancel,” then wait 10-30 minutes for pressure to drop naturally as the cooker cools. This slow release prevents toughening of meats and allows flavors to meld. Always use NR for meats, beans, rice, and any foamy foods—rushing this step causes sputtering messes and undercooked centers.
Quick Release (QR): When You Need Dinner Now
Carefully turn the valve to “Venting” (electric) or hold the cooker under cold running water (stove-top only). Always cover the valve with a folded towel and keep your face away—escaping steam can reach 250°F. Use QR only for vegetables, eggs, and seafood that overcook quickly. For best results, try a combination method: start with 10 minutes of NR, then finish with QR.
Food-Specific Timing Charts: No More Undercooked Chicken
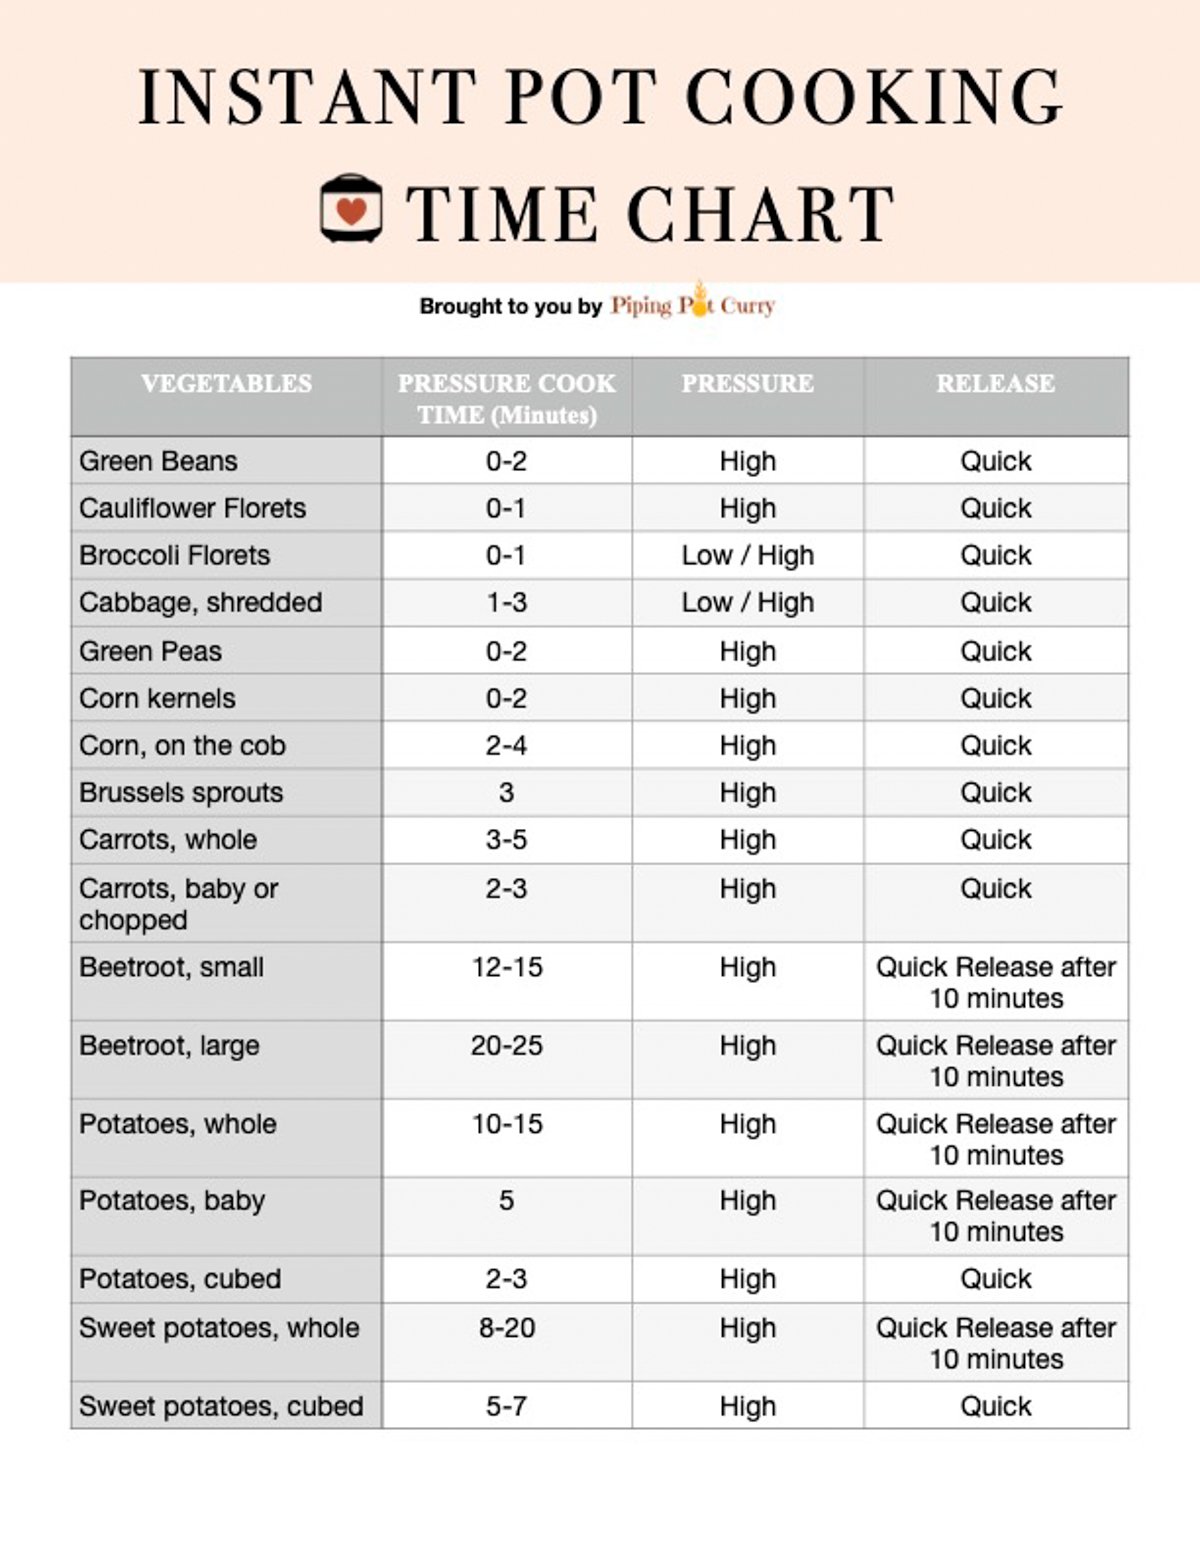
Vegetables (High Pressure, QR)
– Broccoli florets: 2 minutes + 1 minute NR
– Carrot slices: 1-2 minutes + 0 minutes NR
– Whole new potatoes: 5-7 minutes + 5 minutes NR
– Corn on cob: 3-4 minutes + 0 minutes NR
Proteins (High Pressure, NR)
– Chicken pieces: 10-12 minutes + 10 minutes NR
– Whole 4-lb chicken: 20 minutes + 15 minutes NR
– Beef chuck roast: 40-60 minutes + 15 minutes NR
– Pork shoulder: 60-90 minutes + 15 minutes NR
Grains and Legumes
– White rice: 3 minutes + 10 minutes NR
– Brown rice: 15 minutes + 10 minutes NR
– Soaked black beans: 25-30 minutes + 20 minutes NR
– Unsoaked chickpeas: 45-50 minutes + 20 minutes NR
Troubleshooting Common Beginner Mistakes
“Steam Leaks Around the Lid” Fix
Your gasket is dirty or misaligned—remove it completely, wash with warm soapy water, and reseat it properly. Check the pot rim for stuck food particles; anything thicker than a grain of rice breaks the seal. For persistent leaks, replace the gasket (they typically last 12-18 months with regular use).
“Burn Message on Electric Models” Solution
Thick sauces or scorched bottoms trigger this safety feature. Quick-release immediately, scrape the bottom clean with a wooden spoon, add more thin liquid, and restart. Next time, layer sauces on top instead of the bottom, and always deglaze thoroughly after browning.
Your First Three Foolproof Recipes (Ready in Under 30 Minutes)
Perfect Hard-Boiled Eggs in 10 Minutes
Place 1 cup water in the pot with steamer basket. Add 6 eggs, seal, and cook on high pressure for 5 minutes. Quick release, then plunge eggs into ice water for 5 minutes. Shells slide off effortlessly every time—no more ruined Easter egg hunts.
No-Soak Black Beans for Meal Prep
Combine 1 cup black beans, 3 cups water, 1 teaspoon salt, and 1 bay leaf. Cook on high pressure for 30 minutes with natural release for 20 minutes. Drain and use in tacos, salads, or soups all week—no overnight soaking required.
Weeknight Chicken & Rice in 25 Minutes
Brown 1 lb chicken thighs with 1 tablespoon oil. Add 1 cup chicken broth, 1 cup rice, 1 teaspoon salt. Seal and cook on high pressure for 8 minutes with 10 minutes natural release. Fluff rice and serve—complete meal with zero babysitting.
Converting Slow Cooker Recipes: The 4:1 Time Conversion Formula
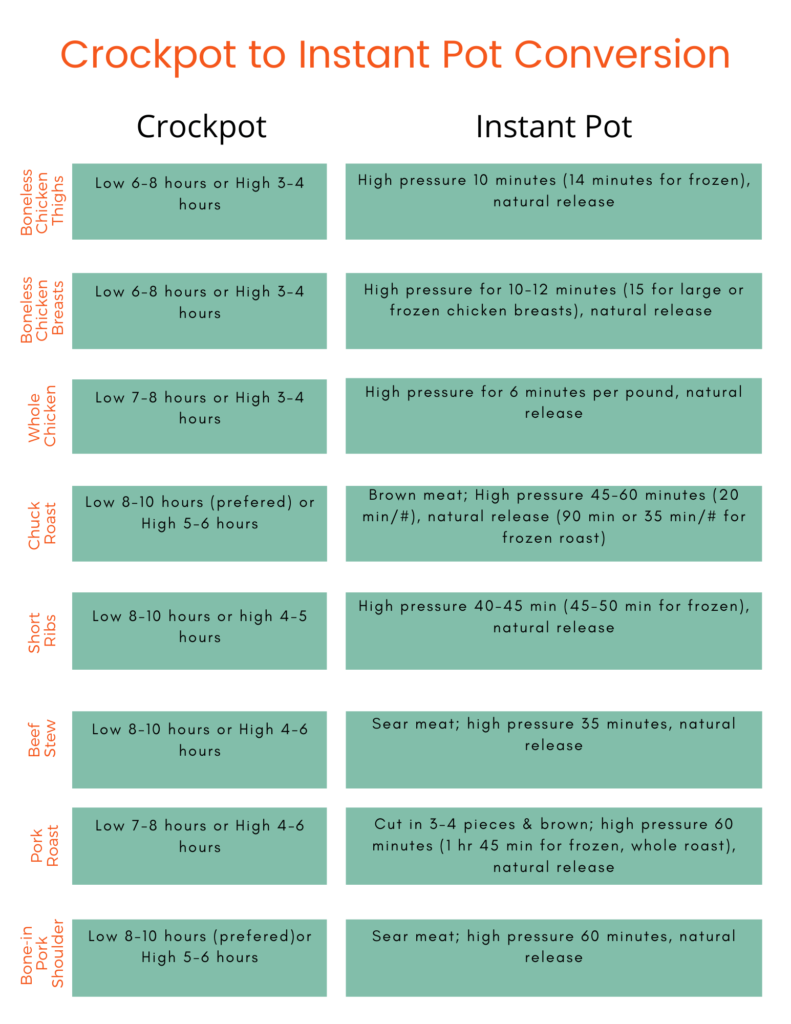
Divide slow-cooker time on LOW by 4 to get pressure-cooker minutes. A 4-hour slow-cooker recipe becomes 60 minutes under pressure. Reduce liquid by ½-1 cup since pressure cookers lose less to evaporation. For even cooking, place dense root vegetables (carrots, potatoes) on the bottom, proteins in the middle, and quick-cooking items on top—this prevents mushy vegetables while ensuring meats cook through completely.
Your pressure cooker will become your kitchen’s MVP within a week. Start with simple recipes like hard-boiled eggs or rice to build confidence, then graduate to full meals. Remember: modern pressure cookers want to help you succeed—they’re designed by engineers who also hate overcooked vegetables. Keep this quick reference card handy: Gasket clean? Valve moves? Fill ≤⅔? Minimum 1 cup liquid? Get these right, and you’ll unlock faster, healthier, more flavorful meals with minimal effort. In no time, you’ll wonder how you ever cooked without this kitchen powerhouse.


