
You just pulled your Ninja Foodi from the box, but the control panel looks like mission control. That “BURN” warning during your first attempt? We’ve all been there. Setting pressure cycles shouldn’t require an engineering degree—especially when you’re starving after a long day. This guide cuts through the confusion with exact steps to program any pressure-cook cycle flawlessly. No more guessing about valve positions or liquid minimums. By the time you finish reading, you’ll confidently launch pressure programs while avoiding the top 5 beginner mistakes that ruin meals.
Position Your Ninja Foodi for Flawless Pressure Building
Slap your Foodi next to the wall? That’s your first mistake. Steam needs an escape route or it’ll warp cabinets and trigger safety shutdowns. Place your unit on a dry, level surface with 5 full inches of clearance on all sides and above. This isn’t optional—it prevents steam from hitting cabinets and keeps the pressure-release valve completely unblocked. Never tuck it into a tight counter corner where heat recirculates.
Critical Pre-Use Component Check
Before adding food, verify these 5 parts are correctly installed:
– Inner pot snapped flush onto the heating plate (wobble = poor heat transfer)
– Silicone sealing ring fully seated in the pressure lid’s groove (press until no gaps)
– Pressure lid (not the crisping lid!) aligned with base arrows before twisting shut
– Black pressure-release valve movable between SEAL and VENT positions
– Condensation collector clipped to the rear base (catches drips during cooking)
First-Time Water Test Cycle
Skip this and risk scorching your first meal. After washing all parts:
1. Fill inner pot with 2 cups water only (no food!)
2. Set pressure lid to SEAL position
3. Program HIGH pressure for 2 minutes
4. Perform quick release after cooking
This flushes manufacturing oils and confirms your seal works—steam should jet steadily from the valve.
Decipher the Control Panel in Under 30 Seconds

That cluster of buttons? You’ll touch only 4 for pressure cooking. Forget Bake/Roast and Broil—they’re irrelevant here. Focus solely on:
– Pressure button (your launchpad for all pressure cycles)
– TIME arrows (adjust cooking duration)
– Pressure Level toggle (switch between HIGH/LOW pressure)
– START/STOP (initiates or cancels programs)
What Those Blinking Lights Actually Mean
Stop guessing whether it’s working. Watch these display cues:
– “On” + rotating dashes = pre-heating (takes 5-15 minutes)
– Solid red circle = actively building pressure (do NOT open!)
– Countdown timer = cooking officially started (red float valve popped up)
– “LID” error = pressure lid misaligned (reseat until arrows click)
– “WATR” warning = less than 1 cup liquid (immediately cancel and add broth)
Avoid These 3 Pre-Pressure Setup Errors
Skipping any of these guarantees a failed cook or safety alert. Do them in this exact order every time.
Why Your Liquid Must Be Thin and Measured
Minimum 1 cup of water, broth, or wine—no exceptions. Cream-based sauces, tomato paste, or milk alone will scorch and trigger “BURN.” For Pot-in-Pot cooking (like rice in a bowl), liquid still goes below the trivet in the inner pot. Never reduce liquid to “concentrate flavors”—that’s how you ruin dinners.
Sealing Ring Installation That Actually Seals
That silicone ring isn’t just tossed in. Line up its tab with the arrow on the lid rim, then press firmly all around until completely flat. After 5 uses, remove it, wash with soapy water, and sniff—if it smells like last night’s chili, swap it for a dedicated “sweet” ring. A crooked ring = steam leaks = no pressure buildup.
Valve Position: SEAL vs. VENT Lifesaver Check
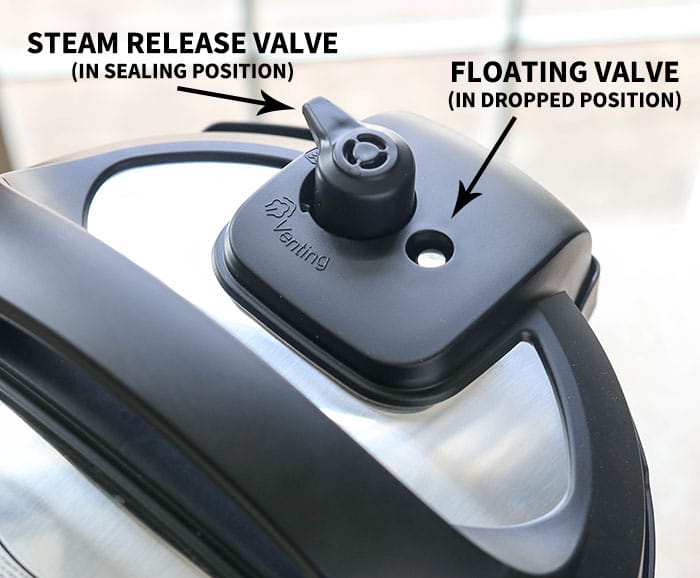
SEAL is non-negotiable for pressure cooking—push the black valve lever all the way back. If it’s even slightly forward, steam escapes and the red float valve won’t rise. After sealing, press down on the lid to ensure it’s locked. The second you hear hissing or see the red button pop up? You’ve got pressure.
Program Any Pressure Cycle: 7-Step Setup Flow
Follow this sequence like muscle memory. Deviate and you’ll get errors.
- Add ≥1 cup thin liquid + food to inner pot (no more than ⅔ full)
- Snap pressure lid on until arrows align—twist clockwise with firm pressure
- Push valve to SEAL (lever clicks backward against the stop)
- Press Pressure button (defaults to HIGH; toggle once for LOW)
- Set time using TIME arrows (e.g., 8 minutes for chicken)
- Hit START/STOP—unit says “On” during pre-heat
- Wait for red float valve to rise—only then does countdown begin
Adjusting Time After Hitting Start
You have 5 seconds to tweak settings. See the time is too short? Press TIME arrows immediately after START. Miss that window? Cancel (STOP), reset, and restart—don’t force changes mid-cycle.
Water Test Cycle Verification
If your first cook fails, run this diagnostic:
– 2 cups water → HIGH pressure → 2 minutes → Quick release
Steam should blast steadily for 30-60 seconds. Weak steam? Reseat the sealing ring. No steam? Check valve position.
Altitude Adjustments: When to Add Cooking Time
Don’t blindly follow recipes if you live above 3,000 feet. Water boils cooler at elevation, so food cooks slower under pressure. Add 5% more time per 1,000 feet:
– At 4,000 ft? A 10-minute recipe becomes 11 minutes
– At 6,000 ft? Add 15% (e.g., 10 minutes → 11.5 minutes)
Below 3,000 ft? Skip adjustments—the Foodi auto-compensates.
Pressure Release: Choose the Right Method for Your Food
Releasing pressure wrong turns tender chicken into rubber. Match the method to your dish.
Quick Release (QR) for Vegetables & Delicate Foods
- How: Slide valve to VENT with oven mitt (steam shoots sideways!)
- When: After timer ends for potatoes, eggs, veggies
- Time: 30-90 seconds until red float drops
- Warning: Keep face/hands clear—steam burns instantly
Natural Release (NR) for Meats & Beans
- How: Walk away—do nothing for 10-45 minutes
- When: Large roasts, whole chickens, dried beans
- Why: Prevents meat from seizing up; lets beans finish softening
- Pro Tip: Set a phone timer so you don’t forget!
Hybrid Release: Best of Both Worlds
- How: NR for 10 minutes → QR to finish
- When: Chicken breasts, pork chops, fish
- Result: Juicy texture without overcooking
Fix These 5 Pressure Cooking Failures Immediately

| Symptom | Real-Time Fix |
|---|---|
| Steam leaking around lid | Cancel → reseat sealing ring → restart |
| Red float valve never rises | Add ½ cup liquid → confirm valve is on SEAL |
| “BURN” warning | Cancel → scrape pot bottom → add ¼ cup broth → restart |
| Food undercooked | Add 2 minutes pressure → QR immediately after |
| Mushy vegetables | Next time: QR as soon as timer ends |
Post-Cook Cleanup in 120 Seconds Flat
Don’t damage your Foodi during cleanup. Do this:
– Unlock lid only after red float drops (twist counter-clockwise)
– Rest lid upside-down on pot handles to drain condensation
– Thicken sauces by pressing Sear/Sauté LOW for 3 minutes
– Wash inner pot, ring, rack in dishwasher (top rack only)
– Wipe base unit with damp cloth—never submerge
Ninja Foodi Pressure Cook Times Cheat Sheet
| Food | Amount | Liquid | Pressure | Time | Release |
|---|---|---|---|---|---|
| Chicken breasts | 2 lbs | 1 cup broth | HIGH | 8 min | NR 5 min → QR |
| Baby potatoes | 1.5 lbs | 1 cup water | HIGH | 4 min | QR |
| White rice | 1 cup | 1¼ cups water | HIGH | 3 min | NR 10 min |
| Black beans (soaked) | 1 cup | 2 cups water | HIGH | 6 min | NR 20 min |
| Beef chuck roast | 2.5 lbs | 1 cup broth | HIGH | 60 min | NR 15 min |
Master these pressure-cook fundamentals and your Ninja Foodi becomes a weeknight dinner superhero. Always start with the minimum liquid, double-check that valve is on SEAL, and use QR for veggies to avoid sogginess. After three successful cycles, these steps will feel automatic—freeing you to experiment with pressure-seared ribs or one-pot pasta. Your perfectly timed, burn-free meal is just 60 seconds of setup away.


