
Your Ninja Foodi sits on the counter, recipe in hand, but you’re staring at it wondering if you really need to preheat. You’ve heard mixed advice—some say it’s crucial, others claim it’s optional. The truth? Preheating your Ninja Foodi pressure cooker transforms mediocre meals into restaurant-quality dishes, especially when using the Air Crisp function. This guide walks you through the exact steps that official Ninja support recommends, validated by thousands of satisfied users. Skip this critical step and you’ll consistently end up with soggy fries, unevenly cooked chicken, or disappointing results that make you question why you invested in this multi-functional appliance.
Why Your Ninja Foodi Air Crisp Function Requires 5-Minute Preheating
Preheating your Ninja Foodi pressure cooker isn’t optional when using the Air Crisp function—it’s the secret to achieving that perfect golden crunch without burning the exterior. The physics is simple: when cold food hits a preheated cooking surface, immediate surface browning occurs while the interior cooks through evenly. Without preheating, your food essentially steams in its own moisture, defeating the purpose of air frying. This 5-minute investment delivers professional results by ensuring the entire cooking chamber reaches optimal temperature before food makes contact.
The Exact 5-Minute Ninja Foodi Preheat Protocol
- Securely close the Crisper lid—listen for the distinct click confirming proper closure
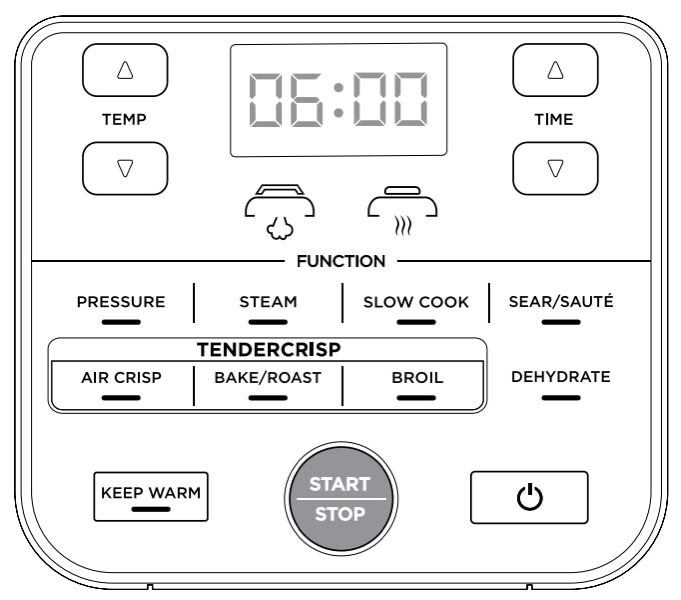
- Press the Air Crisp button on your control panel (labeled Air Fry on some models)
- Set temperature to match your recipe specifications (300°F-400°F range)
- Adjust timer to 5:00—this precise duration is non-negotiable for optimal results
- Leave basket empty—adding food during preheating causes uneven cooking
- Press Start and allow the unit to complete the cycle uninterrupted
- Wait for the completion beep—this signals the chamber has reached target temperature
Critical warning: Never open the lid during preheating. Even a brief peek releases trapped heat and steam, forcing the unit to restart its temperature ramp-up process and adding 2-3 minutes to your cooking time. Keep your hands away from the steam vent during this phase.
Adding Food After Successful Preheating
The moment that beep sounds, you’ve created the perfect cooking environment:
– Open the lid slowly and away from your face (hot steam escapes upward)
– Arrange food in a single layer in the basket—overcrowding creates steam pockets
– Close the lid firmly until it clicks into place
– Re-select Air Crisp mode and input your actual cooking time and temperature
– Press Start to begin proper cooking
Pro tip: For frozen foods like french fries or chicken nuggets, lightly spray the basket with oil before adding food—this creates an instant sizzle upon contact with the hot surface, locking in moisture while crisping the exterior.
Ninja Foodi Model-Specific Preheating Requirements

While the 5-minute rule applies universally across all Ninja Foodi pressure cooker models, slight interface differences exist that could confuse new users. The TenderCrisp 6.5 Quart Digital model (with 4.8/5 stars from 1,255 verified reviews) follows this exact protocol, but larger capacity units require identical preheating procedures despite their increased chamber size.
Cross-Model Preheating Compatibility Guide
6.5 Quart Models (TenderCrisp Series): Standard 5-minute preheat works flawlessly with digital controls—simply match preheat temperature to cooking temperature.
8 Quart Models (Larger Capacity): Same 5-minute duration applies, but ensure food is spread evenly across the larger basket to prevent cold spots.
OP/FD Series Models: Button layout differs slightly, but the preheat process remains identical—look for the Air Crisp or Air Fry function button.
Digital vs. Manual Control Panels: Both achieve target temperature in exactly 5 minutes when following this protocol—digital models display temperature countdown, while manual models beep at completion.
Troubleshooting tip: If your unit consistently takes longer than 5 minutes to preheat, check for proper lid closure and ensure you’ve left at least 6 inches of clearance around the unit for proper ventilation.
Optimal Preheat Temperatures for Different Foods

Matching your preheat temperature to your cooking temperature isn’t just recommended—it’s essential for consistent Ninja Foodi pressure cooker results. Different foods require specific thermal environments to achieve perfect texture without burning.
400°F Preheating for Maximum Crispiness
Preheat to this high temperature when cooking:
– Frozen french fries (for that perfect golden exterior)
– Chicken wings (skin renders fat immediately for extra crispness)
– Breaded foods like mozzarella sticks or fish fillets
– Thin-cut vegetables like zucchini or eggplant
Expert note: At 400°F, the moment food hits the basket, you should hear an immediate sizzle—this is your confirmation that preheating worked perfectly.
350°F Preheating for Balanced Cooking
Ideal preheat temperature for:
– Fresh vegetables (broccoli, asparagus, Brussels sprouts)
– Reheating leftovers without drying them out
– Delicate proteins like fish fillets or shrimp
– Foods requiring even browning without excessive crisping
300°F Preheating for Gentle Applications
Best preheat setting when:
– Dehydrating fruits or making jerky
– Gently reheating sensitive foods
– Keeping cooked food warm without further cooking
– Cooking thicker cuts that need slower, even heat penetration
Four Costly Ninja Foodi Preheating Mistakes to Avoid
Most cooking failures stem from these easily preventable errors that sabotage your results before you even add food.
Mistake #1: Skipping Preheat Entirely
Result: Soggy exterior with undercooked center—especially disastrous for frozen foods that release moisture before crisping occurs.
Mistake #2: Adding Food During Preheating
Result: Extended cooking time as the unit struggles to maintain temperature with cold food introduction—leads to uneven browning.
Mistake #3: Incorrect Timer Setting
Result: 4 minutes leaves the unit 15-20°F below target temperature; 6 minutes wastes energy with no performance benefit.
Mistake #4: Incomplete Lid Closure
Result: Heat escapes continuously, preventing the unit from reaching target temperature—creates safety hazards with steam leaks.
Three Reliable Ways to Verify Your Ninja Foodi Preheated Properly
Don’t guess whether your preheating worked—look for these definitive indicators that your pressure cooker reached optimal temperature.
Visual Confirmation Signs
- Steam wisps escaping from the vent indicate active heating (normal during preheat)
- Basket surface appears shimmering when viewed through the lid
- Immediate sizzle occurs the moment food contacts the basket
Audio Signals That Matter
- Single sustained beep: Preheat cycle complete (5 minutes elapsed)
- No beeping: Unit didn’t complete preheat—check lid closure
- Continuous beeping: Error condition requiring unit reset
Performance-Based Verification
- Consistent browning across entire food surface within first 2 minutes of cooking
- Recipe timing matches actual cooking progress (no extended cooking needed)
- Crisp texture achieved without burnt spots—indicating even heat distribution
Essential Maintenance Before and After Preheating
Proper maintenance during preheating extends your Ninja Foodi pressure cooker’s lifespan and dramatically improves cooking results with every use.
Pre-Preheat Inspection Checklist
- [ ] Basket properly seated in chamber with no wobble
- [ ] No food debris from previous use in basket or chamber
- [ ] Minimum 6 inches clearance around unit for proper airflow
- [ ] Clean, dry basket for optimal heat transfer (moisture creates steam pockets)
Post-Preheat Care Routine
- Wipe minor spills immediately while unit is warm (not hot) for easier cleaning
- Check heating element monthly for grease buildup that impedes performance
- Verify basket integrity before each use—replace if warped or damaged
Troubleshooting Common Ninja Foodi Preheat Problems
When your pressure cooker won’t preheat properly, these quick diagnosis steps can save dinner and prevent unnecessary service calls.
No Heat Generation During Preheating
Symptoms: Cold basket after 5 minutes, no steam, no completion beep
Solution:
1. Confirm power cord is fully inserted at both ends
2. Ensure Crisper lid is completely closed (listen for click)
3. Reset unit by unplugging for 30 seconds then restarting
Uneven Heating Patterns
Symptoms: Hot spots causing burnt areas while other sections undercook
Solution:
1. Clean heating element thoroughly with damp cloth (unplugged)
2. Verify basket isn’t warped—replace if bent
3. Ensure proper ventilation clearance around unit
Extended Preheat Time
Symptoms: Takes longer than 5 minutes to complete cycle
Solution:
1. Check for lid obstructions like food particles
2. Verify room temperature isn’t below 65°F (cold environments slow heating)
3. Clean air intake vents on unit exterior
Energy-Saving Preheating Strategies for Your Ninja Foodi
Preheating actually saves energy by reducing overall cooking time. The pressure cooker uses full wattage for exactly 5 minutes, then drops to maintenance levels once target temperature is reached. Skipping preheat often doubles cooking time, consuming more energy overall while delivering inferior results.
Three Proven Energy Efficiency Tips
- Preheat only when necessary—skip for pressure cooking or slow cooking functions
- Batch cook multiple items during single preheat cycle (reheat between batches)
- Use residual heat for subsequent batches—reduced preheat time needed for second round
Mastering the Ninja Foodi pressure cooker preheat transforms your appliance from a basic countertop device into a precision cooking tool. That 5-minute investment pays dividends in texture, flavor, and consistency with every use. Bookmark this guide—your future self will thank you when every batch comes out perfectly crispy, golden, and restaurant-quality without fail. The difference between mediocre and magnificent meals starts with this simple, often-overlooked step.


