

Your slow cooker just became 10x more versatile thanks to a kitchen staple hiding in your pantry. When you discover how to use aluminum foil in slow cooker setups, you unlock game-changing techniques like cooking two completely different meals simultaneously, preventing delicate fish from disintegrating, and transforming cleanup from a chore into a 30-second task. Major slow cooker brands universally approve this method when done correctly—no more guessing about safety risks. By the end of this guide, you’ll master precise foil applications that solve common slow cooking frustrations while expanding your recipe possibilities.
Stop wrestling with mushy vegetables or unevenly cooked casseroles. Aluminum foil in slow cooker configurations creates controlled micro-environments for perfect results every time. We’ll cut through the confusion with manufacturer-approved techniques verified by food safety experts. Get ready to revolutionize how you use your slow cooker with these actionable, field-tested methods.
Heavy-Duty Foil Safety Rules You Must Follow
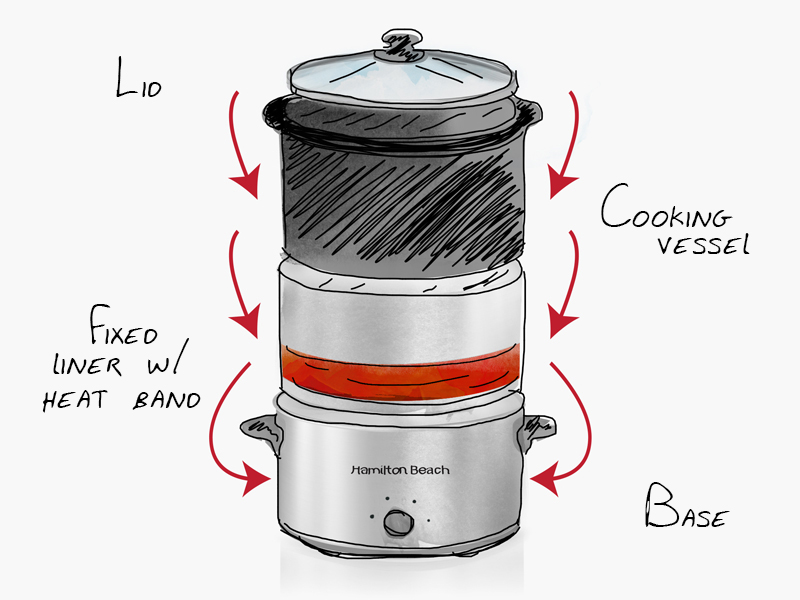
Skip regular foil for structural applications—it tears under food weight and prolonged heat. Heavy-duty foil (minimum 0.00094-inch thickness) provides the rigidity needed for dividers and lifting slings. Always verify compatibility in your specific slow cooker manual; Crock-Pot and Instant Pot both explicitly permit foil use but warn against contact with exposed heating elements in older models.
Critical error to avoid: Never let foil touch visible heating coils. In countertop models with visible elements around the ceramic pot, maintain at least a 1-inch buffer zone. When constructing foil packets, crimp edges twice to seal completely—leaks could cause electrical issues or create cold spots where bacteria thrive. For divided cooking, insert a meat thermometer into both compartments; both must hit 165°F internally. Add 30 minutes to your first dish’s cook time when opening the lid to add the second meal—this compensates for heat loss without overcooking the initial dish.
Lock In Juiciness With Foil Packet Cooking

Prevent Fish and Chicken From Drying Out
Wrap delicate proteins like salmon fillets or chicken breasts in heavy-duty foil parcels to create instant steam ovens. Place food in the center, fold foil edges upward, then crimp tightly twice to seal. This traps natural juices while shielding from direct heat—no more flaky fish turning to shreds after 4 hours. For vegetables like asparagus or green beans that turn to mush, this method extends their ideal texture window by 50%. Pro tip: Add lemon slices and herbs inside the packet for infused flavor without liquid dilution.
Stop Carrots and Peas From Overcooking
When potatoes need 8 hours but carrots turn to mush at 6, wrap speedier veggies in foil. This creates a thermal barrier that slows their cooking rate by 25-30%. Simply place carrots in a foil pouch, fold edges securely, and nestle among slower-cooking ingredients. For layered dishes like vegetable stews, position foil-wrapped items on top—they’ll cook gently via steam rather than prolonged liquid submersion. Never use this method for acidic ingredients like tomatoes; the foil can leach aluminum into low-pH foods during extended cooking.
Eliminate Hot Spots With Precision Foil Collars
Fix Burning Edges on Casseroles
Most slow cookers have uneven heating—typically the wall opposite the control panel runs hottest. America’s Test Kitchen’s foolproof solution: Fold heavy-duty foil into a 2-inch wide collar and position it against this overheated section. The barrier reflects excess heat, preventing lasagna edges from charring while the center cooks through. To identify your cooker’s hot zones, fill with water, run on high 2 hours, then feel the exterior; warmer spots indicate where to place collars.
Customize Collars for Your Cooker Type
Bottom-heat models (like many programmable units) need elevation, not side barriers. Create foil “feet” by crumpling small balls to lift meatloaf off the base, preventing bottom burning. For side-heat cookers, wrap the collar 360 degrees around hotter zones. When making sweet potato casserole, cover the entire surface with a loose foil tent for the first 2 hours—this mimics oven steaming to keep toppings intact before browning.
Transform Cleanup With Strategic Foil Lining
Skip Scrubbing With Bottom Liners
Place a single heavy-duty foil sheet across the ceramic base before adding ingredients. Food residue lifts out in seconds without baked-on messes—ideal for sticky dishes like BBQ ribs or cheese dips. Reynolds Kitchens warns against full lining (which traps condensation), but partial coverage solves 90% of cleanup headaches. Never let foil extend above the pot rim where it might contact heating elements.
Lift Whole Dishes Intact With Foil Slings
For presentation-perfect removal of meatloaf or layered enchiladas, create lifting handles. Fold foil into 3-inch wide strips long enough to drape over both sides of the pot. Position food on the sling before cooking—when done, simply grasp the overhanging ends to hoist the entire dish out. This preserves delicate structures that would break apart with ladles or tongs. Always cool completely before lifting to prevent tearing.
Cook Two Meals Simultaneously With Divider Technique
Build a Rock-Solid Foil Partition
Start with 18-inch wide heavy-duty foil. Fold lengthwise twice to create a rigid 2-inch wide divider that reaches from base to rim. Press firmly against cooker walls to seal gaps—leaks cause flavor transfer. For stability, place slow cooker liners on both sides first; the liner material grips the foil edges. When using liner-free methods, fold 3-inch flaps at the divider base to anchor it to the pot floor.
Manage Dual Cooking Times Like a Pro
Begin with your longer-cooking dish (like pot roast). After 2 hours, prop the divider with foil balls while adding the second item (say, applesauce). Remove balls immediately to reseal compartments. Crucially, add 30 minutes to the first dish’s total time to offset the temperature drop. Always verify both dishes hit 165°F with a thermometer—never guess. Halve standard recipes to fit each compartment, and reduce liquid by 10% since divided cooking alters evaporation rates.
Perfect Casseroles and Structured Dishes

Achieve Lasagna Without Soggy Layers
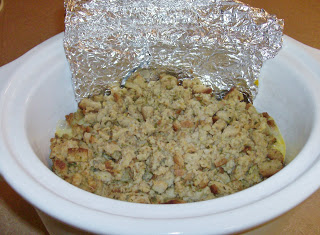
America’s Test Kitchen’s method prevents dry edges while ensuring center doneness: First, install a foil collar against the hottest wall. Layer noodles and fillings normally, but place a foil sheet directly over the top for the initial 4 hours of cooking. This traps steam for even hydration. Remove the foil for the final hour to allow browning. For layered sweet potato casseroles, insert small foil barriers between marshmallow and potato layers to prevent premature melting.
Keep Meatloaf From Falling Apart
Form your meat mixture directly on heavy-duty foil, then wrap loosely like a burrito—don’t seal tightly. The foil maintains structural integrity during cooking while allowing fat to drain away from the meat. After 4 hours, carefully lift the entire loaf out using the foil “handles” for clean slicing. This method prevents the crumbling that plagues traditional meatloaf cooking.
Troubleshoot Foil Cooking Failures Immediately
Fix Wobbly Dividers in Seconds
If your partition collapses during cooking, stop immediately. Remove food from one side, reposition the divider with wider base flaps (fold bottom 2 inches outward), and reinsert liners if used. For recurring instability, switch to pre-folded divider kits—many stores sell reusable silicone versions that clip into place. Never force a wobbly divider; gaps cause flavor mixing and uneven cooking.
Correct Uneven Cooking Without Restarting
One compartment cooking faster? Move the foil collar to the hotter side of the pot. If the center remains underdone, pierce foil packets with two small fork holes to improve steam circulation. Temperatures below 165°F indicate insufficient cook time—add 30-minute increments while monitoring with a thermometer. Never reduce cooking time to compensate; undercooked food risks foodborne illness.
Smart Foil Storage and Reuse Practices
Extend Foil Life With Proper Handling
Cool foil completely before removing—handling hot foil causes tears. For liner methods, lift the entire assembly (liners + divider) in one motion. Heavy-duty foil dividers can be rinsed and reused 2-3 times for similar applications if stored flat between parchment sheets. Discard immediately if you notice pinholes or loss of rigidity. Always recycle clean foil; simply rinse food residue under water before placing in recycling bins.
Balance Convenience and Sustainability
While foil solves immediate problems, frequent dual-cooking demands warrant reusable alternatives. Invest in silicone slow cooker dividers for weekly use, reserving foil for occasional projects. When using foil, maximize width to minimize waste—18-inch rolls create full-height dividers without seams. For eco-conscious cooks, this targeted approach reduces aluminum consumption by 70% versus daily full lining.
Mastering aluminum foil in slow cooker setups turns your appliance into a precision cooking station. You’ll consistently achieve restaurant-quality results while eliminating common frustrations like uneven cooking and stubborn cleanup. Start with simple foil packets for delicate proteins this week, then progress to divider techniques for family meals. Remember: heavy-duty foil, proper sealing, and thermometer verification are non-negotiable for safe, successful results. Your slow cooker’s untapped potential is just a sheet of foil away—unlock it tonight.


