

Ever watched your carefully cracked egg disintegrate into wispy strands in boiling water? You’re not alone. Traditional egg cooking methods often leave home cooks frustrated with inconsistent results and messy cleanup. Enter silicone egg cookers—the game-changing kitchen tool that transforms chaotic egg cooking into foolproof perfection. Whether you’re craving Instagram-worthy poached eggs, fluffy egg bites, or perfectly round fried eggs, these flexible, non-stick wonders deliver restaurant-quality results with zero drama. This guide walks you through every type of silicone egg cooker, from floating poaching cups to microwave-ready containers, ensuring you’ll never struggle with eggs again.
Master Silicone Poaching Cups for Perfect Eggs
Water Setup for Ideal Poaching Conditions
Fill a medium saucepan with 2-3 inches of water—enough for cups to float without touching bottom. Bring to gentle simmer over medium heat. The water should be at 180-190°F (82-88°C), creating small bubbles rising from the bottom but not a rolling boil. This temperature prevents egg whites from becoming rubbery while ensuring thorough cooking. A kitchen thermometer takes the guesswork out of perfect poaching water.
Prevent Sticking with Proper Greasing Technique
Even non-stick silicone benefits from light greasing. Spray each cup with cooking spray or brush with melted butter using a pastry brush. Pay special attention to the bottom and sides where eggs tend to stick. This ensures effortless egg release and maintains your cooker’s longevity. Skip this step, and you’ll likely struggle to remove your perfectly cooked eggs.
Perfect Egg Addition Method
Crack one egg per cup directly into a small bowl first to check for shell fragments, then gently slide into the greased cup. Fill cups only 2/3 full to prevent overflow during cooking. Keep yolks centered for symmetrical results. Add salt, pepper, or fresh herbs directly onto eggs before cooking—this simple step elevates basic eggs to restaurant quality.
Timing for Desired Doneness
- Runny yolks: 4-6 minutes covered (ideal for eggs Benedict)
- Medium yolks: 6-8 minutes covered (perfect for salads)
- Hard yolks: 8-10 minutes covered (best for egg salad)
Pro tip: Set timer for 30 seconds less than desired doneness—eggs continue cooking from residual heat after removal. For consistent results, always use the same size eggs and maintain water temperature.
Safe Removal Technique
Use silicone-tipped tongs or a slotted spoon to lift cups from water. Let drain 10-15 seconds over pot to remove excess water. Gently flex the silicone cup to release eggs—no scraping or prodding needed. This technique preserves delicate yolks while ensuring clean transfer to toast or plate.
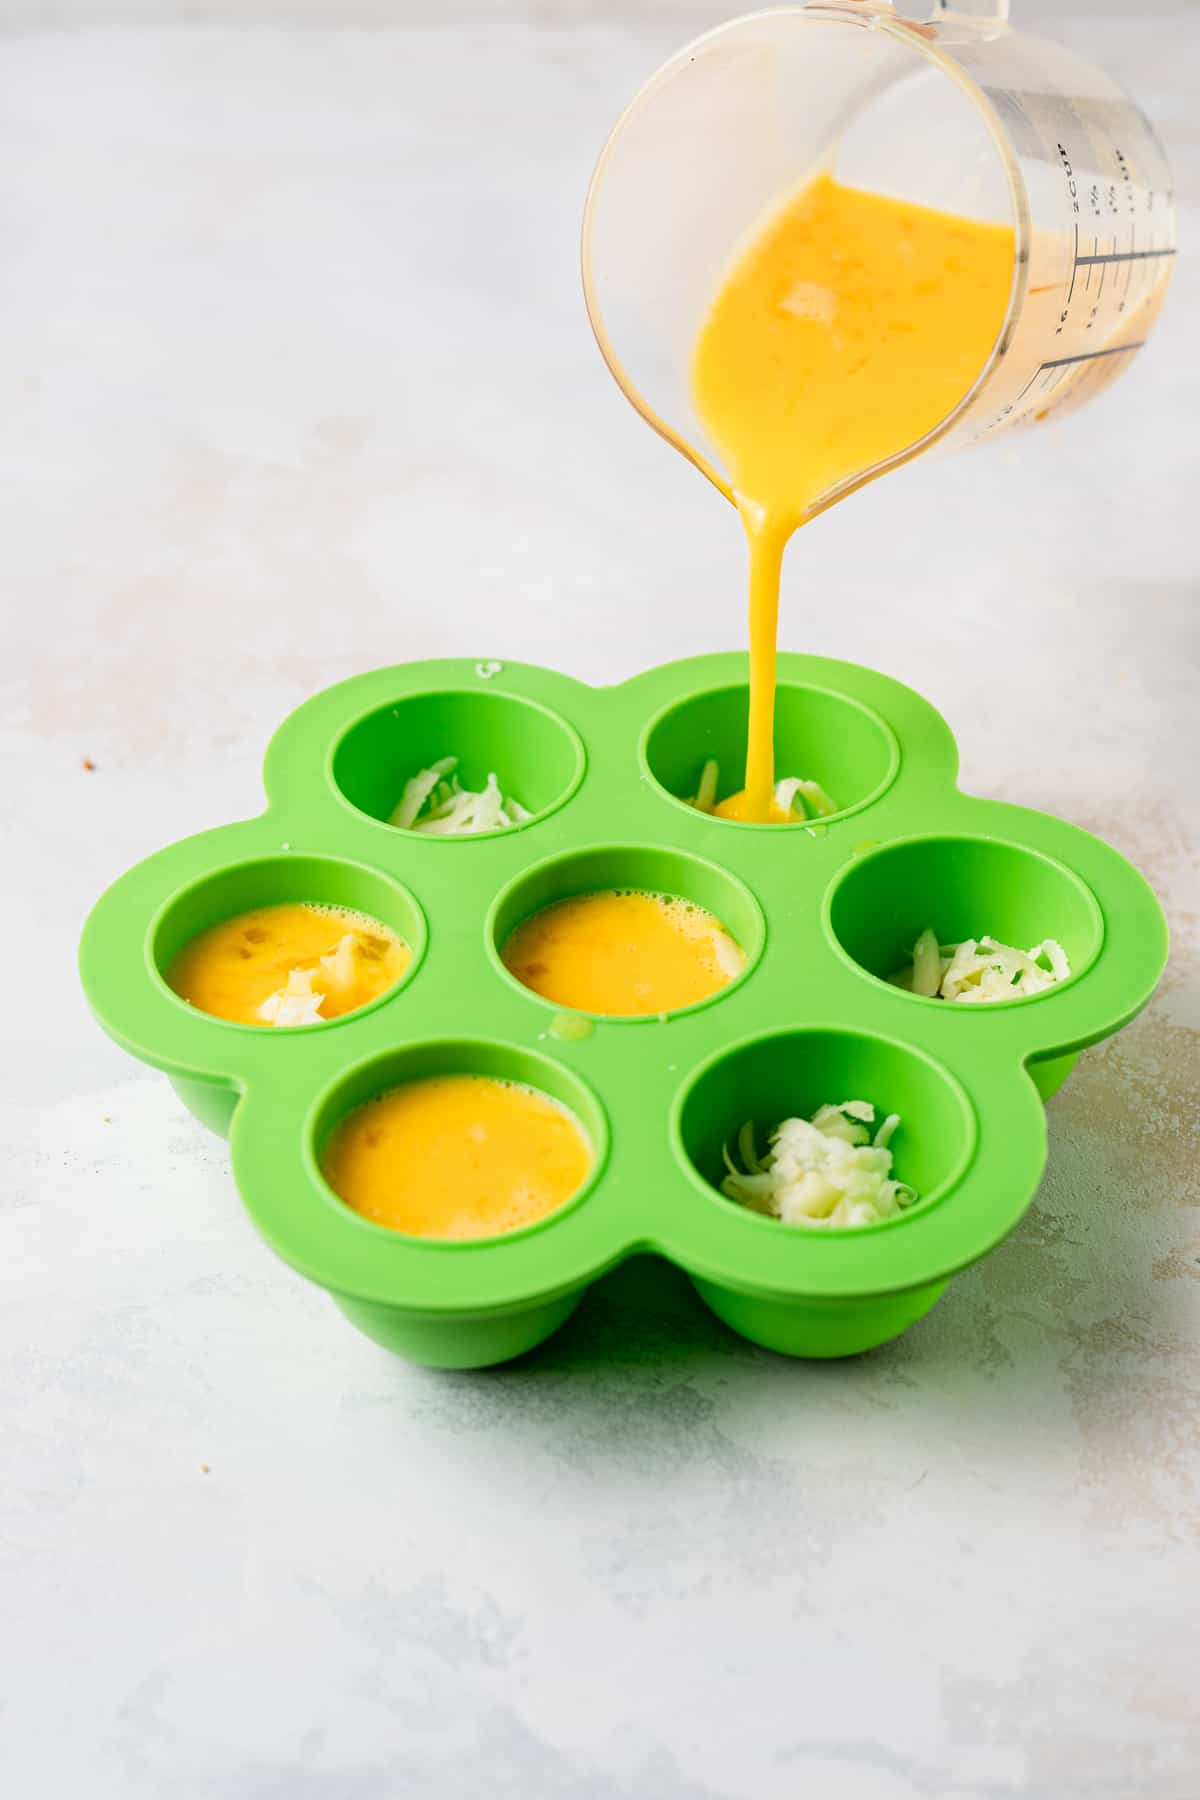
Create Fluffy Egg Bites in Silicone Molds
Oven Preparation for Even Baking
Preheat to 325°F (163°C) for conventional ovens or 300°F (149°C) for convection. Position rack in center for even heat distribution. This lower temperature prevents rubbery edges while ensuring gentle, thorough cooking. Place your filled mold on the middle rack for optimal air circulation.
Master Egg Mixture Ratio
For 7-cavity molds: whisk 6-8 eggs with 1/4 cup milk or cream. This ratio creates the ideal creamy, custard-like texture. Add 1/2 cup shredded cheese plus your favorite mix-ins (cooked bacon, vegetables, herbs). Fill each cavity 3/4 full to allow for proper rising without overflow.
Water Bath Method for Perfect Texture
Place filled mold inside larger baking dish. Add hot tap water halfway up mold sides. This creates a gentle cooking environment that prevents rubbery edges and ensures even doneness. The water bath is crucial for achieving that melt-in-your-mouth texture that makes egg bites so popular.
Doneness Indicators to Prevent Overcooking
Bake 20-25 minutes until centers appear just set with slight jiggle. Insert a toothpick near the center—it should come out clean but not dry. Overbaking creates dense, dry texture. Centers will firm as they cool, so remove from oven when still slightly soft in the middle.
Perfect Fried Eggs with Silicone Rings
Pan Temperature Control for Optimal Results
Heat non-stick skillet over medium-low heat (275-300°F or 135-149°C). Test by flicking water droplets—they should sizzle gently but not violently evaporate. Too hot causes uneven cooking and stuck rings, while too cool leads to watery whites. Proper temperature control is your secret weapon for perfect fried eggs.
Ring Positioning to Prevent Leakage
Place rings on preheated surface and ensure pan is level—this prevents egg white leakage. Let rings heat for 30 seconds before adding eggs. For best results, use a flat, cast-iron or non-stick skillet rather than warped or uneven pans. A slight tilt in your cooking surface can ruin even the most careful egg preparation.
Steam-Setting Technique for Fully Cooked Tops
After 2-3 minutes of cooking, add 1 teaspoon water to pan and cover for 30-45 seconds. This creates steam that sets egg tops without flipping. The result? Perfectly cooked whites with runny yolks, just like restaurant-style eggs. This technique works best with a clear glass lid so you can monitor progress.
Troubleshooting Common Problems

Eggs Sticking to Silicone
- Cause: Inadequate greasing or excessive heat
- Fix: Always grease cups before use, even if labeled non-stick
- Prevention: Use silicone spatula to gently release edges before attempting full removal
- Pro tip: Platinum-cured silicone performs better than peroxide-cured varieties
Egg Whites Leaking from Rings
- Cause: Pan not level or rings too hot
- Fix: Ensure flat pan surface and adequate preheating
- Prevention: Choose appropriate ring size for your egg size—large eggs need larger rings
- Critical step: Crack eggs gently into a bowl first before transferring to rings
Rubbery or Overcooked Texture
- Cause: Temperature too high or cooking time too long
- Fix: Reduce heat by 25°F (15°C), shorten time by 30-60 seconds
- Prevention: Use fresh eggs (older eggs cook faster due to thinner whites)
- Expert note: Eggs continue cooking after removal—factor in 30-60 seconds of residual heat
Cleaning and Maintenance for Longevity
Daily Quick Clean Protocol
- Cool silicone completely before washing—sudden temperature changes can damage material
- Rinse with warm water to remove loose particles immediately after use
- Wash with mild soap using soft sponge—never use abrasive pads
- Rinse thoroughly until squeaky clean to prevent soapy residue
- Air dry completely on rack to prevent moisture buildup and odors
Deep Cleaning Stubborn Residue
Create baking soda paste (1 tablespoon per cup water). Soak 30 minutes, then scrub gently with soft brush. For persistent odors, boil in water with 1/4 cup white vinegar for 10 minutes. Avoid harsh chemicals that can break down silicone over time.
Safety Guidelines You Must Follow
Temperature Boundaries for Safe Use
Most silicone withstands -40°F to 446°F (-40°C to 230°C). Never use under broiler or directly on burners—exceeding limits causes breakdown and potential chemical leaching. Always check manufacturer specifications as some budget models have lower heat tolerance.
Certification Check Before Every Use
Verify 100% food-grade, BPA-free labeling before first use and periodically thereafter. Look for FDA-approved or LFGB-certified products. Discard immediately if silicone becomes sticky, discolored, or cracked—these indicate material breakdown.
Microwave-Specific Rules for Accident Prevention
Use only microwave-specific silicone products in your microwave. Ensure proper venting to prevent pressure buildup. Never use metal-reinforced molds in microwave—this can cause arcing and damage. Always place cookers on microwave-safe plates.
Performance Expectations and Timing

Cooking Time Reference for Meal Planning
- Poached eggs: 5-6 minutes (vs. 4-5 traditional)
- Oven egg bites: 20-25 minutes (perfect for weekly prep)
- Microwave single egg: 45-60 seconds (ideal for rushed mornings)
- Microwave egg bites: 2-3 minutes (great for office lunches)
Capacity Guidelines for Perfect Portions
- 7-cavity mold: 1.5 cups total mixture (ideal for meal prep)
- Individual cups: 1/4 cup each (standard for single servings)
- Large rings: 1/3 cup each (perfect for hearty breakfasts)
- Mini molds: 2-3 tablespoons each (great for kids’ portions)
Mastering silicone egg cookers transforms chaotic mornings into effortless breakfast prep. Start with basic poaching cups for immediate success, then graduate to egg bite molds for weekly meal prep. Remember: proper greasing and temperature control are your keys to restaurant-quality eggs at home. With these techniques, you’ll consistently create perfect eggs while saving time on cleanup—making weekday breakfasts something to look forward to rather than dread.


