

That stubborn pot of rice that always ends up either mushy or crunchy? Your Instant Rice Cooker sits ready to solve this kitchen nightmare, yet many users never unlock its full potential. With the right techniques, this appliance delivers consistently fluffy rice while handling steaming, slow cooking, and even sautéing—all with minimal effort. This guide reveals the exact steps used by experienced owners to transform your Instant Rice Cooker from a simple rice maker into your most versatile kitchen companion. You’ll discover why proper measurement matters more than you think, how to cut carbs by 40% without sacrificing texture, and the 10-minute method for perfect instant rice when time’s tight.
Stop guessing about water ratios or cooking times—your cooker’s internal sensors do the work once you provide accurate inputs. Within minutes of setup, you’ll be preparing restaurant-quality rice with foolproof consistency, freeing you to focus on creating complete meals rather than monitoring a pot. Whether you’re cooking basic white rice or experimenting with international varieties, these techniques ensure success every time you press start.
Why Your Instant Rice Cooker Needs Proper First Cleaning
Factory oils and dust cling to every component right out of the box, directly impacting your first batch’s flavor and texture. Skipping this essential step introduces unwanted tastes that linger through multiple cooking cycles. The residue affects heat distribution, causing uneven cooking that leads to frustrating results before you’ve even mastered the settings.
Wash the inner cooking pot, steam basket, measuring cup, and rice spoon in hot, soapy water using a non-abrasive sponge. Dry each component thoroughly with a clean towel—any moisture left behind creates steam pockets that disrupt the cooking process. Wipe the interior of the cooker base with a damp cloth, then dry completely with a soft clean cloth. This meticulous first cleaning eliminates manufacturing residues that could compromise your rice’s flavor and the appliance’s performance.
Critical Measurement Tools You Must Identify
Your Instant Rice Cooker + Steamer 12 Cup/2.8L includes specialized tools that make or break your results. The included rice measuring cup differs significantly from standard kitchen measuring cups—using the wrong cup guarantees inconsistent water-to-rice ratios. This single mistake causes 90% of failed rice batches among new users who reach for their regular measuring tools.
Identify these essential components before cooking: the heating base with precision sensors, removable non-stick inner pot, specialized locking lid, CarbReduce steam basket, dedicated rice measuring cup, and serving spoon. Critical note: The rice cup holds approximately 3/4 of a standard cup—using it ensures accurate water-to-rice ratios that prevent common issues like undercooked centers or mushy exteriors.
White Rice Formula That Never Fails (1-4 Cups)
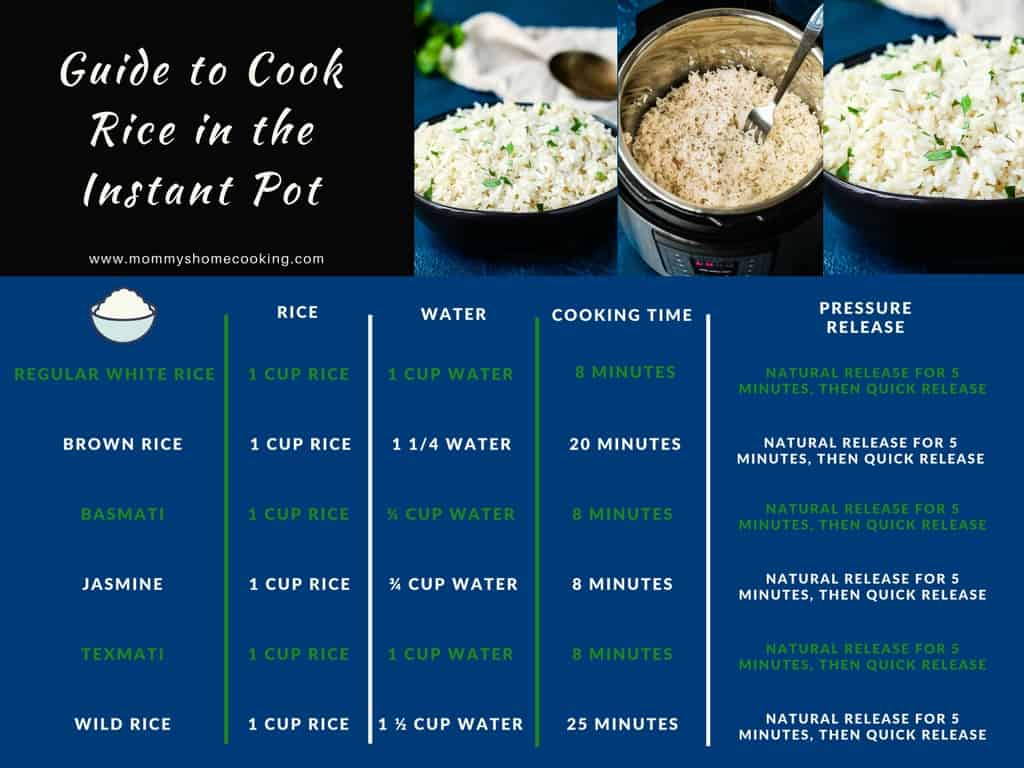
Forget guessing water amounts—this precise ratio delivers perfect texture regardless of batch size. Measure rice using the manufacturer’s cup (1 cup serves 2 people) and add water using a strict 1:1.5 ratio. For example, 2 cups of dry rice require exactly 3 cups of water. This formula works flawlessly for 1-4 cups of dry rice, the maximum capacity for white rice.
The cooker’s internal sensors automatically adjust cooking time based on the rice quantity, eliminating timer confusion. As the cycle completes, the appliance switches to keep-warm mode, maintaining ideal serving temperature without overcooking. Pro tip: For extra-fluffy results, add 1 teaspoon of vinegar to the water—it breaks down surface starch without affecting flavor.
Why Brown Rice Requires Different Settings
Brown rice needs precise water adjustments to achieve tender grains without mushiness. Use 1 cup brown rice to 1.2 cups water for optimal texture—less water than white rice due to the bran layer’s absorption properties. Exceeding the 3 dry cup maximum capacity for brown rice triggers incomplete cooking in the center while edges become overdone.
The cooker automatically extends cooking time for brown rice, but you must reduce the quantity from white rice’s maximum of 4 cups to just 3 cups. Critical mistake to avoid: Never use the white rice water ratio for brown rice—this causes either chalky centers or soupy results. Allow an extra 5 minutes of resting time after cooking completes for perfect separation.
10-Minute Instant Rice Method for Busy Weeknights
Instant rice saves time but requires specific handling in your cooker to avoid gummy texture. Follow these exact steps for reliable results when you need rice fast:
- Measure instant rice using the provided cup (typically 1 cup serves 2)
- Add water following package instructions—usually 1:1 ratio or water 1 inch above rice
- Enhance flavor with salt, butter, or sesame oil if desired
- Seat pot properly in the base until it clicks into place
- Select “Quick Cook” or “White Rice” setting
- Start cycle—instant rice finishes in 10-15 minutes
- Rest 5-10 minutes with lid closed for perfect texture
- Fluff with fork before serving
Instant Rice Mistakes That Ruin Texture
Never lift the lid during cooking—steam escape disrupts the precise temperature needed for instant rice. If your model lacks “Quick Cook,” use the regular white rice setting but reduce time by 3-5 minutes manually through the timer adjustment. Using standard measuring cups instead of the included rice cup creates inconsistent water ratios that lead to either dry or soggy results.
Pro tip: Rinse instant rice once before cooking to remove excess starch that causes clumping. Add a teaspoon of oil to the water to prevent sticking during the short cooking cycle. For best results, use instant rice within 6 months of opening to maintain consistent cooking times.
CarbReduce Technique That Cuts Carbs by 40%

The CarbReduce function works best with 1-2 dry cups of rice, producing 4-8 servings with significantly reduced carbohydrates. This specialized program uses the steam basket to drain away starches during cooking, reducing carbohydrates by up to 40% compared to traditional methods. Critical note: Results vary by rice type—long grain shows more reduction than short grain due to starch composition differences.
Place the CarbReduce basket inside the inner pot before adding rice and water. The basket elevates rice above the starch-collecting water, allowing gravity to pull excess carbohydrates downward during the cooking cycle. After cooking completes, discard the starchy water that collected below the basket—this contains the removed carbohydrates.
Optimal Rice Types for Carb Reduction
Long-grain white rice delivers the most significant carbohydrate reduction due to its starch structure. Basmati and jasmine varieties follow closely behind with 35-38% reduction. Brown rice shows less dramatic results (25-30% reduction) because the bran layer retains more starch. Pro tip: For maximum effect, use slightly less water than standard recipes—1 cup rice to 1.3 cups water instead of 1.5—to concentrate the starch drainage process.
Sauté Function Secrets for Flavor-Packed Rice Dishes
Transform basic rice into restaurant-quality dishes by using the sauté function first. Brown onions, garlic, or meat directly in the pot before adding rice for flavor layers impossible with basic rice cookers. Adjust temperature through multiple heat levels—medium for delicate aromatics, high for searing proteins.
After sautéing, simply add rice and water, then switch to rice cooking mode without transferring ingredients. Time-saving shortcut: For Spanish rice, sauté diced tomatoes and spices first, then add rice and broth for an authentic one-pot meal. Always deglaze the pot with a splash of liquid after sautéing to incorporate flavorful browned bits.
Post-Cooking Cleanup That Prevents Sticky Residue
Unplug and cool completely before cleaning—never clean while warm as thermal shock damages components. Remove the inner pot and accessories for washing; all removable parts except the base are dishwasher safe. Critical mistake: Submerging the base in water destroys the electrical components—wipe only with a damp cloth.
Hand wash the inner pot with standard detergent and non-abrasive sponge to preserve the non-stick coating. Pay special attention to the steam vent area where starch buildup occurs. Dry thoroughly before reassembling—any moisture left in crevices causes mold and odors during storage.
Long-Term Maintenance to Extend Your Cooker’s Life
Store with the lid slightly open to prevent moisture buildup and odors that develop in sealed environments. Check the sealing ring monthly for cracks or wear—replace if damaged to maintain proper steam pressure during cooking cycles. Pro tip: Soak the sealing ring in vinegar water weekly to prevent odor absorption from strongly flavored dishes.
Avoid metal utensils that scratch the non-stick coating, reducing performance over time. Never use abrasive cleaners that damage sensor surfaces inside the base. After heavy use, run an empty cycle with water and vinegar to remove mineral buildup that affects temperature accuracy.
Final tip: Master basic white rice first to understand your cooker’s timing patterns before exploring advanced functions. Within a week of proper use, you’ll consistently create perfect rice while expanding into steaming vegetables, slow cooking stews, and preparing complete one-pot meals. The Instant Rice Cooker becomes truly indispensable once you unlock these techniques—transforming stressful weeknight dinners into effortless culinary successes. For more recipe inspiration, access the Instant Pot UK Facebook Community’s downloadable eBooks featuring tested combinations specifically designed for your model.


