
Stop wrestling with boiling pots and cracked shells—your Instant Pot transforms into the ultimate egg cooker that delivers flawless results whether you need soft-boiled eggs for ramen or hard-boiled for meal prep. With pressurized steam forcing separation between the membrane and shell, these eggs peel like magic every time, eliminating the frustration of stubborn shells. This guide reveals the exact 5-5-5 method perfected by thousands of users, plus pro adjustments for any yolk texture. You’ll never risk overcooked rubbery whites or green-ringed yolks again.
Forget stovetop guesswork where timing feels like Russian roulette. The Instant Pot’s controlled environment creates consistent results from the first egg to the eighteenth, with yolks centered perfectly for deviled eggs. In just 15 minutes hands-off time, you’ll pull out eggs that peel cleanly regardless of freshness—no more farm-fresh egg peeling nightmares. Let’s dive into the exact steps that make how to use Instant Pot egg cooker foolproof.
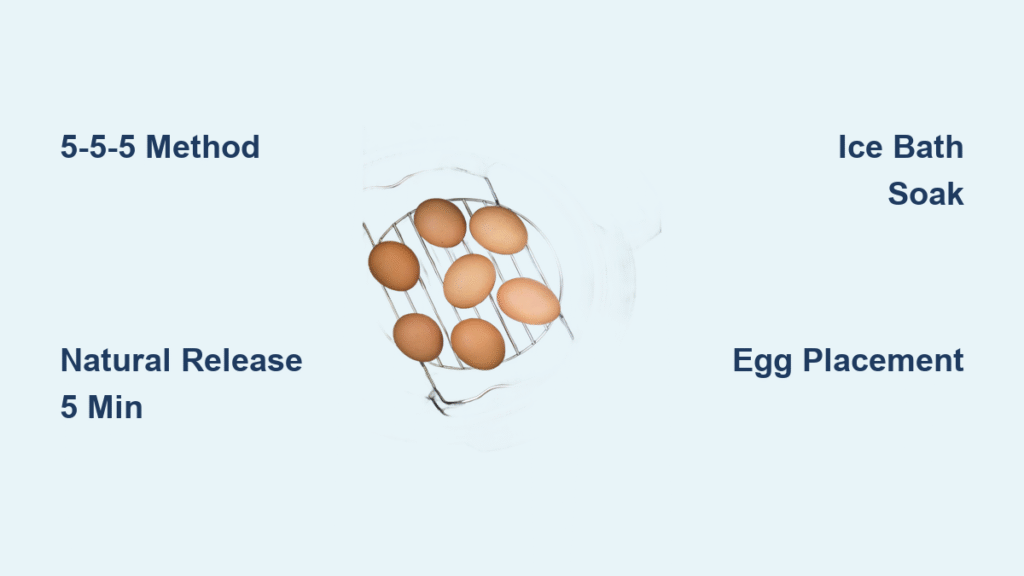
Master the 5-5-5 Method for Foolproof Eggs
This scientifically tested formula works for 1-14 eggs in any Instant Pot size. The magic happens in three pressure phases that cook eggs evenly while creating steam pockets for effortless peeling. Total process time stays under 20 minutes with zero monitoring required.
Pressure Build Phase: The Critical First 5 Minutes
Place cold eggs upright on the rack with 1 cup water below. As the Instant Pot heats, steam builds pressure over 5-10 minutes (display shows “On”). Never skip this phase—rushing by preheating water causes thermal shock and cracks. The gradual pressure rise ensures even heat penetration while steam gently separates the membrane from the shell. Watch for the float valve to pop up, signaling cooking has begun.
Natural Release: Why 5 Minutes Non-Negotiable
When the timer beeps after cooking, do not touch the valve for exactly 5 minutes. This pause allows pressure to drop slowly while residual heat finishes cooking the yolks evenly. Cutting this short causes rapid depressurization that cracks shells and creates uneven texture. Set a separate timer—this step is as crucial as the cook time itself.
Ice Bath Protocol: The Peelability Secret
Immediately transfer eggs to an ice bath (2 cups water + 1 ice tray) after quick release. Soak for 5-10 minutes until completely cold. This rapid cooling:
– Halts all cooking to prevent rubbery whites
– Creates steam pockets between shell and membrane
– Makes peeling 95% faster than room-temperature eggs
Pro tip: Tap each egg firmly on the counter before rolling—it cracks the entire shell uniformly for glove-like peeling.
Adjust Cook Times for Your Perfect Yolk Texture
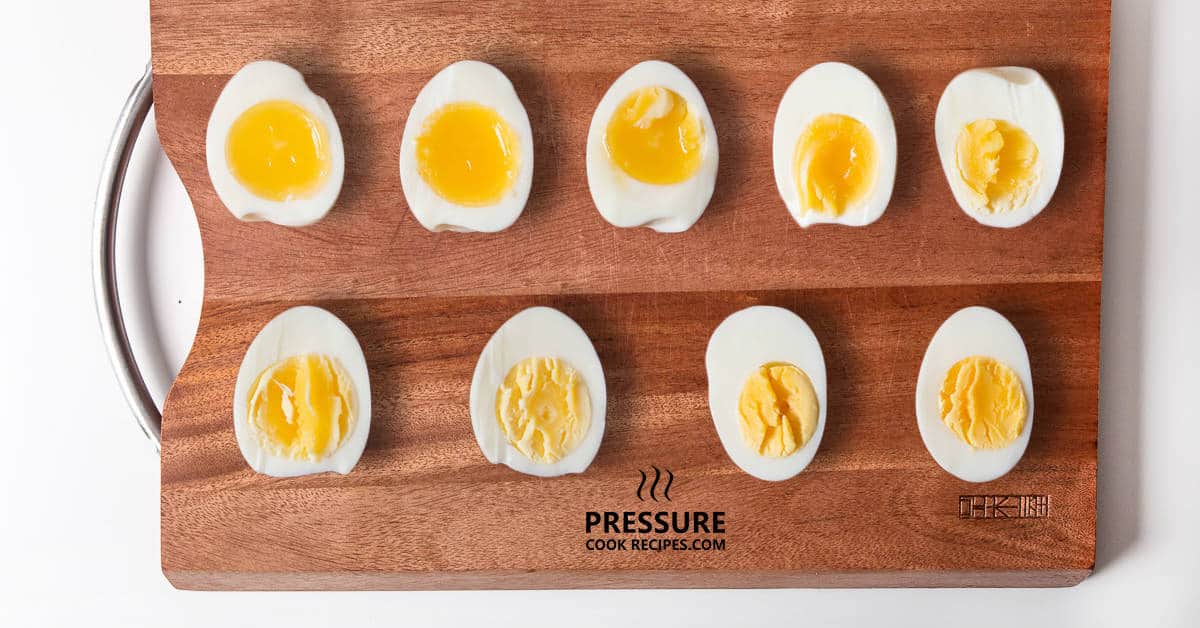
One minute makes all the difference between jammy and chalky. These exact timings work for fridge-cold eggs in 6-8 quart pots (test with 2 eggs first):
Soft-Boiled Eggs (2 Minutes Pressure)
Runny yolks ideal for ramen or buttered toast. Critical adjustment: Use room-temperature eggs to prevent cracking (counter-sit 30 minutes). After 2 minutes pressure + 5 minutes natural release, yolks stay liquid while whites set firmly. Warning: Going beyond 2:30 creates partially set yolks—strict timing is essential.
Jammy Medium Eggs (3-4 Minutes Pressure)
The sweet spot for salads and grain bowls. At 3 minutes, yolks flow like custard; at 4 minutes, they firm up slightly while staying creamy. Pro tip: For restaurant-style ramen eggs, add 1 tbsp soy sauce to the ice bath during cooling—creates a savory crust without over-salting.
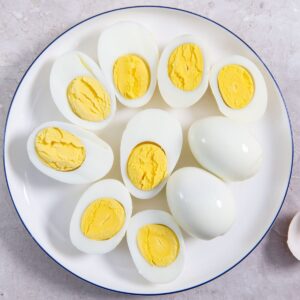
Classic Hard-Boiled Eggs (5 Minutes Pressure)
Fully set yolks for deviled eggs or snacks. Avoid 6+ minutes—this causes sulfur rings and rubbery texture. The 5-5-5 method delivers golden yolks without gray edges. Key insight: Older eggs (7-14 days) peel easiest, but pressure cooking makes even farm-fresh eggs peelable with the ice bath.
Essential Equipment Setup for Flawless Results

Required Items Checklist
- 1 cup water (minimum liquid for safety; never exceed 1.5 cups)
- Rack (metal trivet or silicone egg holder—must elevate eggs above water)
- Eggs (pointy-end down for centered yolks)
Critical detail: Water must sit ½ inch below rack level. Too much water steams eggs unevenly; too little prevents pressure build.
Smart Upgrades That Prevent Disasters
- Stackable silicone racks: Hold 9 eggs each (fits 6-8 qt pots), prevent rolling, and double capacity without timing changes
- OXO egg rack: Centering cups keep yolks perfectly aligned for deviled eggs
- Tongs with silicone tips: Safely grab hot eggs without cracking shells
Avoid: Plastic racks—they warp under high pressure and create uneven cooking.
Step-by-Step Cooking Process
1. Prep Eggs: The Yolk-Centering Trick
Place eggs pointy-end down in the rack. Gravity pulls yolks toward the wider bottom, creating centered yolks ideal for slicing. Never overcrowd—leave ½ inch between eggs to prevent cracking from contact. For 12+ eggs, use stackable racks with space between layers.
2. Water and Rack Setup in 20 Seconds
Pour exactly 1 cup water into the inner pot. Insert rack—water should lap just below the lowest egg. Visual check: If water touches eggs, pour out 2 tbsp. If no water contact occurs, add 2 tbsp.
3. Program Your Instant Pot Correctly
- Manual method: “Pressure Cook” → High Pressure → Set time to 2-6 minutes based on yolk preference
- Egg preset shortcut: Press “Egg” → Adjust time using +/- buttons (default 10 minutes is too long—always reduce)
Critical: Ensure valve is set to “Sealing” before starting. A “Burn” message means insufficient water—add ¼ cup and restart.
4. Pressure Release Sequence: No Guesswork
- Natural release: 5 minutes (display counts up—do nothing)
- Quick release: Turn valve to “Venting” after 5 minutes
- Open only when float valve drops (steam stops hissing)
Warning: Opening early risks steam burns and undercooked eggs.
5. Ice Bath Timing for Perfect Peelability
Submerge eggs immediately in ice bath for 5 minutes minimum. Pro move: Add 1 tsp salt to the ice water—it tightens whites for cleaner peeling. Eggs are ready when shells feel cold to the touch (usually 8-10 minutes).
Solve Common Instant Pot Egg Problems
Cracked Shells: Instant Fixes
Causes: Cold eggs hitting hot steam, overcrowding, or rapid pressure changes. Solutions:
– Bring eggs to room temperature for 30 minutes
– Space eggs ½ inch apart in rack
– Add 2 minutes natural release for fragile eggs
Difficult Peeling: Fresh Egg Rescue
Farm-fresh eggs resist peeling because their low pH bonds membrane to shell. Workaround: Let eggs sit at room temperature 1-2 days before cooking. Pressure cooking + ice bath makes them peel 80% better than stovetop.
Green Yolk Rings: The Overcooking Culprit
That unsightly gray ring forms when sulfur in whites reacts with iron in yolks from excessive heat. Fix: Reduce pressure time by 1 minute (e.g., 4 minutes instead of 5 for hard-boiled). If rings persist, shorten natural release to 4 minutes.
Rubbery Whites: Timing Tweaks
Overcooked whites turn rubbery from prolonged heat exposure. Immediate fix: Drop pressure time to 4 minutes while keeping 5-minute natural release. For soft-boiled, never exceed 2:30 minutes.
Batch Cooking and Storage Hacks
Large Batches Without Fail
- 1-12 eggs: Single layer, standard 5-5-5 timing
- 13-18 eggs: Stackable racks, same timing (no adjustment needed)
- Multiple batches: Wait 10 minutes between cycles for consistent pressure build
Storage That Preserves Freshness
- Unpeeled eggs: Store in airtight container 5 days refrigerated
- Peeled eggs: Submerge in water, change daily, use within 7 days
Never store peeled eggs dry—they absorb fridge odors and dry out.
Meal Prep Power Move
Cook 18 eggs Sunday night using stackable racks. Peel 6 for immediate use, leave 12 unpeeled for grab-and-go snacks. Hard-boiled eggs stay fresher longer than soft-boiled—ideal for weekly prep.
Advanced Pro Techniques
Centered Yolk Secret for Deviled Eggs
Placing eggs pointy-end down during cooking uses gravity to center yolks 90% of the time. For foolproof results, pair with a silicone egg rack that holds eggs vertically.
Model-Specific Timing Adjustments
If 5-5-5 yields overcooked eggs in your Instant Pot:
– 6-quart Duo: Reduce to 4 minutes pressure
– 8-quart Pro: Add 30 seconds to pressure time
– Mini models: Stick to standard timing (heats faster)
Silicone vs. Metal Rack Showdown
- Silicone: Prevents rolling, gentle on shells, dishwasher-safe
- Metal: More durable for high-volume cooking, better heat conduction
Hybrid tip: Use metal rack for bottom layer, silicone for top layer in stacked batches.
Instant Pot Egg Cheat Sheet
| Step | Critical Detail | Time Saver |
|---|---|---|
| Water | Exactly 1 cup | Measure with inner pot markings |
| Placement | Pointy-end down | Load eggs while pot heats |
| Pressure Time | Soft: 2 min • Jammy: 3-4 min • Hard: 5 min | Set phone timer for release |
| Ice Bath | Minimum 5 minutes | Prep bath while cooking |
| Storage | Unpeeled: 5 days • Peeled: 7 days in water | Label container with date |
Your Instant Pot egg cooker eliminates decades of kitchen frustration with one simple formula. Start with the 5-5-5 method for hard-boiled perfection, then tweak timing in 30-second increments to dial in your ideal yolk texture. Remember the ice bath non-negotiable—it’s the secret to peelable eggs regardless of freshness. Within two batches, you’ll master pressure cooking eggs so consistently reliable, you’ll wonder why you ever used a pot. For next-level results, try adding vinegar to the water for extra peelability or experiment with tea-infused ice baths for marbled eggs. Your perfect egg awaits—just press “Start.”


