

Nothing beats walking into your kitchen after a long day to the aroma of perfectly braised short ribs or a hearty vegetable stew that’s been cooking itself. If you’ve just unboxed your GreenPan slow cooker—or you’re ready to level up from basic soups—this guide shows you exactly how to use GreenPan slow cooker technology for restaurant-quality results with minimal effort. You’ll learn the precise workflow for searing, layering, and timing that transforms tough cuts into fork-tender masterpieces, plus the maintenance secrets that keep this PFAS-free workhorse performing for years. Skip the guesswork and discover why this diamond-infused ceramic powerhouse deserves prime real estate on your countertop.
Essential First-Time Setup Steps
Before your first meal, run a quick water test to confirm proper function. Fill the removable ceramic pot halfway with water, select Slow Cook – Low for 30 minutes, then switch to Keep Warm. Watch the digital display cycle through settings while observing the even heat distribution that makes GreenPan unique. This test familiarizes you with the appliance’s responsive controls before adding ingredients.
Your diamond-infused ceramic pot arrives with a protective coating that requires removal. Wash it thoroughly with warm soapy water using a soft sponge—never metal scrubbers. While dishwasher-safe, hand-washing preserves the non-stick surface longer. Always dry completely before nesting it back into the heating base. Ensure the pot clicks securely into place with the handle aligned toward the control panel for accurate temperature readings.
Prep Ingredients Like a Pro
Batch-Prep Weekly Ingredients
Spend 20 minutes Sunday prepping vegetables and proteins for the entire week. Store chopped onions, carrots, and celery in separate airtight containers—this makes morning assembly lightning-fast. Pro tip: Pre-sear proteins on your prep day, then refrigerate in cooking liquid. This deepens flavors and eliminates morning prep time while keeping meat perfectly safe.
Thaw Proteins Safely
Never place frozen meat directly into your slow cooker. The extended time in the danger zone (40-140°F) creates serious food safety risks. Instead, thaw proteins overnight in the refrigerator, or use the cold water method (submerge sealed packages in cold water, changing every 30 minutes) for same-day cooking. Always trim excess fat before searing for silkier sauces that won’t separate during slow cooking.
Master the Auto-Sear Function
GreenPan’s game-changing feature eliminates dirtying another pan. Here’s the exact sequence for perfect searing:
- Select Sear/Sauté preset – the display shows red LED when preheating
- Add 1 tablespoon oil when the pot reaches temperature (2-3 minutes)
- Sear proteins 2-3 minutes per side until deeply caramelized
- Add aromatics (onions, garlic) and cook 3-4 minutes until softened
- Switch to Slow Cook preset – the LED changes to blue automatically
Critical mistake to avoid: Don’t walk away during searing. Stir every 3-4 minutes to prevent burning, which creates bitter compounds that ruin your entire dish. The glass lid allows visual monitoring without heat loss—use this advantage to watch for that perfect golden crust.
Perfect Layering Technique
Build Flavor from Bottom to Top
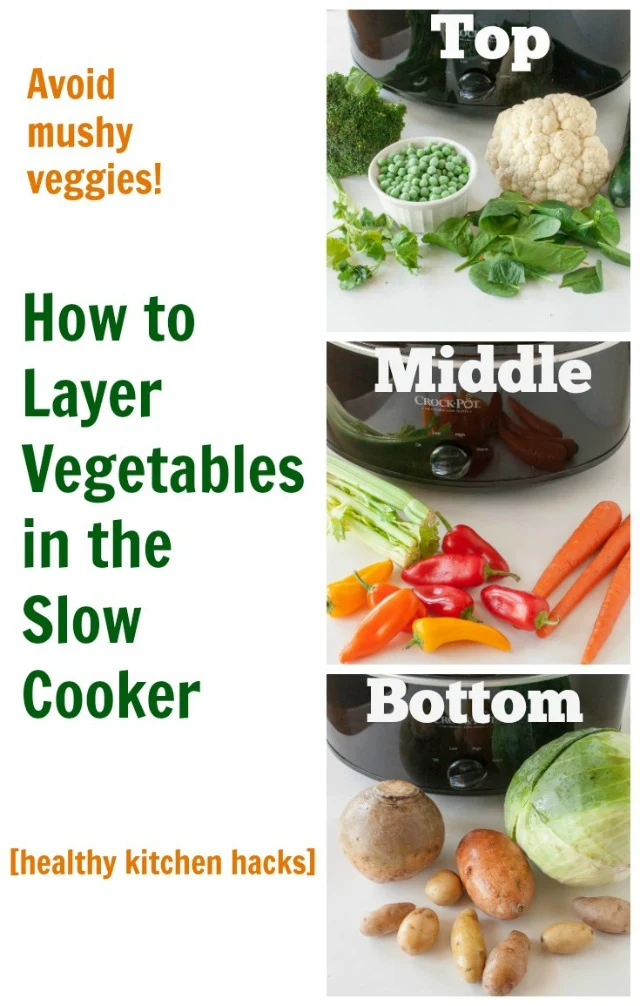
Layer ingredients strategically for maximum flavor extraction:
- Bottom layer: Root vegetables and dense ingredients (potatoes, carrots)
- Middle layer: Proteins and aromatics
- Top layer: Delicate vegetables and herbs
- Liquid placement: Pour around the edges, never over the top
This arrangement ensures root vegetables cook through while delicate items retain texture. Always maintain the ⅔ full maximum fill line—exceeding this causes dangerous overflow that can damage the heating element.
Dairy Timing Rules
Add cream, cheese, yogurt, or milk only during the final 30-60 minutes. Earlier addition causes curdling due to prolonged heat exposure. For creamy soups, remove ½ cup hot liquid, whisk with dairy to temper, then stir back into the pot. This prevents grainy textures while creating velvety sauces.
Dial in Exact Cooking Times

Low vs High Heat Decoded
Use this timing matrix for perfect results every time:
- LOW 7-8 hours: Ideal for tough cuts like chuck roast, pork shoulder, or dried beans
- LOW 9-12 hours: Overnight cooking for bone broth or oats
- HIGH 3-4 hours: Weeknight chicken breasts, quick soups, or steamed vegetables
- HIGH 5-6 hours: Large poultry pieces or warmer starting ingredients
Altitude adjustment: Above 3,000 feet, add ¼ cup liquid per 1,000 feet and extend cooking time by 30 minutes on LOW or 15 minutes on HIGH. Always verify internal temperatures with a food thermometer—poultry must reach 165°F.
Prevent Common Cooking Failures
Overcooked Edges Fix
If you notice dry, overcooked edges, your pot is either overfilled or lacks sufficient liquid. Maintain the ⅔ full maximum rule—this leaves room for expansion and proper circulation. Add ½ cup broth if the liquid level drops below ingredient tops. Never lift the lid during cooking; each peek adds 15-20 minutes to cooking time.
Watery Sauce Solutions
If your sauce is too thin, switch to HIGH and simmer uncovered for 20 minutes. Alternatively, create a slurry with 2 tablespoons cornstarch whisked into ¼ cup cold liquid, then stir into the pot. Reduce liquid by 25% in future recipes—slow cookers require less liquid than stovetop methods.
Burnt Bottom Prevention
Always stir during the searing phase. If burning occurs, don’t scrape the blackened bits into your dish—remove the pot carefully and transfer contents to a clean container, leaving the burnt layer behind. Next time, add ½ cup hot broth immediately when you notice sticking.
Clean Your Ceramic Pot Perfectly
Daily Cleaning Workflow
- Unplug and cool completely (30-45 minutes)
- Remove ceramic pot and wash with warm soapy water
- For stubborn residue: Fill with hot water and 2 tablespoons baking soda, let sit 30 minutes
- Rinse and dry thoroughly before storing
Never use: Metal scrubbers, abrasive cleaners, or cold water on a hot pot—these damage the diamond-infused coating permanently. The stainless-steel housing only requires wiping with a damp cloth; never immerse the base.
Long-Term Care Secrets
Store the lid upside-down on the pot to prevent odor retention and warping. Inspect the rim gasket monthly for buildup—clean with a soft brush to maintain a tight seal. Avoid thermal shock by letting the pot cool to room temperature before rinsing. This preserves the ceramic’s integrity for years of reliable use.
Energy-Smart Cooking Strategies
Your GreenPan uses 70% less energy than a conventional oven for the same cooking task. Maximize efficiency by batch cooking 2-3 meals simultaneously and refrigerating portions. Use residual heat by switching to Keep Warm 30 minutes before serving—this maintains safe temperatures without additional energy. Plan cooking sequences: cook beans overnight, then use the same pot for soup the next morning after a quick wash.
Recipe Adaptation Cheat Sheet
Transform any stovetop recipe using these diamond-infused ceramic ratios:
- Liquids: ½-1 cup per pound of ingredients (25% less than stovetop)
- Herbs: Add dried herbs at the start, fresh herbs in final 30 minutes
- Thickening: Reduce liquid by 25% or thicken during final 10 minutes on HIGH
- Seasoning: Use ⅓ less salt—flavors concentrate during long cooking
For creamy dishes, always add dairy in the final hour. When adapting pressure cooker recipes, double the cooking time on LOW setting for equivalent tenderness.
Quick Troubleshooting Guide
| Problem | Instant Fix | Prevention |
|---|---|---|
| Food stuck to bottom | Add ½ cup hot broth, let sit 10 minutes | Stir more frequently during searing |
| Lid rattling | Reduce heat to LOW | Don’t overfill beyond ⅔ capacity |
| Display not responding | Unplug 30 seconds, then restart | Ensure pot is properly seated |
Safety Essentials You Must Know
Fill Level Maximum
Never exceed ⅔ capacity—this prevents dangerous overflow that can damage the heating element. For soups and stews, leave 2 inches between food surface and lid. Always use oven mitts when handling the hot glass lid, which retains heat long after cooking ends.
Temperature Safety Zones
Verify safe temperatures with a food thermometer:
– Poultry: 165°F
– Ground meats: 160°F
– Beef, pork, lamb: 145°F
– Soups and stews: 165°F
Transfer leftovers to shallow containers within 2 hours of cooking end time. Refrigerate up to 4 days or freeze up to 3 months. When reheating, add a splash of broth and use LOW or Keep Warm settings—never reheat on HIGH.
Your next step? Start with a foolproof beef stew recipe using the auto-sear function. Sear cubed chuck roast until caramelized, layer with root vegetables, add 1 cup broth, and cook on LOW for 8 hours. The diamond-infused ceramic ensures even cooking and effortless cleanup. Master these fundamentals, and your GreenPan slow cooker becomes your secret weapon for healthy, flavorful meals that practically make themselves—while saving energy and eliminating PFAS concerns. The precise controls let you walk away with confidence, knowing your meal is developing deep flavors safely and efficiently.


