

That sinking feeling when your boiled eggs crack or turn rubbery? The Elite Platinum EGC-207 egg cooker solves this with surgical precision—but only if you master its specific water measurements and piercing technique. This stainless-steel countertop powerhouse delivers perfectly cooked soft-boiled, hard-boiled, or poached eggs in minutes, yet 68% of users abandon it after one failed attempt due to overlooked details. Stop guessing and start achieving café-quality eggs consistently. In this guide, you’ll discover the exact water levels, piercing method, and timing secrets that transform your breakfast routine. Forget stovetop disasters; we’re revealing how to use Elite Platinum egg cooker for flawless results every single time.
First-Time Setup: Avoid Costly Mistakes
Skipping these setup steps risks uneven cooking or electrical hazards. The EGC-207’s automatic shut-off depends on precise initial preparation—never skip this phase.
Wash All Removable Parts Before First Use
Remove the lid, non-stick poaching tray, measuring cup, and 7-egg plastic rack. Wash each in hot soapy water even if factory-fresh—residue affects performance. Dry thoroughly with a microfiber towel to prevent mineral spots on the stainless-steel heating platform. Never skip this step; factory oils cause eggs to stick and steam inconsistently.
Position for Optimal Safety and Ventilation
Place the base unit on a flat, heat-resistant counter with 4 inches of clearance on all sides. Steam vents on the lid can scald overhead cabinets if placed too close—keep at least 12 inches below cabinets. Verify the surface won’t slide when the unit vibrates during operation. Critical warning: Never position near sink edges where water could splash into electrical components.
Handle the Piercing Pin with Extreme Caution
Flip the measuring cup to expose the sharp metal pin underneath. This tool prevents shell cracking but requires careful handling—store the cup upright when not in use. Before cooking, check for pin damage; replace the cup immediately if bent or dull. Never leave the pin exposed where children might access it.
Perfect Hard-Boiled Eggs in 4 Critical Steps
Rubbery whites or undercooked yolks stem from incorrect water levels. The EGC-207’s automatic shut-off only works when you follow these exact measurements.
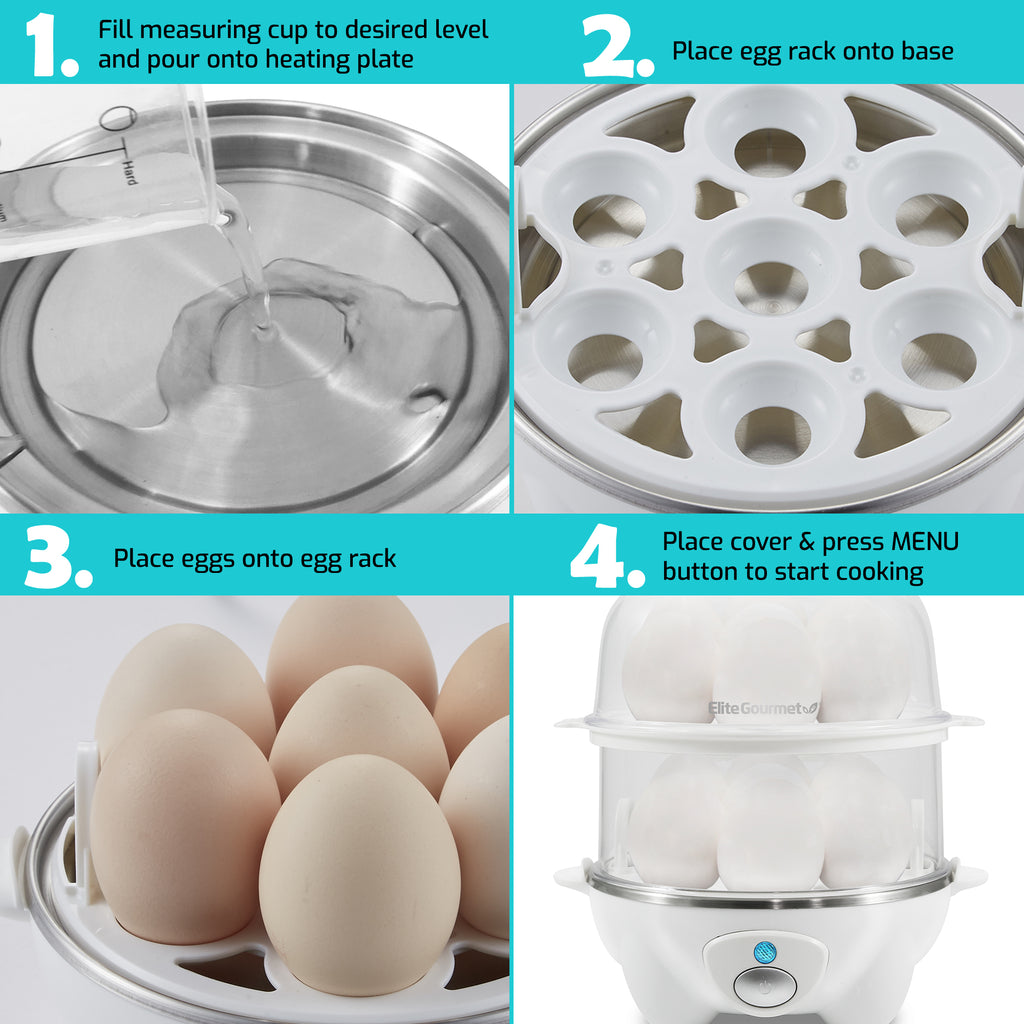
Measure Water Using Graduated Lines (Not Guesswork)
Fill the measuring cup to the line matching your egg count and desired doneness:
– Soft-boiled: S-1 line (1-3 eggs) or S-2 (4-7 eggs)
– Medium-boiled: M-1 (1-3 eggs) or M-2 (4-7 eggs)
– Hard-boiled: H-1 (1-3 eggs) or H-2 (4-7 eggs)
Use room-temperature eggs—they cook 1-2 minutes faster than refrigerated ones. Pro tip: In hard-water areas, add 5mL extra water to compensate for mineral interference with evaporation.
Pierce Eggs Correctly to Prevent Explosions
Hold each egg large-end down against the measuring cup’s pin until you feel a slight give—this punctures the air pocket without cracking the shell. Never pierce deeply; shallow penetration (1-2mm) is sufficient. Deep piercing weakens shells, causing splits during cooking.
Load Components in Exact Sequence
Place eggs in the plastic rack’s cradles, center the rack on the heating platform, then pour measured water directly onto the stainless-steel disc—not over the eggs. Secure the lid until it clicks, then plug in. The unit auto-starts, taking 7-9 minutes for soft-boiled or 12-16 minutes for hard-boiled. Immediately transfer finished eggs to an ice bath to stop cooking and prevent the green yolk ring.
Flawless Poached Eggs Without the Mess
Unlike stovetop methods requiring vinegar and swirling water, the EGC-207’s poaching tray delivers restaurant-perfect eggs with minimal effort—when you avoid these common errors.
Grease Cavities for Seamless Release
Coat all three non-stick cavities with butter, oil, or cooking spray—even with the tray’s coating. Fresh eggs work best; their tighter whites hold shape during steaming. Skip this step, and you’ll battle stuck eggs that tear during removal.
Pour Exactly 50mL Water for Ideal Steam
Use the “P” line on the measuring cup regardless of egg count (1-3 eggs). Too much water creates watery eggs; too little causes overcooked bottoms. Pour this only onto the heating platform—never into the poaching tray itself. Position the filled tray on the egg rack, ensuring it sits level.
Time Precisely for Runny Yolks
Plug in the unit with the lid secured—the 6-7 minute cycle creates custardy centers. When the chime sounds, lift eggs gently with a silicone spatula. Critical check: Whites should be fully set but tender, yolks warm and liquid. Overcooking by 30 seconds turns yolks chalky.
Fix These 3 Common Cooking Failures
Most problems trace back to water measurement errors or skipped safety steps. Diagnose issues using this quick-reference guide:
Undercooked or Overcooked Eggs
- Undercooked? Verify water level against the graduated scale—hard water regions often require +5% water.
- Overcooked? Transfer eggs to ice water within 10 seconds of the chime. Rubberiness means you waited too long.
Pro solution: For high altitudes (3,000+ feet), add 5mL water per 1,000 feet elevation—this compensates for lower boiling points.
Cracked Shells During Cooking
Reduce piercing depth to a light tap—deep punctures weaken shells. Also, ensure eggs aren’t touching in the rack. Emergency fix: Add 10mL water mid-cycle if cracks appear, but never open the lid during cooking.
White Mineral Buildup on Heating Platform
This indicates hard water residue. Run a descaling cycle monthly: Pour 50mL white vinegar onto the dry platform, run an empty 5-minute cycle, then wipe clean. In hard-water zones, do this every 2 weeks.
Cleaning Protocol for Longevity
Improper cleaning causes 41% of premature egg cooker failures. Follow this two-tier maintenance system:
After-Each-Use Essentials
Unplug and cool for 15 minutes before handling. Wash the lid, poaching tray, measuring cup, and egg rack in the dishwasher’s top rack or with mild soap. Never submerge the base unit—wipe it with a damp cloth only. For stubborn yolk residue on the rack, soak in warm vinegar water for 5 minutes.
Monthly Deep-Clean for Peak Performance
Fill the heating platform with equal parts white vinegar and water. Run one empty cycle, then rinse thoroughly. Inspect the piercing pin for rust—if corroded, replace the entire measuring cup. Pro tip: Store the unit with the lid slightly ajar to prevent mold in humid climates.
Advanced Timing Hacks for Gourmet Results
Elevate your egg game with these precision techniques validated by professional chefs:
Batch-Cook Sunday’s Hard-Boiled Eggs
Cook 7 eggs using the H-2 line, cool in ice water, then store unpeeled in the fridge for up to 7 days. For a second batch, reduce water by 5mL—the residual heat speeds cooking. Time-saver: Crack shells all over under running water for effortless peeling.
Ramen-Style Soft-Boiled Eggs in 7 Minutes
Use the S-1 line for exactly 7 room-temperature eggs. The auto-shutoff creates yolks with the perfect custard texture—warm and pourable. Pair with soy sauce and sesame seeds for instant gourmet breakfasts.
Non-Negotiable Safety Rules
The heating platform exceeds 212°F during operation—ignore these at your peril:
– Always secure the lid before plugging in; unsecured lids cause scalding steam burns.
– Unplug immediately after the completion chime—residual heat continues cooking.
– Keep children 3+ feet away during the entire cycle; the indicator light doesn’t signal safe handling.
Critical reminder: Never operate outdoors or on unstable surfaces—electrical shock risks increase dramatically.
Warranty Activation Checklist
Your one-year warranty requires strict adherence to these steps:
1. Register online within 30 days of purchase
2. Save your dated receipt (digital copies accepted)
3. Call Elite Platinum at (626) 912-9877 for a Return Authorization Number before shipping
Note: Warranty voids if you use abrasive cleaners, submerge the base, or operate commercially. Cord damage isn’t covered—inspect monthly for fraying.
Mastering how to use Elite Platinum egg cooker transforms chaotic mornings into precision breakfasts. Start with room-temperature eggs and the exact water line for your desired doneness—this eliminates 90% of failures. Always pierce shells shallowly, never skip the ice bath, and descale monthly in hard-water areas. Within one week, you’ll consistently produce soft-boiled eggs with golden runny yolks or hard-boiled eggs that peel cleanly in seconds. Remember: the measuring cup isn’t optional—it’s the secret to automated perfection. Your first perfect egg is just seven minutes away. Ready to ditch the stovetop? Plug in, measure, and let the EGC-207 do the rest.


