

Picture this: it’s 7 AM, you toss ingredients into a pot, set a dial, and by 6 PM dinner is ready—tender, flavorful, and waiting. That’s the magic of electric slow cookers. These countertop workhorses transform tough cuts of meat and humble vegetables into restaurant-quality meals while you live your life. Whether you’re a busy parent, meal-prep enthusiast, or cooking novice, mastering how to use an electric slow cooker will revolutionize how you approach dinner.
This guide walks you through every step, from choosing the right size to troubleshooting common problems. By the end, you’ll confidently create everything from fall-apart roasts to overnight oatmeal without hovering over a stove. Forget complicated techniques—this appliance thrives on simplicity and precision, making foolproof meals your new normal.
Choose Your Slow Cooker Size
3-Quart Models work perfectly for couples or single servings. You’ll get 1-2 generous portions with minimal leftovers, ideal for small kitchens or side dishes. Fill it ⅔ full to prevent overcooking—too little food creates excessive steam that dries out ingredients.
5-Quart Cookers hit the sweet spot for most families. Expect 3-4 hearty servings—enough for dinner tonight and lunch tomorrow. This size handles whole chickens, medium roasts, and standard soup recipes flawlessly. It’s the Goldilocks zone for weeknight meals without waste.
6-Quart Behemoths serve 5+ people effortlessly. Use these for batch cooking, entertaining, or meal-prepping shredded chicken for the entire week. They accommodate large roasts, full racks of ribs, or big batches of chili. But remember: never exceed ¾ capacity. Overfilling blocks steam circulation, leading to uneven cooking and potential spills.
Why Size Matters for Food Safety
Underfilling is just as risky as overfilling. A half-empty crock spends too long in the bacterial danger zone (40–140°F). When ingredients don’t generate enough steam, they can’t reach safe temperatures quickly. Always aim for that ⅔ to ¾ sweet spot—your thermometer will thank you later.
Pre-Start Safety Checklist
Clean everything first. Wash your hands, cutting boards, knives, and the slow cooker itself—even if it’s new. Bacteria multiply rapidly in the warm, moist environment slow cookers create. A quick wipe of the heating base with a damp cloth prevents grease buildup that could cause electrical issues.
Thaw meat completely. Never toss frozen chicken directly into the crock. Frozen chunks linger in the danger zone too long, creating a food safety nightmare. Plan ahead: move meat from freezer to fridge 24 hours before cooking. For last-minute meals, use the cold-water thawing method (submerge sealed bag in cold water, changing every 30 minutes).
Critical Ingredient Prep Steps
Cut ingredients uniformly. Quarter potatoes roughly the same size. Cube beef into 1-2 inch pieces. This ensures even cooking—no mushy carrots alongside crunchy potatoes. Consider browning first: While optional, searing meat and sautéing onions before slow cooking adds incredible depth. Simply brown in a skillet, then transfer everything to the crock. The extra 10 minutes pays off in flavor dividends and reduces excess fat in your final dish.
Layer Ingredients Correctly
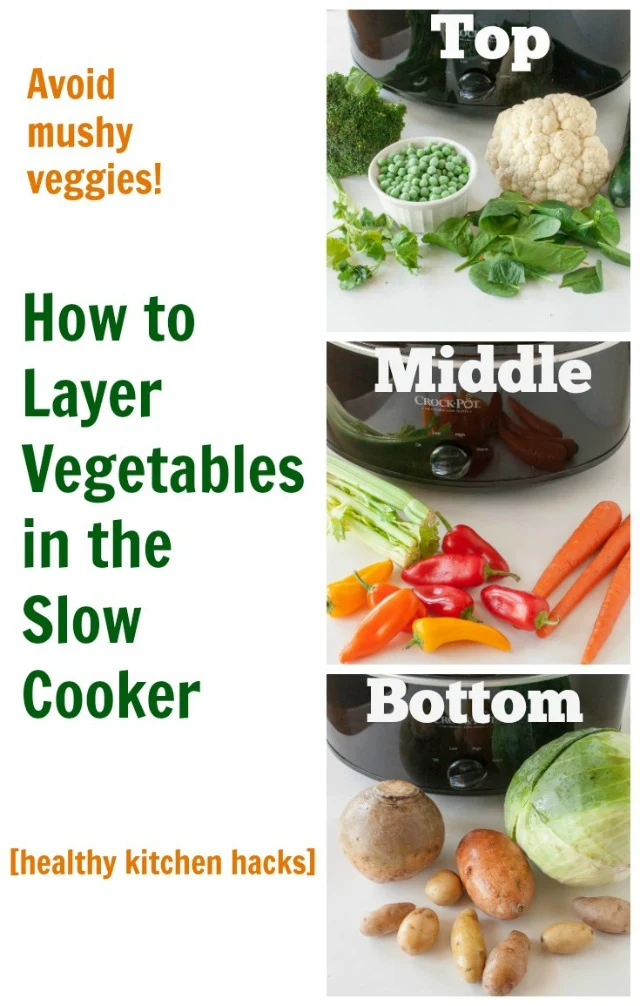
Root vegetables form the foundation. Place dense potatoes, carrots, and onions on the bottom where they’ll absorb maximum heat and flavor from the cooking liquid. These hardy veggies won’t overcook during long cycles and create a natural barrier against scorching.
Add meat in the middle layer. Whether it’s beef chuck, pork shoulder, or chicken thighs, position them above the vegetables but below quick-cooking items. This placement ensures meat stays submerged in liquid for tenderness while avoiding direct contact with the hottest part of the crock (the bottom).
Liquid Management Secrets
Pour liquid strategically. Fill the stoneware ½ to ¾ full with broth, water, wine, or sauce. Liquid should cover meat and poultry completely to create steam and prevent drying. For soups and stews, this means covering ingredients by 1-2 inches. Remember: slow cookers trap moisture, so reduce liquid by 25% compared to stovetop recipes. Too much liquid dilutes flavors and creates soupy results.
Set Temperature and Time
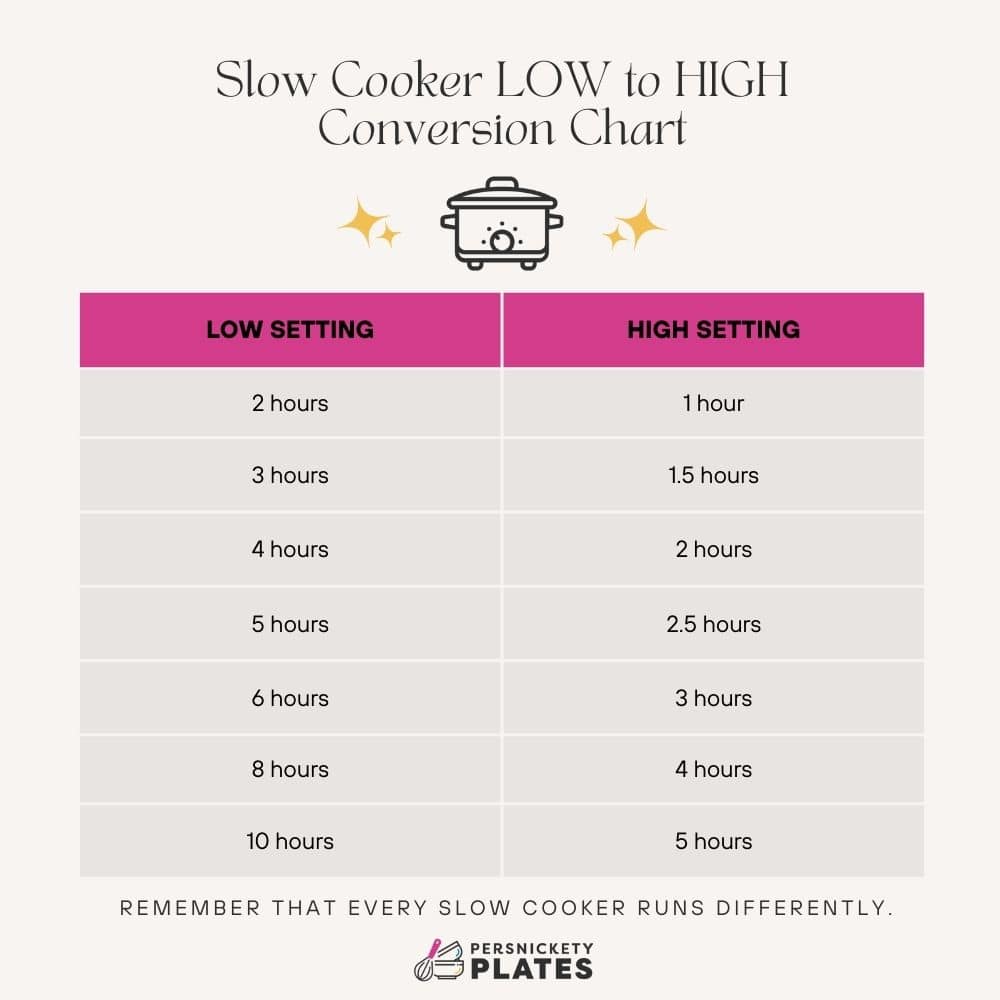
LOW setting (7–12 hours) works best for all-day cooking. Perfect for workdays—start before leaving, return to dinner ready. Ideal for tough cuts like brisket, pork shoulder, or dried beans that need collagen breakdown. The gentle heat preserves texture without boiling ingredients to mush.
HIGH setting (3–6 hours) suits half-day cooking or weeknight meals. Great for chicken breasts, meatballs, or when you started dinner prep after lunch. Remember: 1 hour on HIGH equals 2-2.5 hours on LOW. Never switch settings mid-cook—this disrupts the thermal rhythm and risks undercooking.
Lid Discipline Saves Meals
Never lift the lid. Each peek adds 15-30 minutes to cooking time as heat escapes. Trust the process. If you must check, spin the lid slightly to see inside without fully removing. For safety-conscious cooks: programmable models with auto-warm features prevent overcooking if you’re delayed.
Master Safe Internal Temperatures
:max_bytes(150000):strip_icc()/MeatTemperatureSafetyGuidecopy2-8040ef9b998844248fc922154042c2fb.png)
Food safety isn’t negotiable. Use a reliable meat thermometer to verify these minimum temperatures:
- Beef roasts: 145°F (medium-rare) to 160°F (medium)
- Pork: 145°F with 3-minute rest
- All poultry: 165°F (chicken, turkey, duck)
- Soups and stews: 165°F throughout
Test in the thickest part without touching bone or the crock bottom. For whole chickens, check both breast and thigh. When shredding pork or beef, test multiple pieces—temperature varies in large cuts. Never reheat leftovers directly in the slow cooker; bring to 165°F on the stovetop first, then transfer to WARM setting.
Convert Stovetop Recipes
Transform favorite recipes with this simple conversion chart:
30 minutes stovetop = 2-3 hours HIGH or 6-8 hours LOW
1 hour stovetop = 3-4 hours HIGH or 8-10 hours LOW
2 hours stovetop = 4-5 hours HIGH or 10-12 hours LOW
Reduce liquid by 25% compared to stovetop recipes. Slow cookers trap moisture that would normally evaporate. For pasta or rice dishes, add these during the last 30-60 minutes to prevent mushiness. Adjust seasonings at the end: Flavors concentrate during long cooking. Start with ¾ of your usual salt and spices, then taste and adjust 30 minutes before serving.
Create Freezer Meal Kits
Assemble raw ingredients in labeled freezer bags. Combine meats, vegetables, and seasonings (but not liquids). Press out air, freeze flat for easy stacking. Kits last 3 months frozen. Thaw overnight in the fridge for best results, or use the dump-and-cook method below.
Foolproof Frozen-to-Crock Method
Place frozen meal kit directly into preheated slow cooker. Add required liquid, then cook 1-2 hours longer than fresh ingredients. Critical tip: For poultry dishes, extend cooking by 2 full hours and verify 165°F with a thermometer—frozen chicken needs extra time to exit the danger zone safely. Tested combinations like beef stew or chicken fajitas deliver consistent results.
Clean and Maintain Your Crock
Daily cleanup is simple: Unplug, let cool, remove stoneware and lid. Wash both in warm soapy water or run through the dishwasher if labeled safe. Wipe the heating base with a damp cloth—never submerge the electrical unit. For stuck-on bits, fill the crock with warm water and let soak for 20 minutes before scrubbing.
Stubborn residue? Create a baking soda paste (3 tablespoons soda + water) and scrub gently. For extreme messes, fill the crock with water, add ¼ cup vinegar and ¼ cup baking soda, then cook on LOW for 1 hour. Wipe clean effortlessly. Use disposable liners for busy weeks—they eliminate scrubbing entirely and make transferring leftovers a breeze.
Troubleshoot Common Problems
Food undercooked? Check these culprits:
– Overfilled crock (keep it ½-¾ full)
– Insufficient liquid (add more broth)
– Lid opened too often (resist peeking!)
– Power interruptions (use a surge protector)
Sauce too thin? Mix 1 tablespoon cornstarch with 1 tablespoon cold water. Stir into the crock during the last 30 minutes. For dairy-based sauces, whisk in heavy cream or cream cheese instead. Mushy vegetables? Add delicate vegetables like peas, spinach, or zucchini during the final 30-60 minutes. They’ll cook perfectly without disintegrating.
Quick-Start Success Formula
Follow this streamlined process for guaranteed results:
- [ ] Select 3, 5, or 6-quart based on servings needed
- [ ] Thaw meat completely; cut all ingredients uniform
- [ ] Layer root vegetables → meat → quick-cooking items
- [ ] Add liquid to ½-¾ full; cover all proteins
- [ ] Lock lid; choose LOW (7-12h) or HIGH (3-6h)
- [ ] Resist opening until minimum time elapsed
- [ ] Verify internal temps with meat thermometer
- [ ] Switch to WARM or serve immediately
- [ ] Cool leftovers within 2 hours; refrigerate in shallow containers
Your slow cooker will become your most reliable kitchen companion. Start with simple recipes like pulled pork or minestrone soup, then experiment with global flavors and advanced techniques. The beauty lies in its forgiveness—tough cuts become tender, flavors meld beautifully, and dinner waits patiently when you’re running late. Once you master how to use an electric slow cooker, you’ll wonder how you ever managed without it.


