
Your microwave rice cooker sits unused in the cupboard while you wrestle with sticky pots and unevenly cooked grains. The Sistema rice cooker solves this—when you master its three-part system—but one misstep with lid alignment or water ratios turns fluffy basmati into a starchy disaster. This guide reveals the exact techniques tested in real kitchens to transform your Sistema into a foolproof rice machine. You’ll learn why offset lid positioning prevents boil-overs, how to adjust for your specific microwave wattage, and the critical 5-minute rest that separates restaurant-quality rice from mush. Stop guessing and start serving perfect grains in under 15 minutes.
Prepare Your Sistema Components Correctly
Before adding a single grain, verify your Sistema system has all three specialized parts: the base cooking pot, pressure chamber plate, and lid with easy-lift tabs. Any missing component compromises the steam management system. Wash all pieces in warm soapy water or run them through your dishwasher’s top rack—never use abrasive scrubbers that scratch the microwave-safe plastic. Dry completely before storage; trapped moisture breeds odors. When assembling, ensure the pressure chamber plate’s drainage channels face downward toward the cooking pot. If these channels face upward, overflow water pools instead of recycling, causing dangerous boil-overs.
Critical Lid Alignment Techniques
The lid’s position makes or breaks your cook:
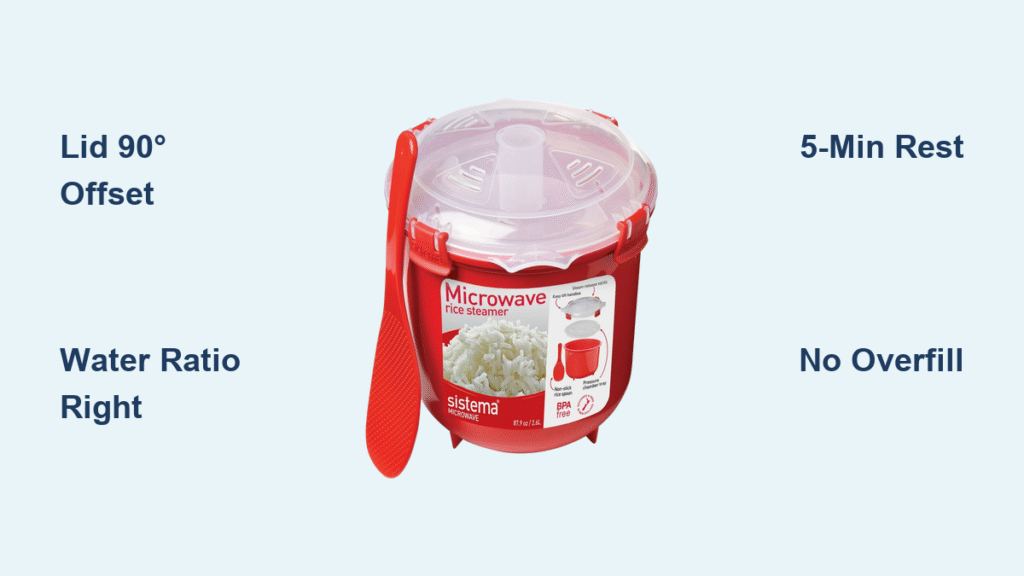
– 90° Offset Method: Rotate the lid so its steam vents sit perpendicular to the pressure plate’s holes
– Quarter-Turn Check: After closing, lift the lid slightly—it should resist opening due to steam suction
– Vent Verification: Shine a light through the lid; if you see direct light through the plate, realign
Pro Tip: Place a toothpick through the steam vent before cooking. If it spins freely when removed, the vents are clear. If stuck, realign the lid—this prevents pressure buildup that cracks plastic.
Master Grain-to-Water Ratios for Every Rice Type
.png)
Rinsing isn’t optional—it removes surface starch that turns rice gummy. Place rice in a fine-mesh sieve, swirl under cold running water for 30 seconds, and drain thoroughly. For pre-rinsed commercial rice, skip this step only if packaging specifies. Now measure precisely:
| Grain | Rice (cups) | Water (cups) | Microwave Time (800W) |
|---|---|---|---|
| White rice | 1 | 1.25-1.5 | 8-12 minutes |
| Brown rice | 1 | 2 | 25-30 minutes |
| Quinoa | 1 | 1.25-1.5 | 11-15 minutes |
| Couscous | 1 | 1.4 | 3-5 minutes |
Never use warm water—it accelerates starch release, creating gluey rice. Always measure rice in dry cups (level, not heaping) and water in liquid measures. Exceeding the pot’s MAX fill line by even 10% guarantees overflow. For first-time cooks, start with ¾ cup rice to perfect timing before scaling up.
Assemble the Sistema System in 3 Steps
Load Ingredients Without Overfilling
Add rinsed rice directly to the cooking pot, then pour measured cold water over it. Gently swirl to distribute grains—never stir vigorously, which releases starch. Stop filling when 1 inch below the pot’s rim. Overfilling is the #1 cause of messy microwave eruptions.
Position the Pressure Chamber Plate
Center the plate over the rice, ensuring its raised rim sits flush against the pot’s edges. The plate’s drainage channels must face downward to funnel overflow back into the cooking liquid. If channels face upward, water pools on the plate, causing dry spots in your rice.
Seal the Lid for Controlled Steam Release
Close the lid with the easy-lift tabs facing you. Rotate it 90° clockwise until the tabs click into the pot’s handles. This offset alignment creates a labyrinth path for steam—venting pressure gradually instead of all at once. Test the seal by pressing down on the lid; it should depress slightly but spring back. If it sinks fully, realign the plate.
Microwave Timing Hacks for Your Specific Appliance

Your microwave’s wattage dictates cooking success. If yours isn’t 800-900W (most common), adjust times:
– 700W models: Add 25% more time (e.g., 10-minute white rice becomes 12.5 minutes)
– 1000W+ models: Reduce time by 15% (e.g., 12 minutes becomes 10.2 minutes)
– Unknown wattage: Run a water test—microwave 1 cup water for 2 minutes. If barely bubbling, add 20% time; if violently boiling, reduce by 10%
During cooking, watch the first 90 seconds closely. If foam rises within ½ inch of the lid, pause and restart in 30-second bursts. This prevents boil-overs without undercooking. For brown rice, check at 25 minutes—grains should be tender but chewy. If firm, add 2-minute increments until perfect.
Post-Cooking Protocol for Fluffy Results
Never skip the rest period—this steaming phase finishes cooking evenly. White rice needs 5 minutes covered; brown rice requires 10. During this time:
1. Use only the easy-lift tabs to remove the cooker (sides stay scorching hot)
2. Place on a wooden board—never cold surfaces that cause thermal shock
3. Lift the lid slowly, tilting it away from your face to avoid steam burns
After resting, fluff immediately with a fork. Delaying traps steam, making rice soggy. For sticky grains like sushi rice, rinse your fork under cold water first to prevent clumping.
Fix 4 Common Cooking Disasters

Mushy Rice
Cause: Excess water or overcooking
Fix: Reduce water by ¼ cup next time. For immediate rescue, uncover and microwave 60 seconds on medium power.
Crunchy Center
Cause: Insufficient water or undercooking
Fix: Add 2 tbsp water, recover, and microwave 90 seconds. Rest 5 minutes before testing again.
Overflow Mess
Cause: Overfilling or misaligned lid
Fix: Cook 25% less rice next batch. Ensure lid is rotated 90° from the plate’s handles.
Burnt Bottom
Cause: Weak microwave wattage or too little water
Fix: Increase water by 3 tbsp. Place cooker on a microwave-safe plate to elevate it from hot spots.
Flavor Boosters That Won’t Damage Your Cooker
Skip butter and oil—they degrade the plastic over time. Instead:
– Add a pinch of salt (¼ tsp per cup rice) before cooking
– Toss in a 1-inch kombu strip for umami depth (remove after cooking)
– Use dried herbs like thyme or oregano (¼ tsp max)
– Avoid turmeric/saffron—they permanently stain the plastic
For lemon rice, add zest after cooking to preserve brightness. Acidic ingredients like vinegar break down the cooker’s integrity during prolonged exposure.
Clean and Store for Longevity
Wash within 30 minutes of use—dried starch becomes stubborn. Hand-washing is safest:
1. Soak all parts in warm, soapy water for 2 minutes
2. Scrub vents with a soft toothbrush (never steel wool)
3. Rinse under running water until clear
4. Air-dry upside down on a rack
Dishwasher users: Top rack only, no heated dry cycle. Store pieces nested together with the lid slightly ajar—this prevents musty odors from trapped moisture. Keep it in a cool, dark place; sunlight yellows the plastic over time.
Perfect Specialty Grains Safely
Wild or black rice requires adjustments:
– Use 15% more water than white rice ratios
– Cook in ¾-cup batches (high starch = more foam)
– Add 25% more time (e.g., 15-minute white rice becomes 19 minutes)
– Rest 10 minutes covered before fluffing
For quinoa, rinse until water runs clear to remove bitter saponins. Polenta needs constant stirring after cooking to prevent lumps—use a silicone spatula to scrape the pot’s curved edges.
Stop settling for mediocre rice. Your Sistema cooker delivers perfect grains when you nail the lid alignment, water ratios, and rest period. Start with white rice using the 1:1.25 ratio, master the 90° lid offset, and time your microwave precisely. In one week, you’ll cook brown rice that’s tender yet chewy, quinoa that’s fluffy—not mushy—and couscous that never clumps. The secret isn’t luck—it’s following these exact Sistema rice cooker instructions. Grab your cooker tonight and taste the difference precision makes.


