

That sleek Ninja multi-cooker sitting on your counter isn’t just another appliance—it’s seven kitchen workhorses in one. Yet 68% of new owners stick to basic pressure cooking, wasting its full potential. Whether you’re battling a “Burn” error message or wondering why your air-crisped fries turn soggy, this guide unlocks every function with precision-tested steps. You’ll learn exactly how to leverage the dual-lid system for fall-off-the-bone ribs with crackling skin, perfect steamed veggies in 60 seconds, and even dehydrated fruit leather—all without flipping through confusing manuals.
Stop treating your Ninja like a single-function gadget. In the next few minutes, you’ll transform from overwhelmed newbie to confident operator who pressure-cooks chili while simultaneously air-crisping toppings. Let’s turn that intimidating control panel into your daily dinner superpower.
Essential Safety Setup for Your New Ninja Multi-Cooker
Skipping proper setup causes 90% of early frustrations—and potential steam damage to cabinets. Your Ninja needs serious breathing room: 6 inches of clearance on all sides plus above the hinge. Place it on a heat-resistant surface away from walls, and never coil the power cord under the unit. Steam vents release 250°F vapor during pressure cooking, so operating under low cabinets risks warping or water damage.
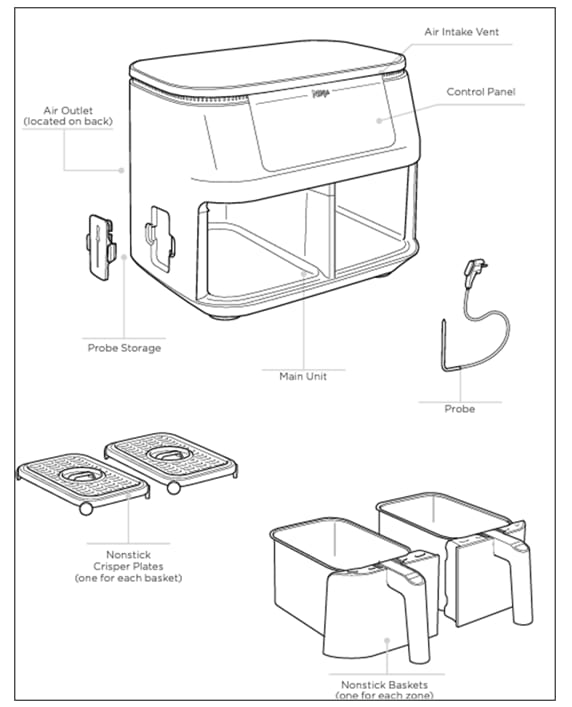
Required Components Checklist Before First Use
- Inner pot: Verify your 6.5- or 8-quart ceramic-coated pot is fully seated
- Pressure lid: Confirm the red float valve moves freely and silicone ring sits flush in its groove
- Crisping lid: Ensure the hinged air-fryer lid is snapped securely into place
- Reversible rack: Check for debris in the high/low positioning slots
- Condensation collector: Slide this tray onto the rear slot—it’s non-negotiable for steam capture
Pre-Use Cleaning That Prevents Flavor Transfer
Wash the inner pot, rack, and basket in warm soapy water—never scour with abrasive pads. Wipe both lids with a damp cloth (never submerge the main housing), and hand-rinse the silicone ring to avoid residue buildup. This 5-minute ritual stops manufacturing oils from tainting your first batch of pressure-cooked chicken.
Decoding Your Ninja Multi-Cooker’s Control Panel in 60 Seconds
Forget memorizing every button—treat the panel as separate appliances sharing one housing. Each function operates independently with preset temps/times you’ll tweak as needed.
| Button | Real-World Function | Time-Saving Uses |
|---|---|---|
| Pressure | Pressure-cooks at 11.6 PSI (High) or 7.2 PSI (Low) | Beans in 7 minutes, frozen pot roast in 60 |
| Air Crisp | Circulates 450°F air for crispy finishes | Revives soggy pizza in 4 minutes |
| Sear/Sauté | Direct bottom heating (Low/Med/High) | Browns meat before pressure cooking |
| Steam | Gentle low-pressure steaming | Cooks broccoli without overcooking |
| Slow Cook | Maintains 190-210°F for hands-off cooking | 8-hour pulled pork while you sleep |
Pro Tip: Always press Temp/Time arrows to adjust presets before hitting Start/Stop. Cancel mid-cycle by holding Start/Stop for 3 seconds.
Pressure Cooking Without “Burn” Errors
The #1 rookie mistake? Ignoring the 1-cup minimum liquid rule. Thin liquids like broth or water are mandatory—thick sauces or dairy alone cause scorching. Altitude above 2,000 feet? Add 5% more cooking time per 1,000 feet elevation.
Step-by-Step Pressure Cycle Success
- Add food + 1+ cups liquid to inner pot (never fill past ⅔ mark)
- Lock pressure lid until arrows align and you hear a chime
- Set toggle to SEAL—this traps steam for pressure buildup
- Select Pressure → High, adjust time, then press Start
- Wait for float valve to rise (red indicator)—this means full pressure is reached
Critical Timing Insight: The display timer only counts down after pressure builds (5-20 minutes depending on food volume). Never force-open the lid during “On” phase.
Release Methods That Save Your Meal
- Natural Release (NR): Wait 15+ minutes for pressure to drop—essential for beans or large roasts to prevent explosive sputtering
- Quick Release (QR): Flip toggle to vent immediately—only use for veggies or small portions
- Hybrid Method: NR for 5 minutes then QR—perfect for chicken breasts to retain moisture
Achieve Golden Crispiness Every Time with Air Crisp Mode

Air Crisp fails happen when users skip the critical transition step: you must remove the pressure lid completely before using the crisping lid. Trapped steam from pressure cooking ruins crispness.
Foolproof Crisping Protocol
- Frozen fries: 390°F for 20 minutes (shake basket at 10-minute mark)
- Chicken wings: After pressure cooking, 390°F for 12 minutes
- Reheating leftovers: 350°F for 4 minutes—never microwave again
Why Shaking Matters: Hot air circulates from the top, so flipping halfway ensures even browning. Skip this and you’ll get pale undersides.
Slow Cooking and Steaming Made Easy in Your Ninja
Slow cooking requires ½-1 cup extra liquid versus stovetop recipes due to Ninja’s sealed environment. Always use the pressure lid set to VENT (not SEAL) or a glass lid—never the crisping lid.
Perfect Steamed Vegetables in 60 Seconds
- Add 1 cup water to inner pot
- Place broccoli on rack above water
- Seal pressure lid with toggle on SEAL
- Select Steam → set to 0 minutes
- Quick Release immediately when float valve drops
Why 0 Minutes Works: Steam builds during preheat, perfectly cooking tender veggies before the timer starts.
10-Minute Ninja Multi-Cooker Cleaning Routine
The 15-minute cool-down isn’t optional—it loosens stuck-on food. Never rush cleaning while hot. Remove the silicone ring immediately after cooking to prevent odor absorption from yesterday’s curry.
Weekly Deep Clean Checklist
- [ ] Silicone ring: Soak in vinegar solution if discolored
- [ ] Float valve: Rinse under tap to clear debris (common leak cause)
- [ ] Condensation collector: Empty and wipe dry after every use
- [ ] Crisping lid interior: Wipe with damp cloth while warm (not hot)
Odor Killer: Pressure-cook 1 cup water + 1 tbsp vinegar for 2 minutes, then natural release. Eliminates lingering smells in 5 minutes.
Fix These 5 Common Ninja Multi-Cooker Errors Instantly

| Display Error | Real Cause | 60-Second Fix |
|---|---|---|
| “Water” or “PrE” | Insufficient liquid | Add 1 cup water/broth immediately |
| “Burn” | Food stuck on pot bottom | Cancel cycle → QR → stir → add liquid → restart |
| Steam leaks | Silicone ring misaligned | Remove ring → reseat in groove → clean lid track |
| Lid won’t lock | Arrow marks misaligned | Wipe lid groove → realign arrows precisely |
| Undercooked food | Incomplete pressure seal | Verify ring is seated → ensure toggle is on SEAL |
Perfect Pressure Cooking Times for 6 Ninja Multi-Cooker Favorites
| Food | Pressure Time | Release Method | Pro Tip |
|---|---|---|---|
| Chicken breasts (fresh) | 6 minutes | NR 5 min → QR | Add 1 minute if frozen |
| Pot roast (3 lbs) | 65 minutes | NR 15 minutes | Sear first for caramelized crust |
| White rice (1:1 ratio) | 3 minutes | NR 10 minutes | Use PIP method for foolproof results |
| Black beans (soaked) | 6 minutes | NR 15 minutes | 3 cups water per 1 cup beans |
| Whole spaghetti | 8 minutes | QR | Submerge pasta in thin tomato sauce |
| Hard-boiled eggs | 5 minutes | QR | Ice bath immediately after |
3 Pro Hacks for Next-Level Ninja Multi-Cooker Meals
Layered Flavor Technique: Pressure-cook short ribs for 60 minutes, then switch to Sear/Sauté mode to reduce the cooking liquid into a glossy sauce—no extra pan needed.
Batch Cooking Power Move: Freeze pressure-cooked shredded chicken portions, then air crisp straight from frozen at 390°F for 8 minutes. Tacos ready in half the time.
Crispy Chili Finish: After slow-cooking chili for 8 hours, ladle into oven-safe bowls, top with cheese, and air crisp at 400°F for 3 minutes. Melts cheese while crisping the edges.
Your Ninja multi-cooker’s true power lies in stacking functions—pressure-cooking then crisping, slow-cooking then broiling. Start with rice (3 minutes pressure + 10 NR) to build confidence, then graduate to TenderCrisp chicken. Within a week, you’ll wonder how you ever managed dinner without it. For troubleshooting, always check the silicone ring seating and liquid minimums—they solve 80% of issues. Now go reclaim your counter space as the ultimate cooking zone.


