
Nothing ruins breakfast faster than overcooked eggs that smell like sulfur or discovering your soft-boiled eggs are actually hard as rocks. A mini egg cooker eliminates these kitchen disasters by delivering perfectly cooked eggs every single time—whether you want them soft, medium, or hard-boiled. This compact powerhouse uses precise steam control to transform ordinary eggs into consistent, restaurant-quality results without guesswork or constant monitoring. If you’ve ever wondered how to use a mini egg cooker to achieve flawless eggs, you’re holding the solution to your breakfast frustrations.
In the next few minutes, you’ll master everything from basic setup to advanced techniques like altitude adjustments and batch cooking. Whether you’re cooking for one or feeding a family, this guide will turn you into an egg-cooking expert. Forget boiling water and timers—your mini egg cooker handles the science while you enjoy perfect eggs with zero effort.
Unbox and Setup Your Mini Egg Cooker
Remove every piece of packaging before your first use—plastic films, cardboard spacers, and protective foam can hide in unexpected places. Wash all removable parts in warm, soapy water: the egg tray, poaching tray, measuring cup, and transparent lid need thorough cleaning to remove manufacturing residues. Dry each component completely to prevent water spots on the heating plate. Never skip this step, as residue can affect cooking performance and create off-flavors.
Quick Component Checklist:
– Heating base with embedded element (never submerge in water)
– Egg tray with individual depressions for stable positioning
– Ventilated lid with handle (check steam vent for blockages)
– Dual-purpose measuring cup and egg piercer (test the pin)
– Poaching tray (if included—lightly grease before use)
– Recipe booklet (keep for reference)
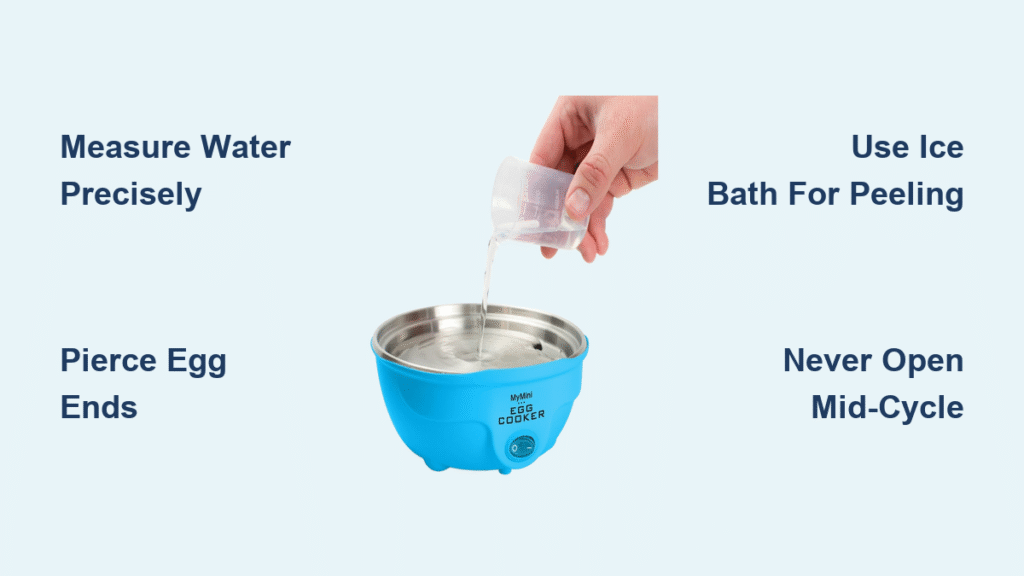
Measure Water for Perfect Doneness

The measuring cup holds the secret to consistent results. Cold tap water works perfectly—no need for filtered or special water initially. Fill to the exact line matching your desired doneness:
- Soft-boiled: Soft line (25ml) for runny yolks
- Medium-boiled: Medium line (40ml) for slightly set centers
- Hard-boiled: Hard line (60ml) for fully cooked yolks
Pour the measured water directly onto the heating plate, ensuring it spreads evenly across the surface. This water creates the steam that cooks your eggs precisely. Critical mistake to avoid: Never eyeball the water level—use only the provided cup. Even 5ml too much water creates excessive steam pressure that cracks shells.
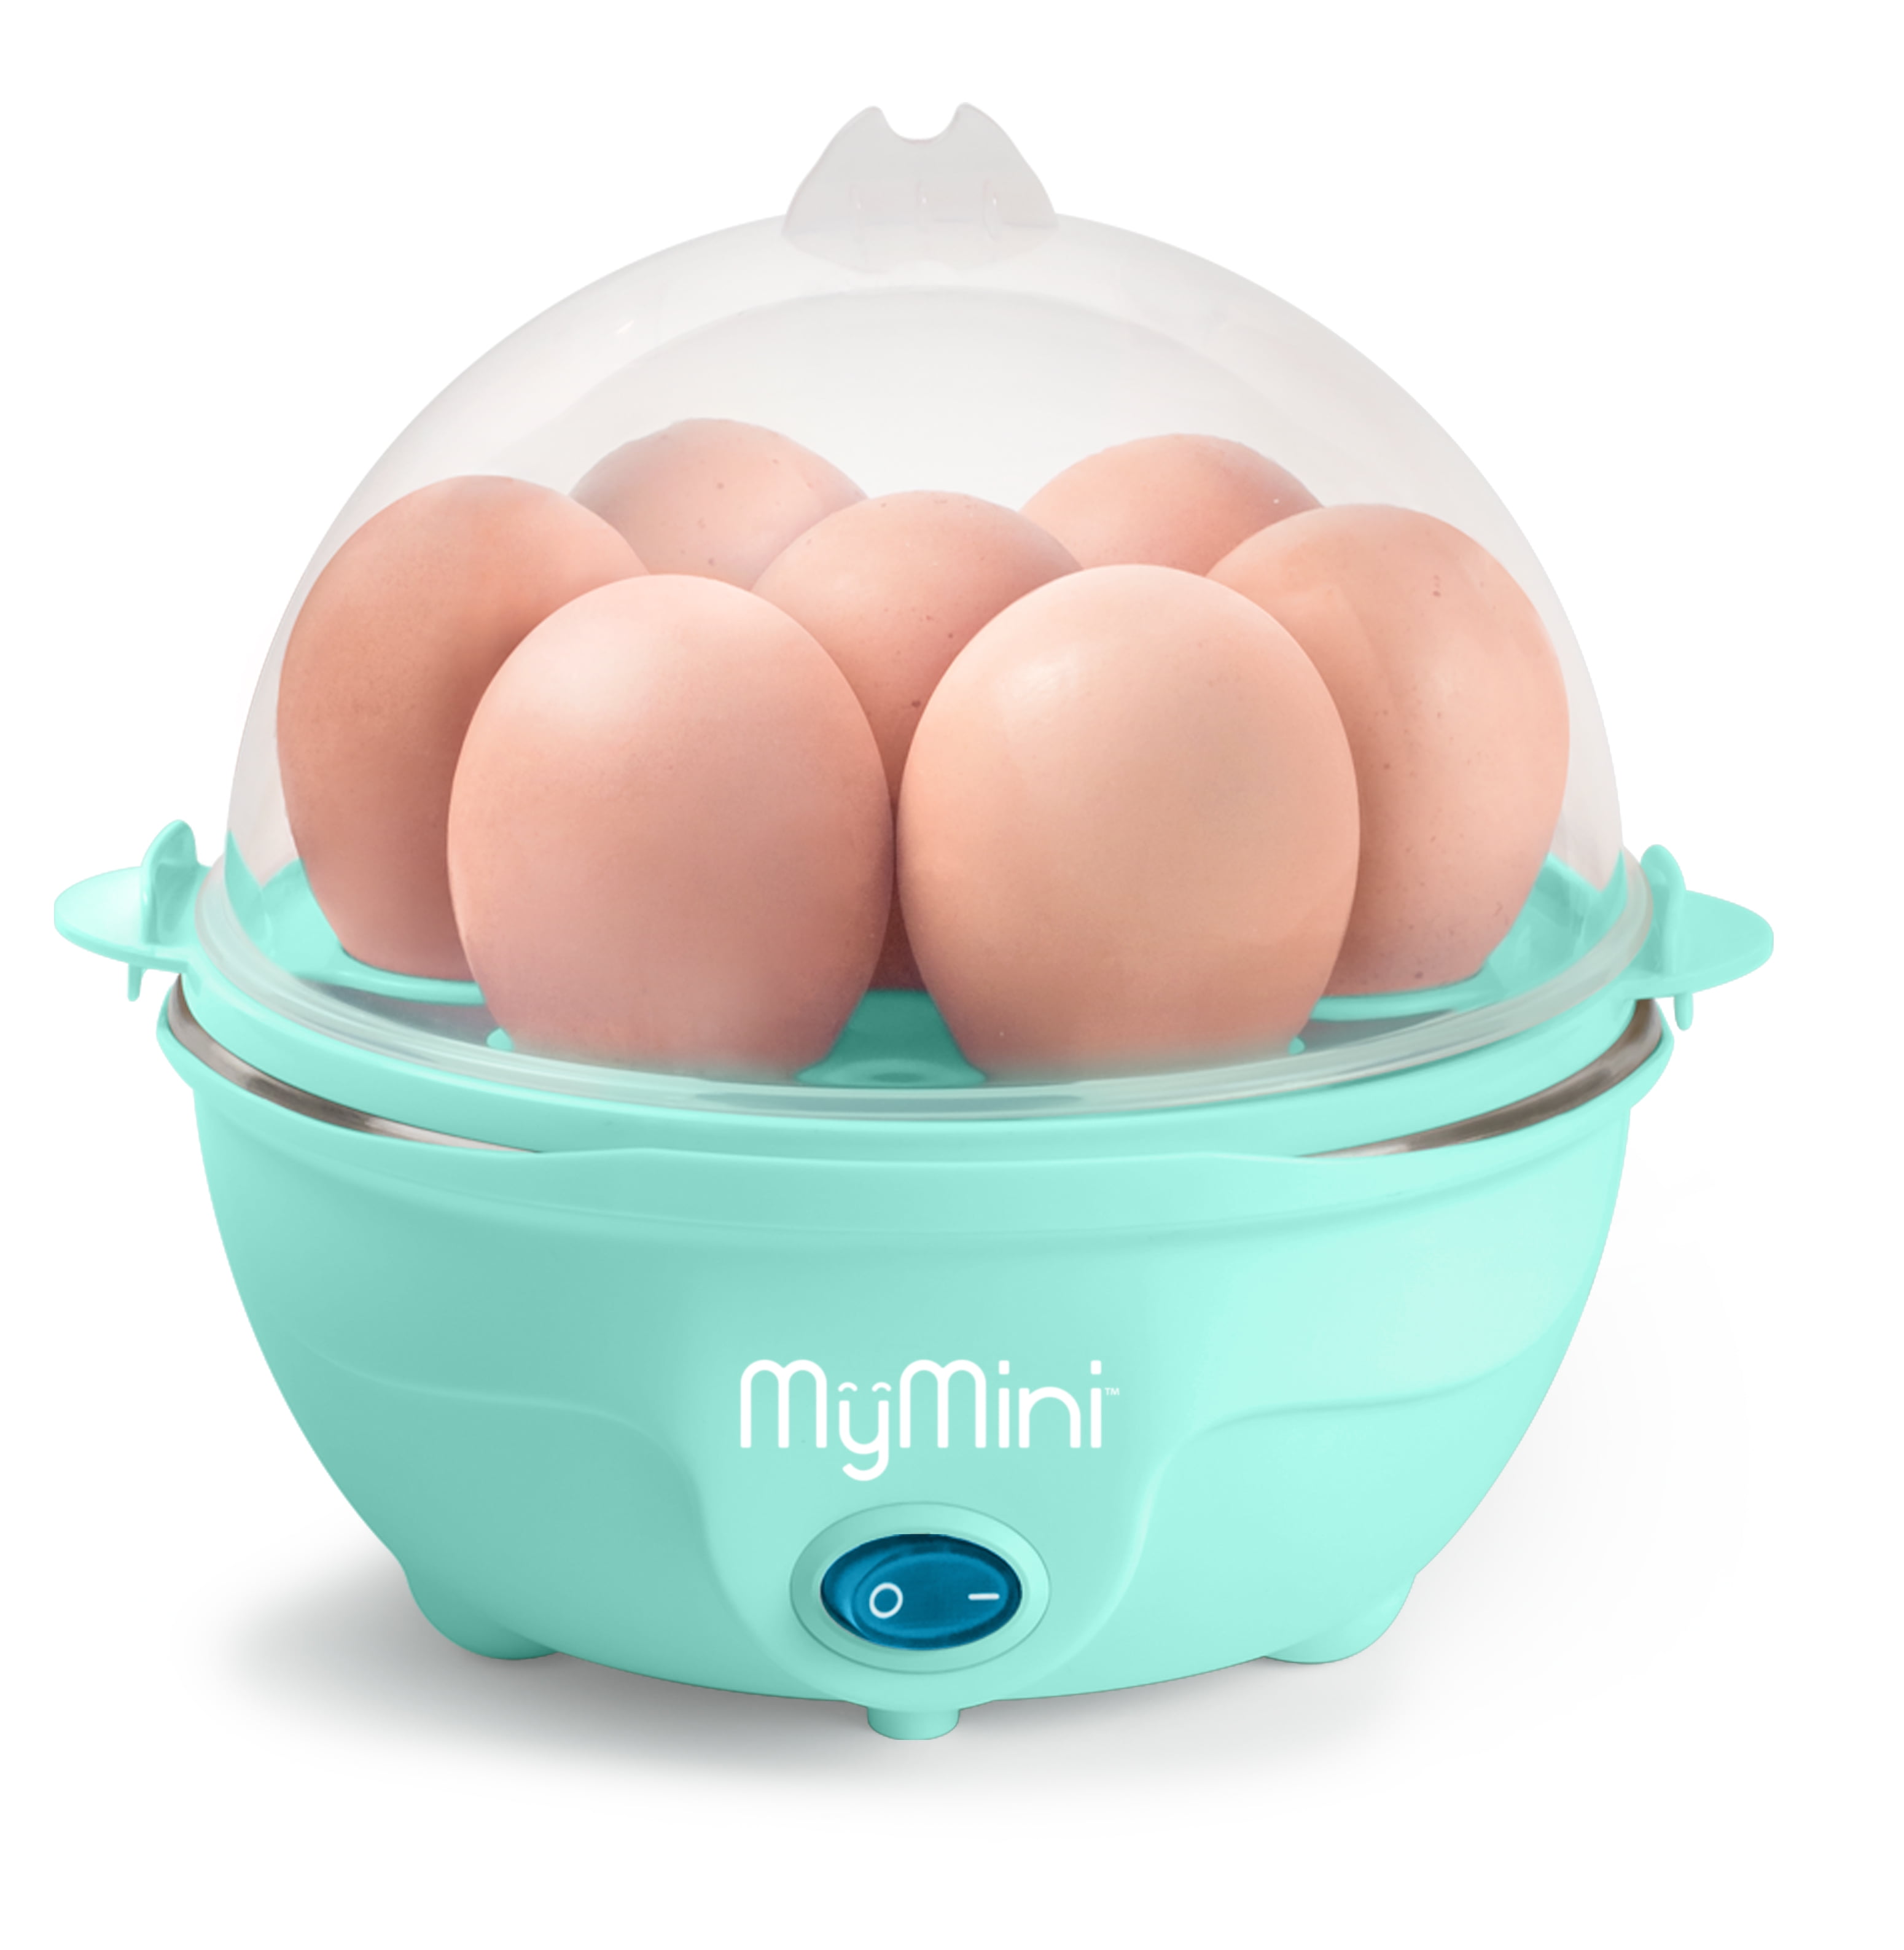
Load Eggs Like a Pro
Prep and Pierce Technique
Use fresh, refrigerated eggs straight from the fridge—they peel easier and cook more evenly. Hold each egg large-end up and press firmly against the piercing pin on the measuring cup. This tiny hole prevents shell cracking and creates an escape route for pressure buildup. Pro tip: Farm-fresh eggs need 1-2 extra minutes due to thicker whites, so adjust accordingly.
Positioning Matters
Place each egg pierced-end up in the tray depressions. This orientation allows steam to escape through the hole, preventing messy cracks. Don’t crowd the tray—leave space between eggs for even steam circulation. For poached eggs, lightly grease the poaching tray compartments first and crack eggs without breaking yolks.
Start Cooking Process
Position the egg tray securely on the base, ensuring it sits level. Press the lid down firmly until you hear it click into place. Plug into any standard outlet—the indicator light illuminates immediately, signaling the heating cycle has begun. What to expect during cooking:
– Water boils in 2-3 minutes (steam builds rapidly)
– Light turns off automatically when water evaporates
– Audible click confirms completion (no need to time)
– Total cooking time: 7-14 minutes depending on doneness
Never open the lid mid-cycle—this releases steam and disrupts temperature control, causing inconsistent results. Trust the automatic shut-off; it prevents overcooking and burning.
Handle Hot Eggs Safely
Steam burns hurt—always use oven mitts when removing the lid. Tilt the lid away from your face as steam rushes out. Transfer boiled eggs immediately to an ice bath for 60-90 seconds. This stops cooking and creates that perfect peelable texture. For poached eggs, gently slide a silicone spatula under each egg to lift it cleanly from the tray. The yolk should jiggle slightly when perfectly poached. Critical safety step: Keep children 3+ feet away during operation—steam vents reach 212°F.
Fix Common Cooking Problems

Eggs Cracking or Leaking
Check these three culprits:
– Piercing: Ensure you’re piercing the large end only (small end has air pocket)
– Water level: Too much water creates excessive pressure
– Egg quality: Hairline cracks before cooking spell disaster
Inconsistent Doneness
When some eggs are soft and others hard:
– Measure water precisely—eyeballing causes failures
– Clean the heating plate between batches
– Use similar-sized eggs in each batch
– Never open the lid mid-cycle
Peel Like a Champion
Struggling with stubborn shells? Try these tricks:
– Use week-old eggs instead of fresh ones
– Ice bath for 2 full minutes
– Roll eggs gently to crack shells before peeling
– Start peeling from the pierced end where air pockets form
Clean and Maintain Your Cooker
Daily Cleaning Routine
Always unplug and cool completely before cleaning. The removable parts are dishwasher-safe on the top rack, but hand washing prevents warping. Wipe the heating plate with a damp cloth—never submerge the base unit. Mineral deposits appear as white spots and affect performance. Pro tip: Wipe the plate immediately after cooling if using hard water.
Monthly Deep Clean
Mix equal parts white vinegar and water, pour onto the heating plate, and run a complete cycle without eggs. This dissolves stubborn mineral buildup. For the piercing pin, use a toothpick to remove dried egg residue. Check the steam vent monthly for blockages—this prevents pressure issues.
Master Advanced Techniques
High-Altitude Cooking
Above 3,000 feet, water boils at lower temperatures. Increase water amounts by 10-15% and expect 2-4 extra minutes cooking time. Your eggs may need slight adjustments based on your exact elevation. Key indicator: If yolks remain too runny, add 5ml more water next time.
Batch Cooking Secrets
Between batches, let the heating plate cool for 5 minutes and wipe away any residue. Pre-warm refrigerated eggs to room temperature for 10 minutes to reduce overall cooking time. Keep a log of successful combinations for consistent results—note egg size, water amount, and final texture.
Beyond Basic Eggs
Your mini cooker doubles as a mini steamer:
– Vegetables: Broccoli florets or asparagus with 40ml water (6-8 minutes)
– Reheating: 15ml water warms refrigerated hard-boiled eggs in 2-3 minutes
– Individual custards: Heat-safe ramekins with 60ml water create perfect portions
Safety Rules That Prevent Burns
Electrical Safety:
– Place on stable, heat-resistant surfaces only
– Keep away from sink edges and water splashes
– Dry hands completely before handling the power cord
– Unplug immediately after use
Burn Prevention:
– The entire unit becomes extremely hot during operation
– Use proper hand protection—regular kitchen towels aren’t enough
– Keep children and pets at least 3 feet away
– Never lean over the cooker when removing the lid
Optimize Performance Every Time
Egg Selection Tips
Medium eggs (USDA Large) deliver optimal results. Extra-large eggs need slightly more water or time. Avoid cracked or thin-shelled eggs entirely. Farm-fresh eggs may require 1-2 extra minutes due to thicker whites. Pro tip: Store eggs pointy-end down in the fridge—this centers the yolk for prettier slices.
Water Quality Impact
Hard water leaves mineral deposits that reduce efficiency. If you have hard water, wipe the heating plate immediately after cooling. Filtered water produces the most consistent results, but tap water works fine with regular cleaning. Warning: Mineral buildup causes uneven heating—descale monthly if using hard water.
Timing Precision
Use a separate timer for your first few attempts—manufacturer times are guidelines, not guarantees. Kitchen temperature and egg starting temperature affect total time. Record your perfect combinations in a kitchen notebook. Key insight: Cold eggs straight from the fridge add 1-2 minutes to cooking time versus room-temperature eggs.
Key Takeaway: Your mini egg cooker transforms inconsistent stovetop results into perfectly cooked eggs every time. Master the water measurements, maintain the heating plate, and handle hot components safely. Within a week, you’ll develop muscle memory for your preferred doneness—no more guessing, no more green-ringed yolks, no more breakfast disappointment. Remember: how to use a mini egg cooker effectively comes down to precise water measurement, proper egg piercing, and respecting the steam cycle. Ready to expand your skills? Try poaching eggs this weekend, or experiment with steaming vegetables for quick, healthy sides. Your mini cooker just became your kitchen’s most versatile breakfast companion.


