
The moment you catch that first whiff of tender pulled pork or rich beef stew after a full day at work—that’s the magic of mastering how to use a crockpot slow cooker. Unlike high-maintenance appliances, this countertop hero transforms cheap cuts of meat into succulent feasts with minimal hands-on time. Yet too many home cooks end up with mushy vegetables or undercooked roasts simply because they skip critical setup steps.
Whether you’re unpacking your first Hamilton Beach model or reviving a dusty KitchenAid unit, this guide cuts through the confusion. You’ll discover exactly how to layer ingredients for perfect texture, why liquid measurements differ from stovetop cooking, and the one safety mistake that risks cracking your ceramic insert. Forget vague advice—these actionable steps come straight from manufacturer-tested protocols.
Choose Your Crockpot Size Strategically
Match Capacity to Household Needs
Your slow cooker’s size directly impacts food safety and texture. An undersized unit crowds ingredients, creating cold spots where bacteria thrive, while oversized models cook too slowly, risking the temperature danger zone.
3-3.5 quart models work for singles or couples craving minimal leftovers. They comfortably handle a 2-pound chuck roast or 4 chicken thighs but overflow with soup recipes. 4-5 quart units are the family sweet spot—ideal for 3-4 pound roasts, full chili batches, or 6-8 portions of soup without spillovers. For meal preppers or holiday crowds, 6-7 quart giants tackle whole chickens or doubled recipes but require careful filling to avoid scorching.
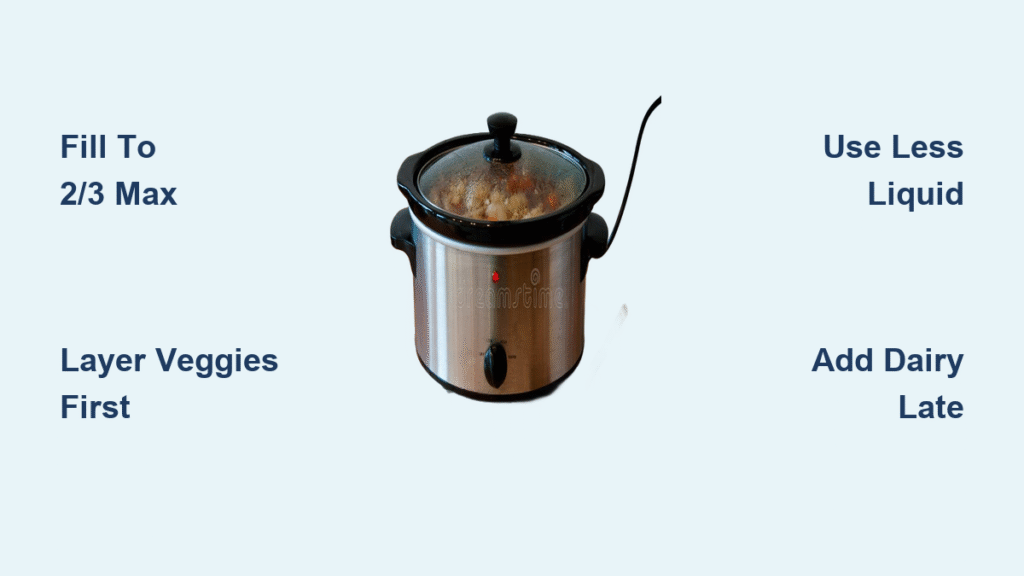
Never Ignore the Fill Rule
Keep ingredients between half and two-thirds full—no exceptions. Overfilling past the two-thirds mark traps steam, causing dangerous boil-overs that short-circuit heating elements. Underfilling below half exposes meat to dry heat, resulting in leather-like textures and burnt edges. Always measure after layering: if ingredients peak above the ceramic insert’s shoulder, remove a cup of veggies.
Perfect Ingredient Prep for Foolproof Results
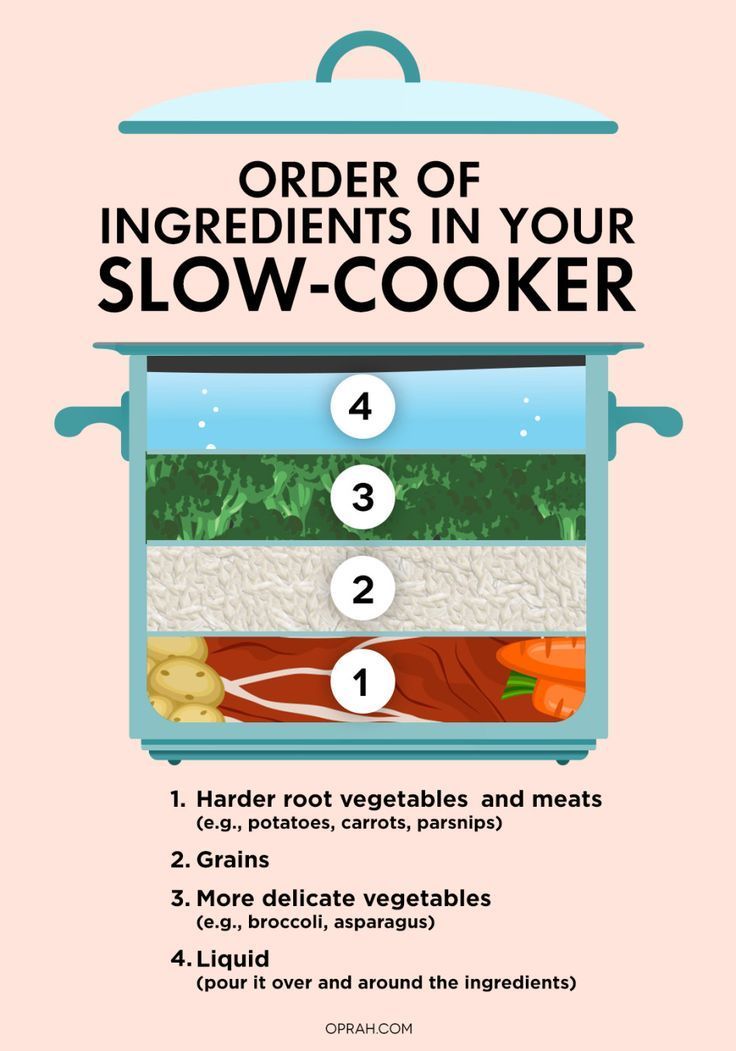
Master the Layering Sequence
Strategic placement prevents the #1 slow cooker failure: mushy carrots atop dry chicken. Start with hard root vegetables like potatoes and carrots cut into uniform 1.5-inch chunks—they need the most direct heat from the base. Add meat next, trimming visible fat first (rendered fat pools without drainage). Top with delicate items like spinach or peas—they’ll steam gently without disintegrating.
Skip the Oil Trap
Contrary to stovetop habits, adding oil to your crockpot causes greasy disasters. The moist heat environment naturally prevents sticking as long as liquid covers the bottom. For richer flavor, brown ground beef in a skillet first to drain excess grease, or sear roasts 60 seconds per side for caramelized depth. Caramelize onions separately too—their raw sharpness lingers even after 8 hours.
Liquid Adjustments That Prevent Watery Disasters
Slash Liquid by One-Third Immediately
Slow cookers lose minimal moisture due to their tight seals, so conventional recipes drown your dish. If a stew calls for 3 cups broth, use 2 cups max. Ingredients should be just submerged—never exceeding the three-quarter fill line. Too little liquid creates hot spots that burn food; too much dilutes flavors into blandness. Remember: sauces thicken naturally during cooking, so resist adding extra liquid upfront.
Ditch Dairy Until the Final Hour
Milk, cream, and cheese separate when exposed to prolonged heat. Stir in dairy-based sauces, coconut milk, or sour cream during the last 30 minutes only. Similarly, add quick-cooking elements like pasta, rice, or fresh herbs in the final hour—they turn to sludge if added at the start.
Temperature Control for Tender, Not Tough, Results
Low vs. High: When to Switch Settings
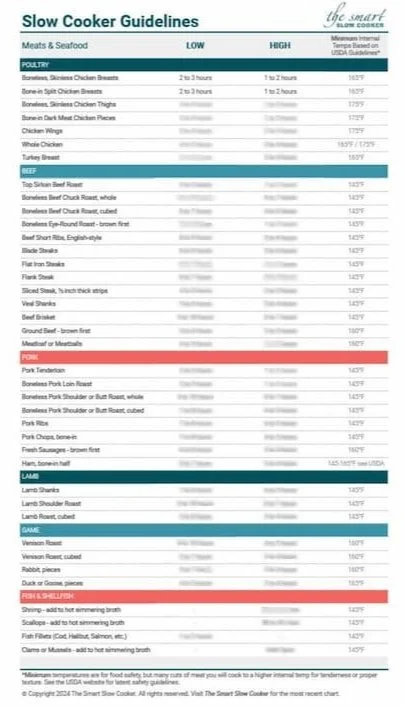
LOW (200°F/93°C) is your default setting for 90% of recipes. It gently breaks down collagen in tough cuts like pork shoulder over 8-10 hours, yielding fork-tender meat. HIGH (300°F/149°C) suits lean proteins like chicken breasts for 4-5 hours max—any longer dries them out. WARM (165°F/74°C) holds food safely but never cooks it; switch to this mode after cooking completes.
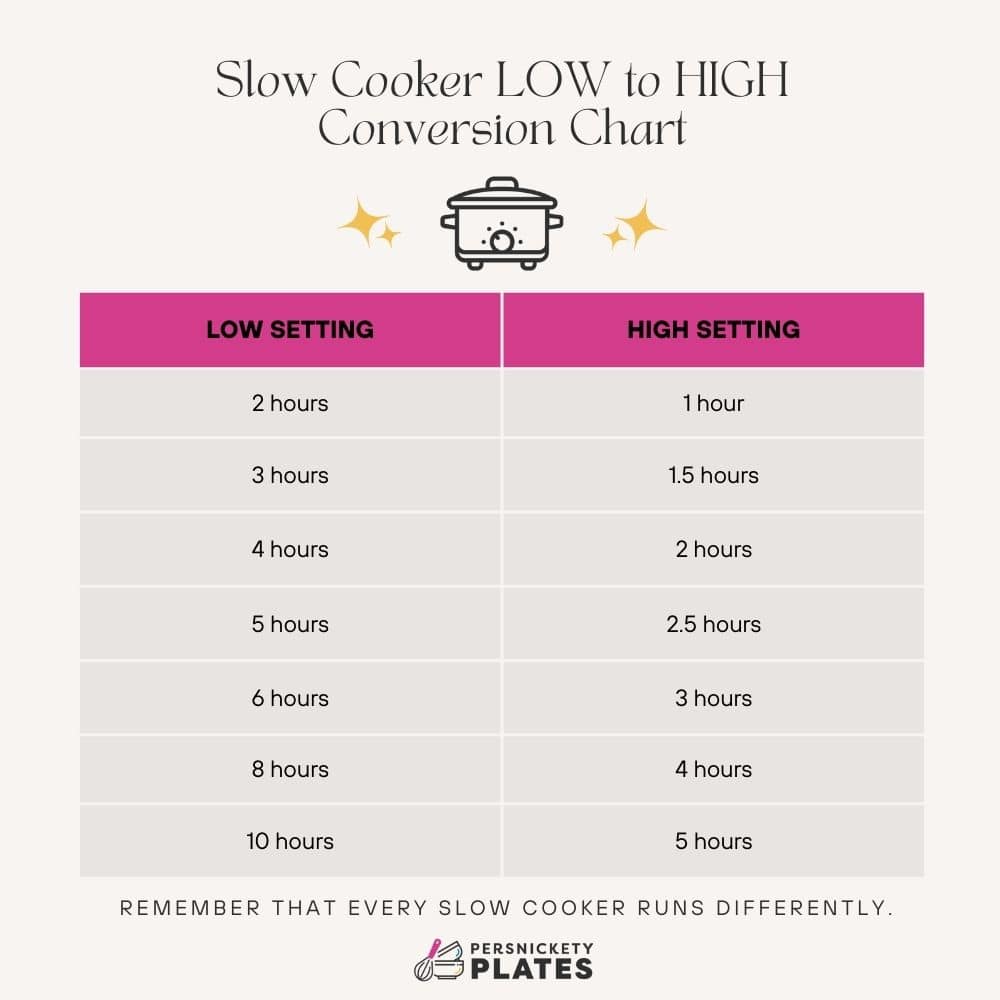
Convert Stovetop Times Instantly
Transform any recipe with this chart:
– 15-30 minute stovetop cook → LOW 4-6 hours or HIGH 1-2 hours
– 30-60 minute stovetop cook → LOW 6-8 hours or HIGH 2-3 hours
– 1-3 hour stovetop cook → LOW 8-10 hours or HIGH 4-5 hours
Execute the Morning Assembly Routine Flawlessly
Avoid These 3 Critical Errors
- Never plug in a cold insert straight from the fridge—thermal shock cracks ceramics. Let it sit 15-20 minutes at room temperature first.
- Skip transport locks during cooking—they trap pressure and prevent steam venting, risking lid blowouts.
- Resist lifting the lid—each peek adds 15-20 minutes to cook time by releasing built-up heat.
Programmable models auto-switch to WARM when done, but manual units need external timers. Set reminders to switch to WARM after cooking completes—never leave food on HIGH for “just 30 more minutes.”
Add Ingredients at Precision Timing
Start-to-Finish Additions Cheat Sheet
| Add at the Beginning | Add in Final 30-60 Minutes |
|---|---|
| Root vegetables (potatoes, carrots) | Pasta, rice, quinoa |
| Tough meats (chuck roast, pork shoulder) | Dairy (cream, cheese, milk) |
| Dried beans (in bean-safe recipes) | Fresh herbs (basil, cilantro) |
| Frozen meatballs (pre-cooked only) | Leafy greens (spinach, kale) |
| Seafood (shrimp, fish) |
Adding rice too early turns it into glue—stir in uncooked rice during the last 60 minutes for perfect texture. For thick sauces, mix 1-2 tsp cornstarch with cold water into a slurry and stir in during the final 15 minutes.
Safety Rules That Prevent Costly Mistakes
Never Cook Frozen Roasts Directly
Solid frozen meats create dangerous temperature zones where bacteria multiply rapidly. Thaw roasts completely overnight in the fridge first, or use pre-portioned freezer meals designed for slow cookers.
Handle Inserts Like Fragile Glass
Ceramic inserts crack if moved from cold to hot abruptly. Always thaw ingredients overnight in the insert, then let the whole unit warm up on your counter for 20 minutes before plugging in. If using liners, choose BPA-free Reynolds brand—they prevent staining and simplify cleanup.
Fix Common Problems in Minutes
Undercooked Food? Check These Culprits
- Lid lifted too often (each peek adds 20 minutes)
- Overfilled cooker blocking heat circulation
- Insufficient liquid creating cold spots
- Oversized crockpot for small recipes
Solution: Add ½ cup liquid, reset timer for 1-2 hours on HIGH, and keep the lid sealed.
Greasy or Burnt Results? Apply These Fixes
- Trim all visible fat from meats before cooking
- Brown ground beef and drain grease first
- Skim fat from the surface before serving
- Never exceed two-thirds fill to prevent scorching
For thin sauces, whisk 1 tsp cornstarch with 1 tbsp cold water and simmer 10 minutes covered.
Beginner Recipes That Guarantee Success
Start With These 5-Ingredient Wins
- Mississippi Pot Roast: Chuck roast + pepperoncini + ranch seasoning + au jus mix + butter
- Salsa Chicken: Chicken breasts + salsa + taco seasoning + black beans + corn
- Garlic Parmesan Pasta: Chicken + cream cheese + garlic + parmesan + uncooked pasta (add last hour)
Build Meal-Prep Powerhouses
Shredded chicken (stores 5 days refrigerated) and pork carnitas form the base for tacos, salads, or grain bowls all week. For turkey breast, cook 6 hours on LOW—slice immediately for sandwiches or shred for soups.
Final Pro Tips for Consistent Perfection
Mastering how to use a crockpot slow cooker hinges on three non-negotiables: never overfill, always trim fat, and respect the fill rule. Start with 5-ingredient recipes to build confidence before attempting lasagna or cheesecake—yes, your slow cooker bakes both flawlessly. Remember that LOW heat develops deeper flavors than HIGH, and programmable timers prevent overcooking disasters.
Within weeks, you’ll develop intuitive timing for your favorite dishes. The real victory? Coming home to restaurant-quality meals with only 10 minutes of prep. Keep this guide handy for your first 5 recipes, and soon you’ll wonder how you ever cooked without this countertop essential. Your future self—relaxed, well-fed, and free from last-minute dinner panic—will thank you.


