
That frustrating moment when your poached eggs turn into wispy whites and rubbery yolks? Your egg cooker solves this brunch nightmare in under 10 minutes. Forget vinegar swirls and timer anxiety—this appliance transforms finicky poaching into a precise, repeatable process. By following these exact water measurements and timing techniques, you’ll achieve restaurant-perfect eggs with tender whites and molten yolks every single time. This guide reveals the critical details most manufacturers omit, including why cold water matters and how to avoid common pitfalls that ruin your results.
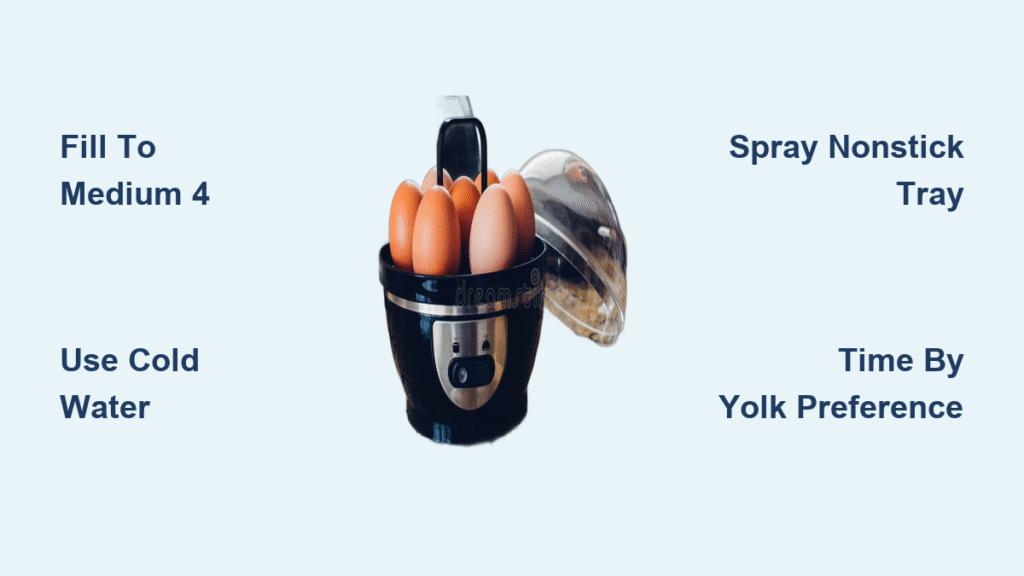
Fill Water to MEDIUM 4 Mark
Your egg cooker’s magic happens through controlled steam pressure, and this starts with precise water volume. Pour cold tap water into the included measuring cup until it hits the MEDIUM 4 line—no more, no less. This exact amount generates optimal steam for three standard large eggs. Too much water floods the poaching compartments; too little causes scorching and uneven cooking.
Check Water Temperature
Always use cold water straight from the faucet. Warm or hot water accelerates steam production, cooking yolks too quickly and creating that dreaded chalky texture. If your tap water runs warm, chill it in the fridge for 5 minutes first. You’ll notice immediate improvement in yolk consistency.
Pour Into Center Reservoir
Aim the water stream directly into the circular depression in the cooker’s base. This central reservoir distributes heat evenly around the poaching tray. Pouring off-center creates steam pockets that cook one egg perfectly while leaving others underdone. Watch for the water to pool symmetrically before assembling other components.
Prep Poaching Tray Correctly
Your poaching tray’s condition directly impacts egg release. Most models feature three individual wells designed for single-egg portions—never skip prepping this component. A bare tray guarantees stuck eggs and torn whites, ruining presentation.
Spray Nonstick Coating
Hold cooking spray 6 inches from the tray and apply one quick burst per compartment. Avoid pooling by spraying while the tray is tilted. This creates an invisible barrier that lets eggs slide out cleanly. Skip this step, and you’ll spend valuable minutes scraping stubborn bits from scratched surfaces.
Secure Components
- Place the heating base on a dry, level countertop (uneven surfaces cause water leakage)
- Snap the egg holder ring firmly onto the base until it clicks
- Lower the poaching tray straight down to avoid misalignment
- Verify no gaps exist between components—steam escapes through even tiny openings
Crack Eggs Without Breaking Yolks
This is where most home cooks fail. Your egg cooker eliminates water swirling but demands careful egg transfer. Use room-temperature eggs—they’re less prone to yolk breakage than cold ones straight from the fridge.
One-Handed Cracking Technique
Tap the egg’s equator firmly on a flat surface (not the bowl edge!), then pull halves apart over the tray. This minimizes shell shards and keeps yolks centered. If a fragment falls in, fish it out immediately with a wet fingertip—residual shell ruins texture.
Fill All Compartments
Crack all three eggs even if serving fewer people. Empty wells disrupt steam flow, causing uneven cooking. For single-egg meals, fill the extra compartments with water to maintain pressure balance. Never overload beyond three eggs—the tray wasn’t engineered for it.
Set 6-8 Minute Timer
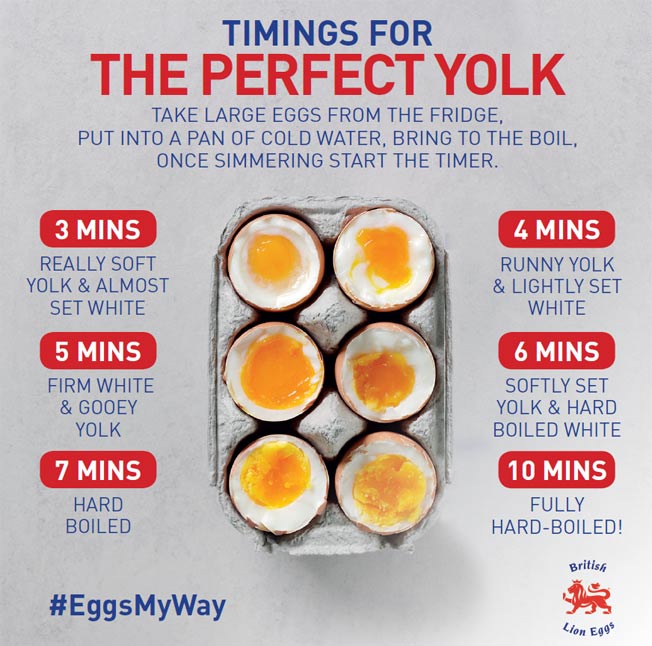
Cover the unit completely and press the power button. The cooker now regulates steam automatically, but timing determines your yolk’s fate. Set your phone timer as backup—the built-in alert can be easy to miss.
Timing Guide by Preference
- 6 minutes: Liquid yolk center (ideal for Eggs Benedict)
- 7 minutes: Jammy, custard-like yolk (perfect for avocado toast)
- 8 minutes: Fully set but tender yolk (best for salads)
Critical move: Flip the power switch OFF the second the alert sounds. Residual heat will overcook eggs in 30 seconds.
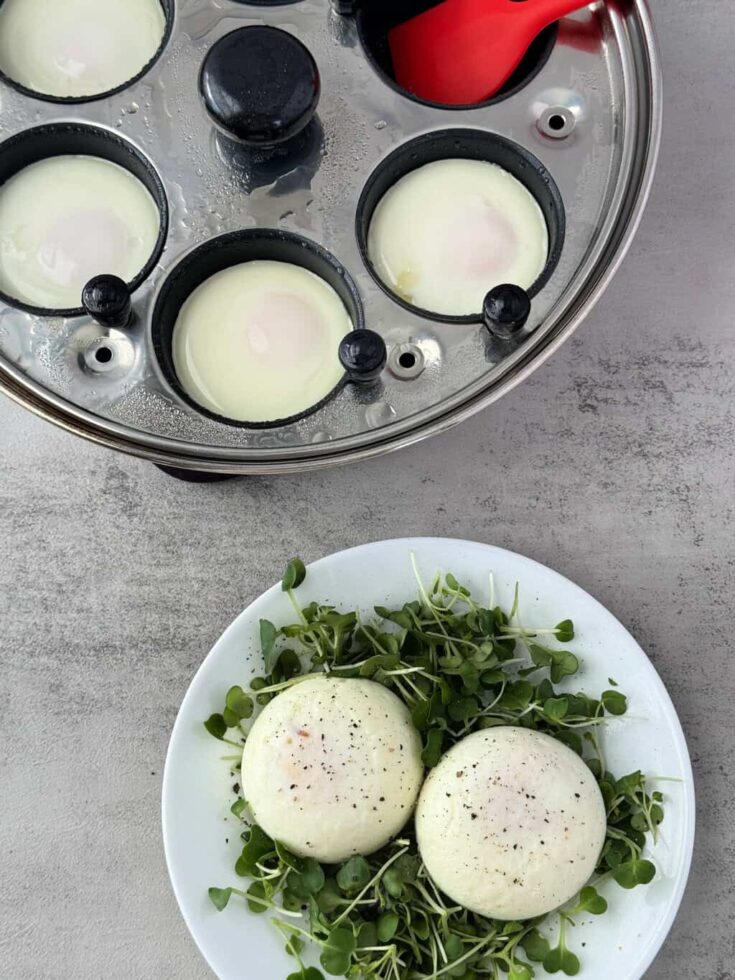
Remove Eggs Safely
Steam burns are the hidden danger here. Never lift the lid straight toward your face—steam rises vertically. Work with oven mitts even though the exterior feels cool; trapped steam can scald instantly.
Drain Excess Water
Slide a silicone spatula under each egg and transfer to a paper towel-lined plate. Let them rest for 10 seconds to absorb surface moisture. Skipping this step drowns your English muffin in watery residue.
Season and Serve Hot
Sprinkle flaky salt and cracked pepper immediately after draining. Poached eggs cool rapidly—serve within 90 seconds for that signature warm-yolk flow. Delaying turns delicate whites rubbery.
Fix Common Problems
Eggs stick stubbornly to tray: Increase spray to two bursts per compartment or replace scratched trays (nonstick degrades after 6 months).
Whites spread thin like lace: Use eggs less than 7 days old—their thicker whites hold shape better.
Yolks overcook despite timing: Start checking at 5 minutes if using extra-large eggs.
Uneven cooking: Ensure water reservoir is centered and all tray slots are filled (even with water).
Master Timing Variations
Large eggs need 30 seconds longer than standard; jumbo eggs exceed capacity. For extra-large eggs, extend to 7.5 minutes for jammy yolks. Always adjust based on your specific eggs—size varies wildly between brands.
Altitude Adjustments
Above 3,000 feet, add 45 seconds to cooking time. Lower atmospheric pressure reduces water’s boiling point, slowing steam penetration. Test with one egg first before committing to a full batch.
Batch Cooking
For second servings, unplug the unit and wait 3 minutes for residual heat to dissipate. Never reuse hot water—it creates inconsistent steam density. Always start with fresh cold water in the measuring cup.
Elevate Your Presentation
Transform basic poached eggs into brunch showstoppers with these pro shortcuts that leverage your cooker’s efficiency.
Eggs Benedict Shortcut
While eggs cook, toast English muffin halves. Layer Canadian bacon, warm muffin, then your perfectly poached egg. Drizzle with store-bought hollandaise for a 7-minute gourmet meal.
Avocado Toast Toppers
Mash 1/2 avocado with lime juice and sea salt on toasted sourdough. Top with a 6.5-minute poached egg and everything bagel seasoning. The runny yolk becomes instant sauce.
Salad Protein Boost
Chop cooled poached eggs over arugula salad with lemon vinaigrette. The yolk emulsifies the dressing while whites add lean protein—ready in 8 minutes flat.
Maintain Your Cooker
Residue buildup sabotages future batches. Hardened egg proteins insulate the heating element, causing inconsistent steam. Clean immediately after use while components are still warm.
Daily Cleaning
Rinse the poaching tray under hot water within 5 minutes of cooking. Use a soft sponge with dish soap—never steel wool, which destroys nonstick coating. Dry thoroughly to prevent mineral deposits.
Deep Clean Weekly
Mix equal parts white vinegar and water in the measuring cup. Run one full cooking cycle, then wipe all components with a microfiber cloth. This dissolves limescale that affects steam precision.
Store Leftovers Safely
Refrigerate cooled eggs in a covered container with 1/4 inch water to maintain moisture. They’ll keep for 72 hours—but texture degrades after day two.
Prep-Ahead Brunch
For weekend entertaining, cook eggs to 5.5 minutes (slightly underdone). Submerge in ice water for 1 minute, then refrigerate. Reheat in 140°F water for 60 seconds before serving—yolks stay molten.
Your egg cooker turns poached egg anxiety into brunch confidence. By nailing the MEDIUM 4 water line, using cold tap water, and timing to your yolk preference, you’ll consistently achieve that elusive tender-white/runny-yolk balance. Remember to spray the tray religiously, fill all compartments, and flip the power off the instant the timer sounds. These small adjustments prevent 90% of common failures. Now that you’ve mastered how to poach an egg in an egg cooker, experiment with toppings—try everything bagel seasoning on avocado toast or a dash of smoked paprika over salads. With this method, perfect poached eggs become your easiest culinary win, ready faster than scrambled.


