
That stubborn ring of tomato sauce baked onto your slow cooker’s metal housing isn’t just unsightly—it’s actively shortening your appliance’s lifespan. Unlike the ceramic insert you casually toss in the dishwasher, the metal base contains delicate electrical components that demand a completely different cleaning approach. Water seeping into these areas can cause electrocution hazards or permanent damage the next time you plug in your appliance. This guide delivers precise, safety-first methods for how to clean the metal part of a slow cooker effectively without risking your safety or destroying your kitchen workhorse.
Most home cooks mistakenly treat the entire slow cooker as one unit, not realizing the metal housing requires specialized care. When food spills bake onto these surfaces during cooking, they create electrical hazards and affect heat distribution. The good news? With the right techniques, you can safely restore your slow cooker’s metal base to like-new condition in under 20 minutes—no electrical expertise required.
Why Your Slow Cooker’s Metal Housing Needs Specialized Cleaning
Food residue on your slow cooker’s metal base does more than look unappetizing—it creates genuine safety hazards. Spills that seep into crevices can corrode electrical components, while grease buildup near ventilation holes increases fire risk. The longer these residues remain, the more they bake onto surfaces during each use, eventually becoming nearly impossible to remove without damaging the finish.
Immediate consequences of neglecting metal base cleaning:
– Electrical shorts from food acids contacting internal wiring
– Uneven cooking from obstructed heat distribution
– Permanent discoloration that worsens with each use
– Lingering odors transferring to future meals
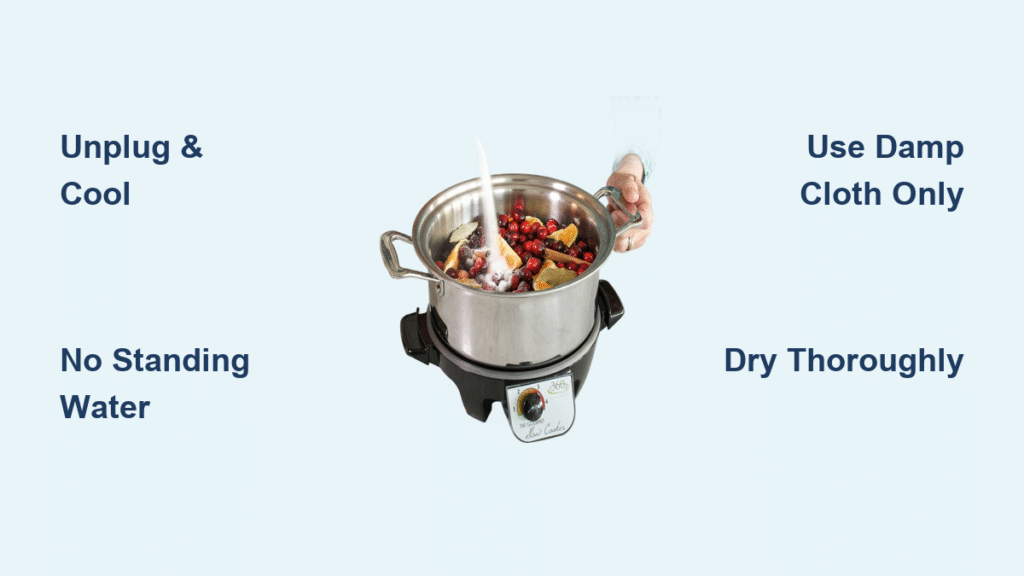
Critical Safety Steps Before Cleaning Begins

Before you touch a single cleaning cloth, understand this non-negotiable rule: your slow cooker’s metal base must never contact standing water. This isn’t a suggestion—it’s a safety imperative that prevents electrocution and appliance destruction. Even experienced home cooks make this fatal mistake, thinking “just a little water won’t hurt.”
Power Disconnection Protocol
Unplug your slow cooker and wait at least two hours for complete cooling. Residual warmth creates steam when cleaning, potentially carrying moisture to electrical components. Confirm the metal housing is room temperature by touching multiple points with your palm—never proceed while any warmth remains.
Moisture Control Techniques
Use only cloths dampened to “wrung-out sponge” level—visible moisture should be minimal. Test your cloth by holding it over a sink; no drips should fall. Excess liquid migrates through seams and ventilation holes, reaching circuits that can short when next plugged in. Keep a dry towel nearby to immediately blot any accidental moisture exposure.
Remove Ceramic Insert Before Any Cleaning
This critical first step exposes all metal surfaces for thorough treatment. Grasp the stoneware liner’s handles firmly and lift straight up—never twist or rock the insert. Set it aside for separate cleaning in your sink. With the ceramic component removed, you’ll see the full extent of spills and can safely access every metal surface without risking damage to the fragile liner.
Commercial Cleaners That Deliver Results
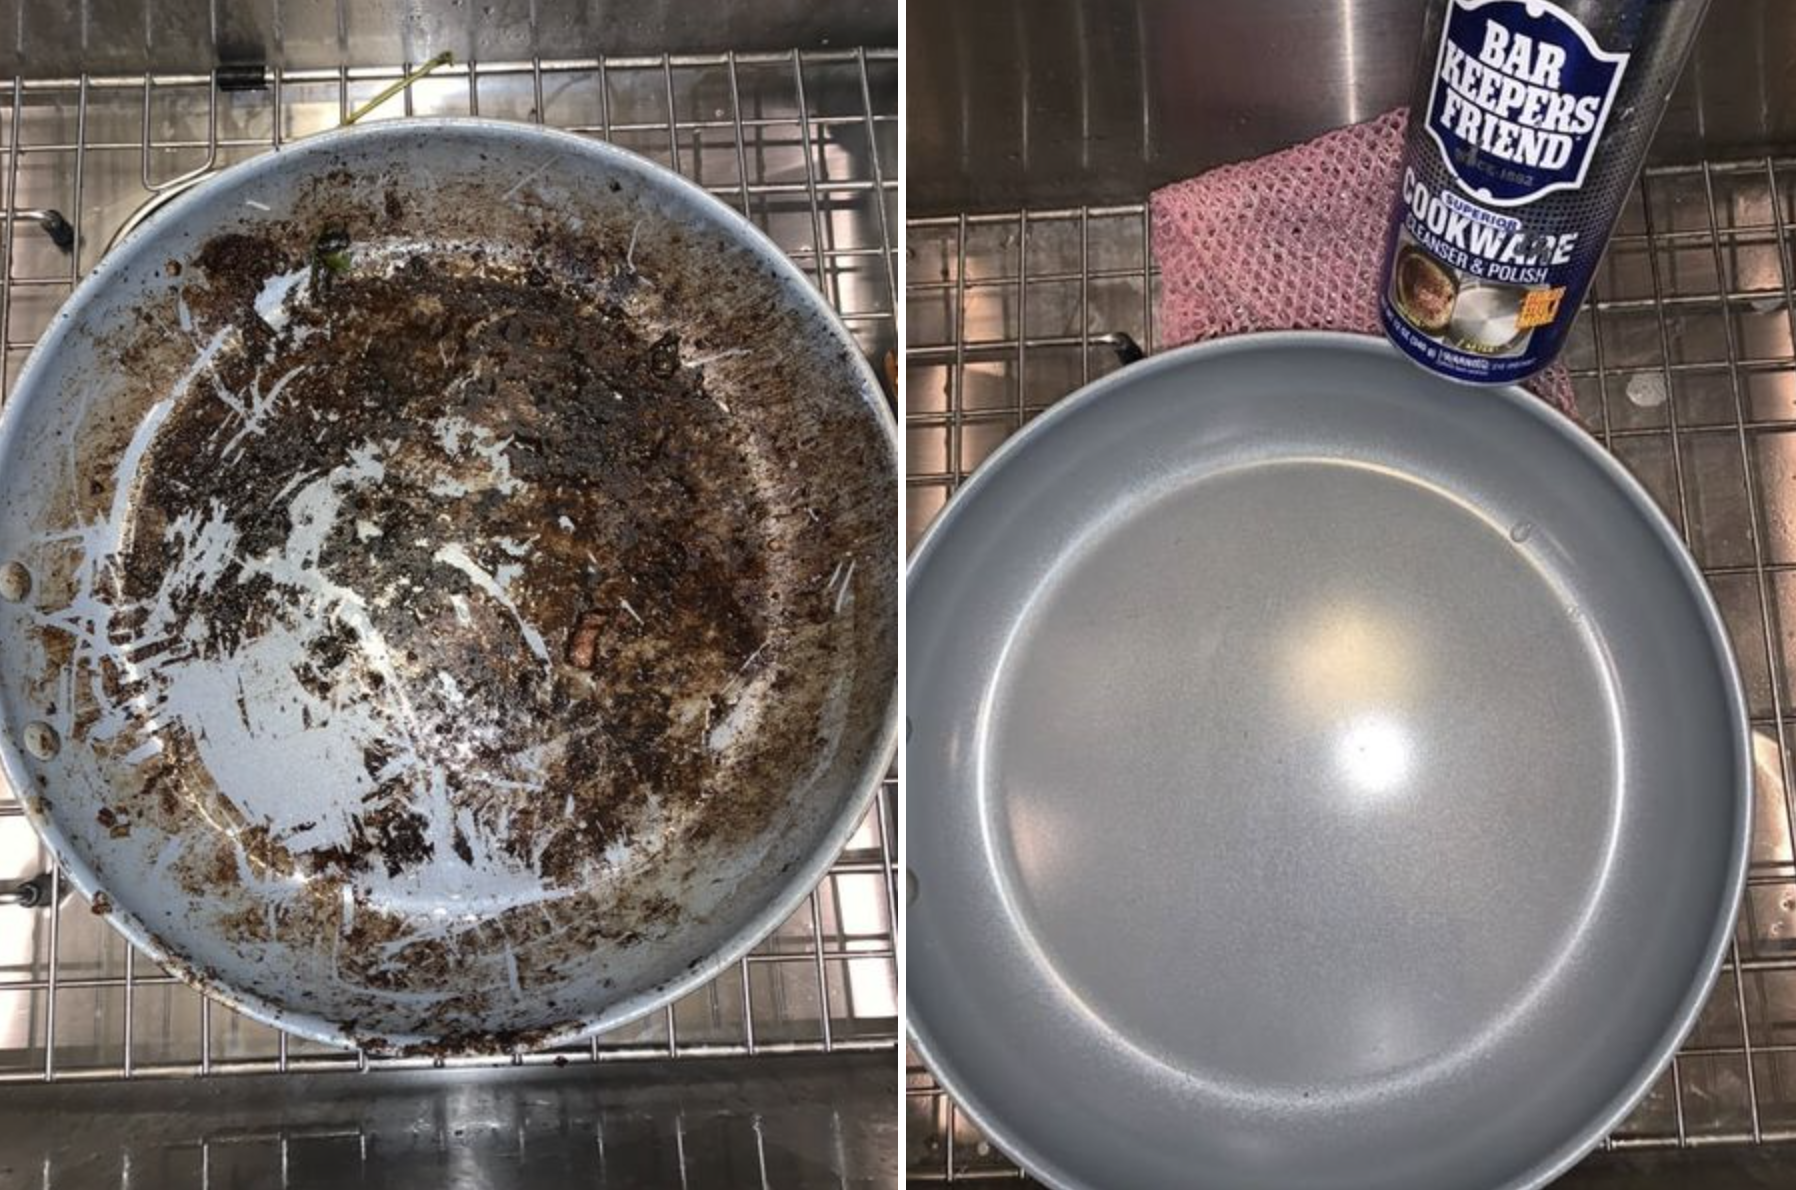
Bar Keeper’s Friend Application Method
Bar Keeper’s Friend outperforms all other products for removing stubborn burn stains from slow cooker metal bases. This powdered cleaner contains oxalic acid that breaks down baked-on food without harsh scrubbing.
Proper usage technique:
– Dampen microfiber cloth with minimal water
– Sprinkle small amount of powder onto cloth (not directly on appliance)
– Rub stained areas using light circular motions
– Focus on discolored spots for 15-20 seconds
– Wipe clean with separate damp cloth
– Dry immediately with paper towel
Magic Eraser Effectiveness Guide
Mr. Clean Magic Erasers provide mechanical cleaning power through microscopic abrasion. They work like ultra-fine sandpaper, lifting stains without scratching metal finishes.
Optimal application:
– Lightly dampen eraser with single drop of water
– Test on inconspicuous area first
– Use pencil-eraser sized sections for precision
– Apply consistent, gentle pressure in short strokes
– Replace eraser when visibly dirty (they wear quickly)
– Wipe residue with clean, barely damp cloth
Natural Cleaning Solutions That Work
Vinegar and Baking Soda Deep Cleaning Process
This chemical reaction creates effervescence that penetrates baked-on messes without harsh chemicals. The fizzing action lifts residue while neutralizing odors.
Step-by-step execution:
1. Fill spray bottle with plain white vinegar
2. Lightly mist affected metal areas (avoid pooling)
3. While vinegar is still wet, sprinkle baking soda directly onto stains
4. Observe bubbling reaction—this indicates active cleaning
5. Let mixture work for 5-10 minutes for tough stains
6. Wipe clean with barely damp cloth using circular motions
7. Repeat for persistent residue
Lemon Juice Alternative for Sensitive Areas
For lighter stains near electrical components, lemon juice provides safer acidity than vinegar. Mix equal parts lemon juice and water in a spray bottle for controlled application that cuts through grease without strong odors.
Target Specific Stain Types Effectively
Burnt Food Rings Around Heating Element
These circular stains require precision treatment to avoid damaging the heating coil housing. Apply Bar Keeper’s Friend paste directly to the ring, let sit for 3 minutes, then gently rub with damp cloth using inward circular motions. For extreme cases, create a thicker paste with minimal water and let work for 10 minutes before wiping.
Sauce Splatter Removal Technique
Food splatters containing sugars harden into glassy residues. Spray with vinegar, wait 5 minutes for softening, then use Magic Eraser with short, firm strokes working from outer edges toward center. This prevents spreading the stain while breaking its bond to the metal surface.
Grease Buildup Elimination
Grease stains respond best to the baking soda method. The alkaline nature cuts through oil while gentle abrasion lifts residue. Apply paste with circular motions, then wipe with downward strokes to prevent re-depositing grease onto cleaned areas.
Complete Metal Surface Cleaning Protocol
Systematic Wiping Pattern
Start cleaning from the top rim, working downward in 2-inch sections. This prevents cleaned areas from catching drips from above. Use consistent pressure (about the weight of a pencil) and check your cloth every 30 seconds—replace when visibly dirty to avoid redistributing grime.
Residue-Free Final Wipe
After cleaning agents do their work, use a fresh microfiber cloth barely dampened with distilled water to remove all traces of cleaning products. Rinse and wring the cloth three times to ensure no residue remains. Any leftover cleaner will burn and create unpleasant odors during next use.
Guarantee Complete Drying Before Reassembly
Moisture left on metal surfaces creates rust and electrical hazards. Follow this drying protocol:
– Blot all surfaces with paper towels for immediate moisture absorption
– Air dry for 45 minutes in well-ventilated area (not in direct sunlight)
– Use hair dryer on cool setting for crevices near electrical components
– Check seams with dry cotton swab to detect hidden moisture
Critical tip: Leave the slow cooker disassembled overnight after deep cleaning to ensure absolute dryness before reassembly.
Prevent Future Buildup With Smart Habits
Immediate Post-Use Cleaning Routine
Wipe the metal housing with a damp cloth within 30 minutes of unplugging if spills occurred. This 45-second habit prevents the need for deep cleaning later. Keep a dedicated soft cloth stored with your slow cooker for quick access.
Monthly Deep Cleaning Schedule
Even without visible spills, perform thorough cleaning monthly. Set calendar reminders to establish this routine—consistency prevents invisible residue buildup that affects performance. Mark your calendar for the first of each month for automatic maintenance.
Protective Measures That Work
- Use slow cooker liners for messy recipes like chili or barbecue
- Place aluminum foil ring between ceramic insert and metal housing
- Wipe spills immediately when safe to do so (after unplugging)
- Store with ceramic insert slightly ajar for air circulation
Dangerous Cleaning Mistakes to Avoid
Never commit these errors:
– Submerging the metal base in water (even partially)
– Using steel wool or abrasive pads that scratch protective coatings
– Spraying cleaners directly onto metal surfaces
– Using oven cleaner or dishwasher detergent
– Rushing the drying process with heat sources
Warning signs requiring immediate cessation:
– Rust spots appearing after cleaning
– Electrical burning smell during next use
– Visible moisture near power cord connection
– Discoloration that worsens with each cleaning
When Professional Service Becomes Necessary
If you notice electrical issues, persistent odors after cleaning, or rust that won’t respond to treatment, discontinue use immediately. Contact the manufacturer—some problems indicate internal damage requiring professional service rather than surface cleaning. Never attempt to disassemble the metal housing yourself, as this voids safety certifications and creates electrocution risks.
Your slow cooker’s metal housing can maintain like-new appearance with proper care. By following these precise methods and establishing consistent cleaning habits, you’ll extend your appliance’s life while ensuring safe, delicious meals for years. Remember: that 30-second wipe-down after each use prevents the 20-minute deep cleaning session later. Most importantly, always prioritize safety over speed—your slow cooker’s metal components demand respect, but with the right approach, they’ll serve you reliably for countless meals to come.


