

That glass lid tucked in your Emeril Lagasse box isn’t just for decoration—it unlocks a hidden slow cooker mode most owners miss. Your Pressure Air Fryer transforms into a dedicated slow cooker with this single component, letting you build deep flavors in chuck roast while you work or create fall-apart chicken curry with zero monitoring. Forget complicated setups; this dual-function powerhouse handles everything from dried beans to vegetarian stews using just one switch and the included glass lid. You’ll discover why this feature turns budget cuts into gourmet meals and how to avoid the #1 mistake that ruins slow-cooked dishes.
Glass Lid Setup Process: Activate Slow Cooking Mode
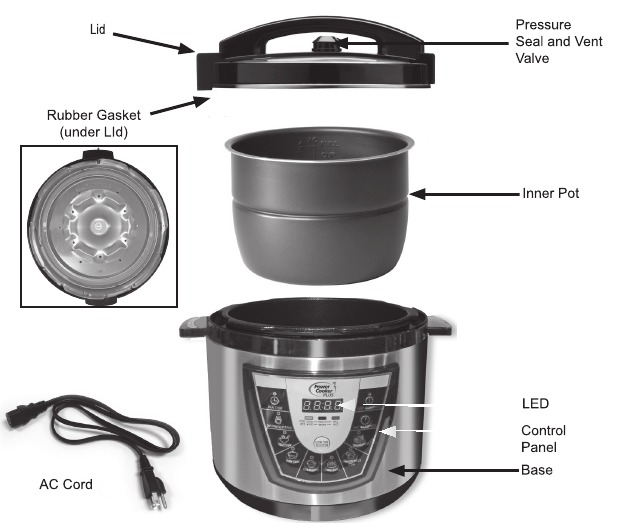
Skip the pressure cooker lid entirely—this is your critical first step. Place the glass lid directly onto the cooking pot to create the sealed slow-cooking environment. The transparent design lets you monitor progress without releasing precious heat or steam, unlike traditional slow cookers where peeking resets cooking time. Ensure the lid sits flush with no gaps around the rim.
Switch to Slow Cook Mode in 30 Seconds
Press the Slow Cook Button once—the display instantly confirms activation. Use the +/- buttons to set your exact cook time (up to 12 hours). Select Low for 6-8 hour recipes like pot roast or High for 3-4 hour dishes like chicken soup. The LED indicators glow steadily to show your selection—no confusing symbols or hidden menus.
Control Panel Navigation for Beginners
New users often miss that temperature settings lock in after 5 seconds of inactivity. Set your time first, then choose Low/High. If you select High but need Low later, simply press Slow Cook again and reset—no need to restart the entire cycle. The display shows remaining time clearly, counting down as your meal simmers.
Temperature Settings Guide: Low vs High Heat Decoded
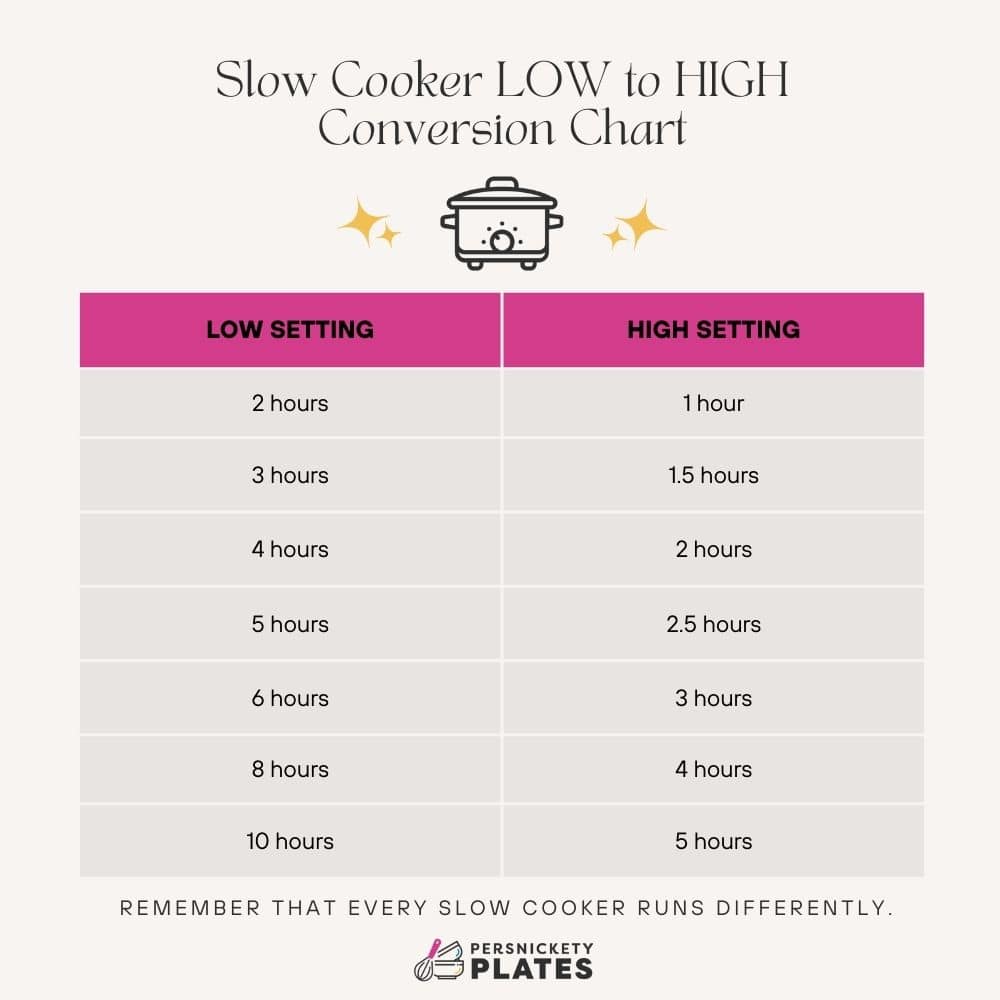
Low (190°F) isn’t just “slower cooking”—it’s the secret to transforming tough cuts. This gentle heat breaks down collagen in chuck roast or brisket over 6-8 hours, yielding fork-tender results without drying. Perfect for dried beans (no pre-soaking needed), all-day soups, or dishes where ingredients must retain shape like root vegetable stews.
High (212°F) delivers restaurant-speed results for time-crunched cooks. Ideal for chicken thighs, sausages, or vegetable curries that cook through in 3-4 hours while staying juicy. Use this setting when you forget to start dinner early—it’s not “rushing” the process but leveraging precise high-heat circulation.
Keep Warm Function: Prevent Overcooking
When cooking completes, the unit automatically shifts to Keep Warm (165°F) for up to 4 hours. This isn’t a passive mode—it actively maintains food safety while you finish side dishes or wait for family. Never leave food in Keep Warm beyond 4 hours, as flavors degrade and textures turn mushy.
Essential Safety Steps Before First Use
Maximum Fill Lines You Must Respect

Never fill past the 2/3 mark for liquid-heavy dishes like soups or chili. For grain-based recipes (quinoa, rice) or dried beans, stop at the 1/2 mark—these expand dramatically during cooking. Overfilling risks clogging the anti-block shield and causes messy boil-overs that damage the heating element.
Lid Safety Checks That Prevent Disasters
Before each use, run your finger along the glass lid rim checking for hairline cracks. Inspect the silicone seal underneath for twists or gaps—reposition it until it sits flat against the pot. Replace damaged seals immediately ($12 online); compromised seals create steam leaks that extend cooking time by hours.
Flavor Building Techniques: Beyond Dump-and-Go
Layer Ingredients Like a Pro
Bottom layer: Dense vegetables (potatoes, carrots) and aromatics (onions, garlic) that need longest cook time
Middle layer: Proteins (seared first for 3 minutes in pressure mode) sitting on vegetables—not submerged
Top layer: Delicate items (zucchini, peas) added in last 60 minutes
Liquids: Pour ½ cup broth around ingredients first to deglaze fond, then add remaining liquid
Herb Timing Strategy for Maximum Impact
Add at start: Whole spices (cumin seeds), bay leaves, dried thyme—these need hours to bloom
Add last 30 minutes: Fresh parsley, cilantro, or dill—delicate flavors vanish with prolonged heat
Add at finish: Lemon zest or hot sauce—brightens rich stews without “cooking out”
Beef Stew Master Recipe: 8-Hour Transformation
Why Chuck Roast Wins Every Time
Choose well-marbled chuck roast cut into 2-inch cubes—avoid lean sirloin that dries out. The intramuscular fat renders slowly, basting meat from within. Sear first in pressure cook mode for 3 minutes per side to lock in juices and create fond (those browned bits = flavor gold).
Step-by-Step Process That Never Fails
- Sear beef in pressure cook mode (3 min/side)
- Build base: Add 1 diced onion, 2 carrots, 2 celery stalks to browned bits
- Deglaze: Pour 2 cups beef broth while scraping bottom
- Season: 2 bay leaves, 1 tsp thyme, 1 tsp paprika (no salt yet—reduces later)
- Slow cook: 8 hours on Low until beef shreds with two forks
Texture Test: Don’t Guess, Verify
Gently press beef with a fork—if it offers resistance, cook 30-60 minutes longer. Overcooked stew becomes stringy; undercooked stays chewy. Perfect stew holds its shape but separates cleanly when nudged.
Common Mistakes to Avoid: Save Your Dinner
Overcrowding the Pot: The Silent Killer
Filling beyond ¾ full traps steam unevenly, creating cold spots that undercook food. For large batches, cook in shifts—this appliance excels at 4-6 servings max per cycle. If doubling recipes, increase liquid by only 25% (not 100%) to avoid watery results.
Dairy Timing That Prevents Curdling
Milk, cream, or cheese added too early separates into grainy bits. Always stir in dairy during the last 30 minutes on Keep Warm mode. For coconut milk-based curries, add it after initial vegetable simmering—never at the start.
Cleaning and Maintenance: Extend Your Appliance’s Life
Daily Cleaning Protocol
After cooling 30 minutes, remove the inner pot and wash with warm soapy water (never dishwasher—it warps). Wash the glass lid on the top rack only. Wipe the heating element with a damp microfiber cloth—never submerge the base unit. Dry all parts thoroughly to prevent mineral buildup.
Deep Clean Schedule for Peak Performance
Weekly: Remove and soak the silicone seal in vinegar-water solution (1:1 ratio) for 15 minutes to dissolve grease. Check the anti-block shield (under the lid) for food debris using a soft brush. Replace the seal every 12-18 months—cracks cause steam leaks that add hours to cooking.
Pro Tips for Slow Cooking Success
Leftover Transformation Hack
Shred leftover beef or chicken into taco seasoning for next-day tacos, or stir into quinoa bowls. Freeze cooking liquid in ice cube trays—these flavor bombs instantly upgrade soups or grain dishes. Never discard that rich broth!
Batch Cooking Without Burning
Double recipes safely by:
– Increasing liquid by only 25%
– Layering ingredients 25% thinner
– Adding 15 minutes to cook time
Freeze portions in 4-cup containers for up to 3 months—thaw overnight before reheating.
Quick Reference Chart: Emeril Lagasse Slow Cook Times
| Food Type | Low Setting | High Setting | Doneness Test |
|---|---|---|---|
| Beef Chuck | 8 hours | 4 hours | Fork shreds with light pressure |
| Chicken Thighs | 6 hours | 3 hours | 165°F internal temp, no pink |
| Dried Beans | 8-10 hours | 5-6 hours | No chalky center when bitten |
| Root Vegetables | 6-7 hours | 3-4 hours | Knife slides in with no resistance |
Your Emeril Lagasse slow cooker turns overlooked cuts into showstopper meals with minimal effort—no babysitting required. Start with the beef stew recipe using that glass lid you nearly tossed, and you’ll never buy canned soup again. Remember: low-and-slow isn’t just a setting—it’s your shortcut to deeper flavors, tender textures, and reclaiming weeknight dinner sanity. The next time you’re tempted to order takeout, grab that glass lid instead; in 4 hours, your kitchen will smell like a five-star bistro.


