

You’ve probably stared at your Aroma slow cooker wondering why your pot roast turned out dry or your chili boiled over. You’re not alone—most owners never move beyond basic rice mode despite owning a powerful slow-cooking tool. Whether you have a dedicated Aroma slow cooker or a multi-cook model with slow-cook function, mastering these settings transforms cheap cuts into fall-apart perfection while you tackle other tasks. This guide reveals exactly how to use your Aroma slow cooker safely and effectively, eliminating guesswork for consistently tender meals.
Unlike traditional slow cookers, Aroma models hide critical slow-cook functions behind rice-centric buttons. The good news? Once you decode the control panel, your unit becomes a hands-off meal machine capable of everything from 8-hour pulled pork to overnight steel-cut oats. Skip the confusing manual—we’ll walk through every step from initial setup to troubleshooting real-world cooking disasters.
Initial Setup: Cleaning, Burn-Off & Placement for Aroma Slow Cookers
Complete First-Time Cleaning Protocol
Unbox your Aroma slow cooker and remove all packaging materials. Wash the inner pot, steam vent cap, condensation collector, and included spatula in warm soapy water using a soft sponge—never steel wool. While these parts are top-rack dishwasher safe, hand-washing preserves the non-stick coating long-term. Dry all components thoroughly before assembly. Neglecting this step risks plastic residue tainting your first meal.
Mandatory Burn-Off Cycle to Prevent Chemical Taste
Manufacturing oils cause metallic flavors in initial dishes. Add exactly 2 cups plain water to the dry inner pot, secure the lid with steam vent open, then press KEEP WARM once to power on. Press SLOW COOK twice for HIGH setting and run 30 minutes. Discard the water and wipe the pot with a damp cloth—this one-time process eliminates factory residues. Skipping this risks ruined meals and lingering chemical odors.
Critical Placement Requirements for Safety
Position your Aroma slow cooker on a completely flat, heat-resistant surface with at least 4 inches of clearance from walls or cabinets. Never place under hanging cabinets—the rear steam vent requires unobstructed airflow. Always use the original power cord in a grounded 120V outlet. Operating on uneven surfaces or near flammable materials risks tipping or fire hazards due to prolonged heating cycles.
Decoding Your Aroma Control Panel: Slow Cook Button Secrets

Button Translation Guide for Slow Cooking
Your Aroma unit’s rice-focused labels hide slow-cook functionality. Ignore all “RICE” settings—they use aggressive heating unsuitable for slow cooking. Instead:
– KEEP WARM/POWER: Press once to activate unit (display lights)
– SLOW COOK: Press once for LOW (190°F) or twice for HIGH (212°F)
– DELAY TIMER: Programs start time up to 15 hours ahead (select models only)
– STEAM/RICE BUTTONS: Never use for slow-cook recipes
LED Display Decoding During Slow Cooking
During operation, the display shows a chasing dot pattern—not active timing. The final 10 minutes count down visibly before auto-switching to KEEP WARM mode. If you see “E1” error code, unplug immediately—this indicates overheating from insufficient liquid. Proper display reading prevents premature lid lifting, which adds 15-30 minutes to cook time each time.
Ingredient Prep Rules That Prevent Slow Cooking Disasters
Liquid Volume: The Scorch Prevention Formula
Always use at least 1 cup liquid (broth, water, or sauce) to prevent scorching—this is non-negotiable. Never exceed the MAX fill line etched inside the pot (approximately ¾ capacity). For thick stews or chili, fill only ⅔ full since bubbling ingredients expand during cooking. Underfilling causes dryness; overfilling guarantees boil-overs that trigger error codes.
Cutting Guide for Evenly Cooked Results
Dense ingredients like potatoes, carrots, or dried beans require uniform 1-inch pieces. Larger chunks create “raw centers” while exteriors turn mushy. Proteins should be cut into 2-inch cubes—larger pieces won’t break down properly on LOW setting. Skipping precise cutting causes uneven texture where some components are rubbery while others disintegrate.
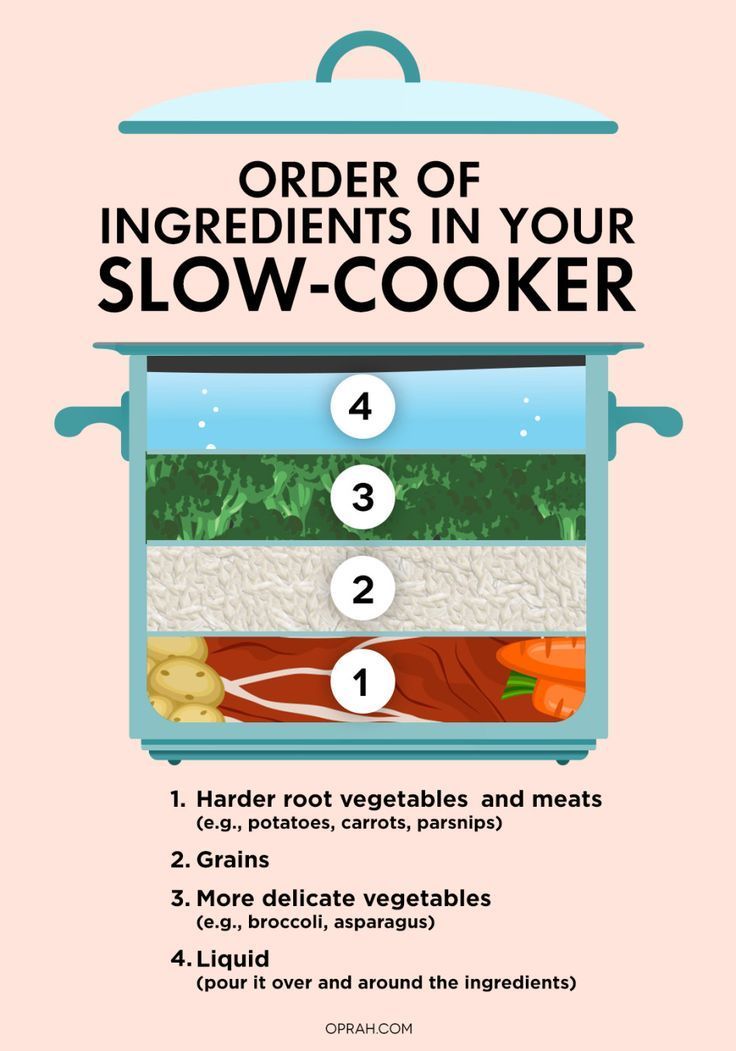
Foolproof Layering Order for Perfect Heat Distribution
Follow this sequence to prevent cold spots:
1. Root vegetables/grains (potatoes, carrots, rice) on the bottom near the heating element
2. Meats/proteins (chuck roast, chicken thighs) in the middle layer
3. Aromatics (onions, garlic, herbs) on top of solids
4. Liquids poured last (broth, canned tomatoes, sauces) to lock in moisture
Programming Your First Slow-Cook Meal: Step-by-Step

60-Second Setup Process for Any Recipe
- Add prepped ingredients following layering order
- Secure lid with steam vent cap open (prevents pressure buildup)
- Press KEEP WARM once to activate unit
- Press SLOW COOK once for LOW or twice for HIGH
- Set DELAY TIMER if starting later (optional)
- Walk away—never stir during cooking
Temperature & Time Cheat Sheet
| Dish (3-4 Servings) | LOW Setting | HIGH Setting | Critical Liquid Ratio |
|---|---|---|---|
| Pot roast (3 lb) | 8-10 hours | 4-5 hours | ½ cup broth minimum |
| Chicken chili | 6-7 hours | 3-3.5 hours | Cover solids by ½ inch |
| Steel-cut oats | 7-8 hours | 3.5-4 hours | 3 cups water per 1 cup oats |
| Bean soup | 5-6 hours | 2.5-3 hours | 1 cup extra liquid |
Pro Tip: Brown meats in a skillet first—this caramelization adds depth impossible through slow cooking alone. Deglaze the pan with broth and add those flavorful bits to the pot.
Troubleshooting Real Slow Cooker Emergencies
Why Your Food Isn’t Cooking Through (And Immediate Fixes)
Symptom: Meat remains tough or vegetables are raw in center despite full cook time.
Cause: Insufficient liquid or oversized ingredient pieces blocking heat transfer.
Fix: Add ¼ cup hot broth, switch to HIGH for 30-60 minutes. Next time, cut ingredients smaller and verify liquid meets minimum requirements. Never add cold liquid—it shocks the heating element.
Stop Boil-Overs Before They Ruin Your Countertop
Symptom: Lid rattling violently with messy spills escaping steam vent.
Cause: Overfilling beyond ⅔ capacity or using HIGH setting for dense stews.
Fix: Immediately unplug unit, cool for 20 minutes, then restart on LOW. For future batches, reduce ingredient volume by 20% and use LOW setting for gentler simmering—especially with bean-based dishes.
E1 Error Code: The Overheating Emergency
Symptom: Display shows “E1” with unit shutting down.
Cause: Liquid level below 1 cup minimum triggering over-temperature sensors.
Fix: Unplug for 10 minutes, verify liquid meets requirements, then restart. If recurring, descale the heating element with vinegar solution—mineral buildup insulates the sensor.
Daily Cleaning Routine That Preserves Your Cooker
5-Step Post-Meal Maintenance
- Unplug and wait 30 minutes for complete cooling (prevents warping)
- Remove inner pot, steam vent cap, and condensation collector
- Hand-wash non-stick components with soft sponge (dishwasher top-rack safe but harsher)
- Wipe base housing with damp cloth only—never immerse
- Store with lid slightly ajar to prevent musty odors
Critical “Never Do” List
Avoid metal utensils, abrasive cleaners, or steel wool on the non-stick pot—they create permanent scratches causing food to stick and reducing heating efficiency. Never store the unit with the cord tightly coiled; this damages internal wiring. Most warranty claims stem from these preventable mistakes.
Pro Secrets for Restaurant-Quality Results
The Overnight Oats Game-Changer
Prep steel-cut oats with 3 cups water and pinch of salt the night before. Refrigerate in the inner pot covered with plastic wrap. Next morning, place the cold pot directly into the base—no pre-warming needed—and select SLOW COOK LOW for 7 hours. You’ll wake to perfectly creamy, non-mushy oats without babysitting.
Sauce Thickening Trick in 30 Minutes
For gravy that coats a spoon: 30 minutes before serving, remove ½ cup cooking liquid. Whisk with 1 tablespoon cornstarch until smooth, then return to pot. Switch to HIGH setting—the final simmer creates restaurant-quality thickness without flour lumps.
The 12-Hour Keep-Warm Safety Rule
While your Aroma automatically switches to KEEP WARM after cooking, unplug after 12 hours. Extended warming degrades food quality and risks bacterial growth in the “danger zone” (40°F-140°F). Set a phone reminder if cooking overnight.
Your Aroma slow cooker how to use mastery starts now. Forget dry pot roasts and boil-overs—apply these precise liquid ratios, layering techniques, and error code fixes for foolproof meals. Start with a simple 4-hour HIGH chicken chili tonight, then progress to 10-hour LOW brisket. Remember the golden rules: never skip the burn-off cycle, always use 1+ cup liquid, and cut ingredients uniformly. Within weeks, you’ll confidently create hands-off meals that taste like you spent all day cooking—while actually tackling your to-do list. The next time your unit beeps signaling completion, you won’t wonder “Is it done?” You’ll know exactly when to pull that perfect, fall-off-the-bone pork shoulder.


