
You’re late for work, hungry kids are at the table, and the thought of boiling water for poached eggs feels like a full-blown kitchen crisis. A microwave egg cooker solves this daily breakfast battle in under 90 seconds—no simmering pots, no swirling water, and zero cleanup anxiety. This specialized gadget uses controlled steam within sealed compartments to transform raw eggs into restaurant-quality poached perfection while you pour your coffee. Forget rubbery yolks or watery whites; when you master the precise water measurement and yolk-pricking technique, you’ll consistently achieve tender-cooked eggs with that signature runny center.
In this guide, you’ll discover the exact microwave timing adjustments for your specific wattage, the critical safety step that prevents explosive messes, and the flipping trick that turns wrinkled-looking eggs into Instagram-worthy breakfasts. We’ll walk through every detail using only verified techniques from microwave egg cooker manufacturers—no guesswork, no kitchen disasters. By the end, you’ll cook flawless poached eggs faster than your toaster springs up your bread.
Select Your Microwave Egg Cooker Correctly
Identify Essential Compartment Features
Choose a cooker with individual egg-holding sections, each designed to accommodate exactly one standard large egg. Confirm the container uses microwave-safe plastic construction with heat-resistant properties, as stated in product specifications. The lid must feature a secure closure system to contain steam during cooking—this seal prevents messy splatters and ensures even heat distribution. Verify dishwasher-safe certification for effortless post-cooking cleanup, eliminating hand-scrubbing nightmares.
Confirm Safety Compliance Before First Use
Before initial cooking, inspect your egg cooker for manufacturer labels confirming microwave-safe and dishwasher-safe compliance. These certifications guarantee the plastic won’t warp or release chemicals during heating. Run a simple water test: fill compartments with water, microwave at full power for 30 seconds, and check for any deformation—this verifies heat resistance before adding eggs.
Crack and Prepare Eggs Without Failures
Perfect Single-Egg Placement Method
Gently crack one cold egg directly into each compartment, aiming for centered yolks. Work over the cooker itself to avoid shell fragments in your meal. If yolks break during cracking, the eggs will still cook safely but won’t achieve the classic poached egg presentation—reserve these for sandwiches where appearance matters less.
Non-Negotiable Yolk Pricking Procedure
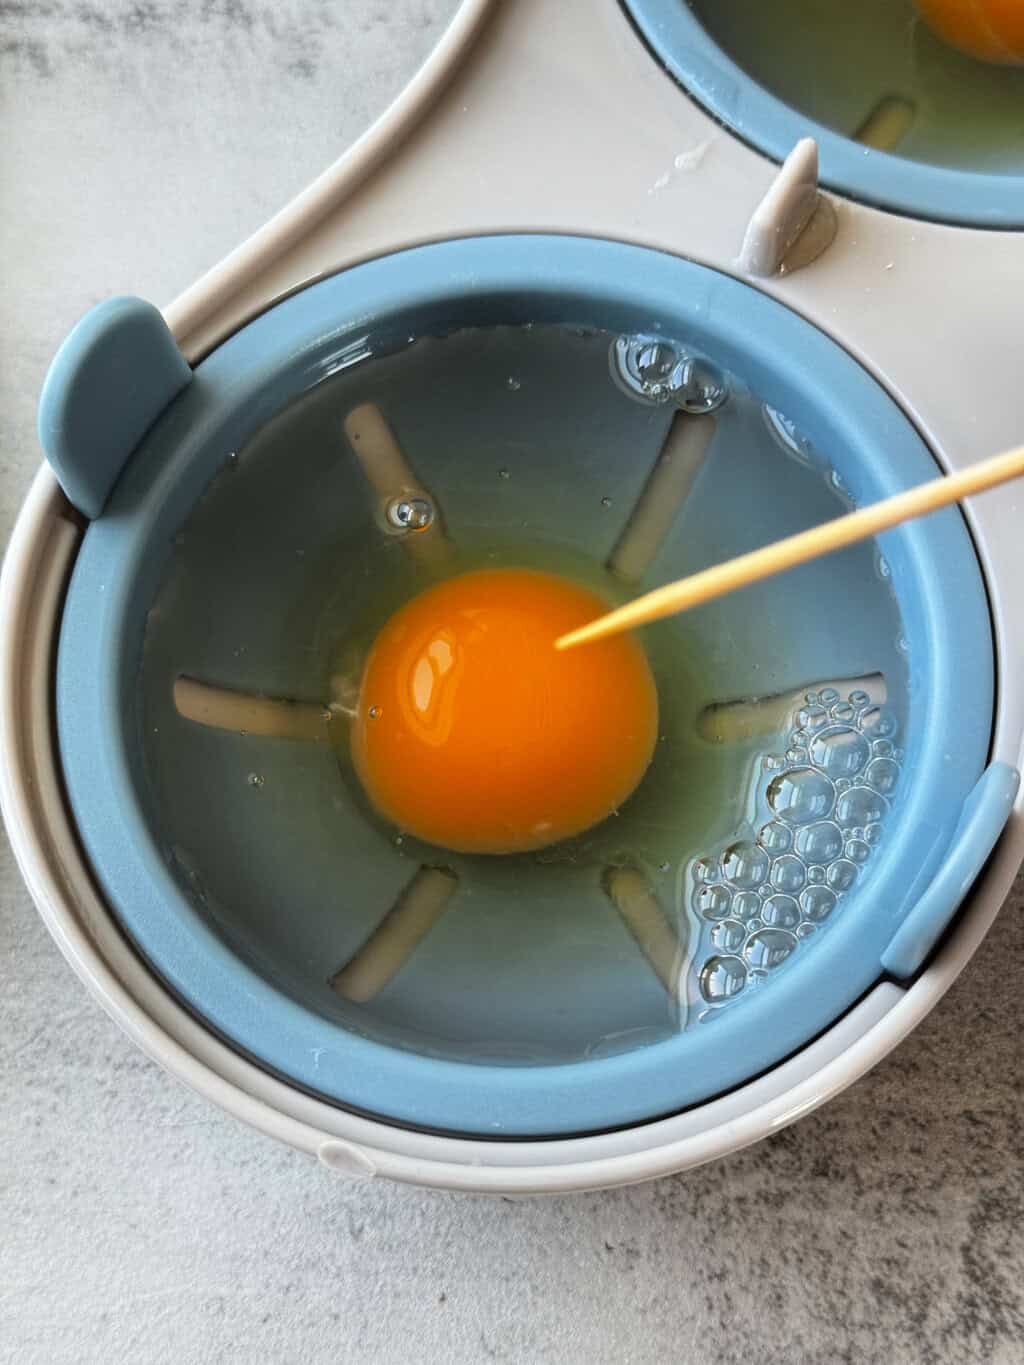
Puncture each yolk exactly once with a fork tine or toothpick before cooking. This microscopic hole releases internal steam pressure that builds during microwave heating. Skip this step, and trapped steam causes explosive pops that scatter egg fragments across your microwave interior—wasting food and creating hazardous cleanup.
Add Water for Precision Steam Cooking
Exact Water Measurement Per Egg
Pour precisely 1 tablespoon of cold tap water over each egg in its compartment. This specific amount creates the optimal steam environment to cook the top surface evenly without submerging the egg. Too little water leaves upper whites translucent and jelly-like; too much produces watery, overcooked eggs with compromised texture. Measure consistently—eyeballing causes frequent failures.
Strategic Water Distribution Technique
Drizzle water slowly around (not directly onto) the egg white to avoid breaking yolks. The liquid should form a shallow ring around the egg, pooling slightly at the compartment base. Cold tap water works perfectly—no preheating or filtration needed—as it generates consistent steam when heated.
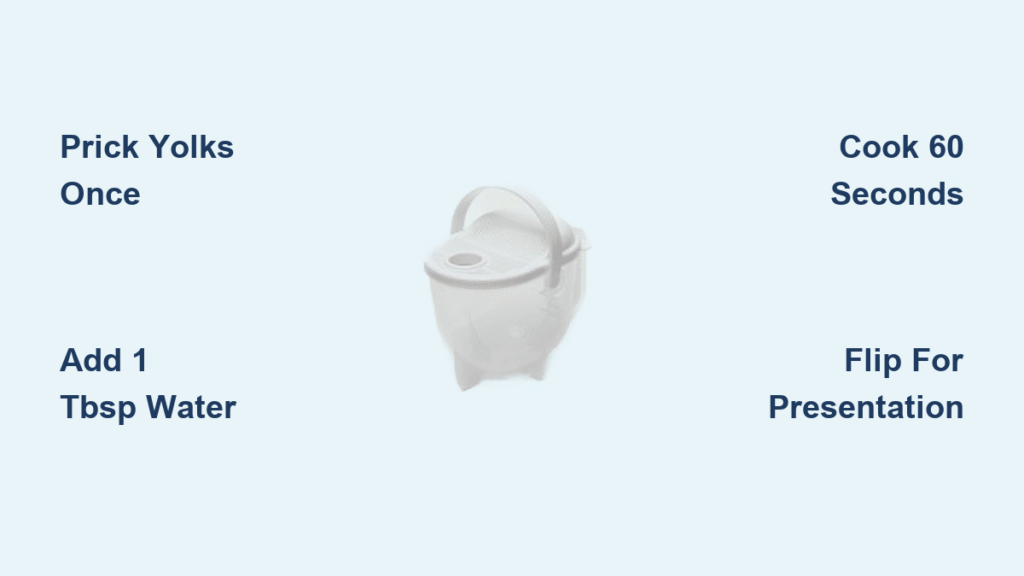
Optimize Microwave Timing for Your Unit
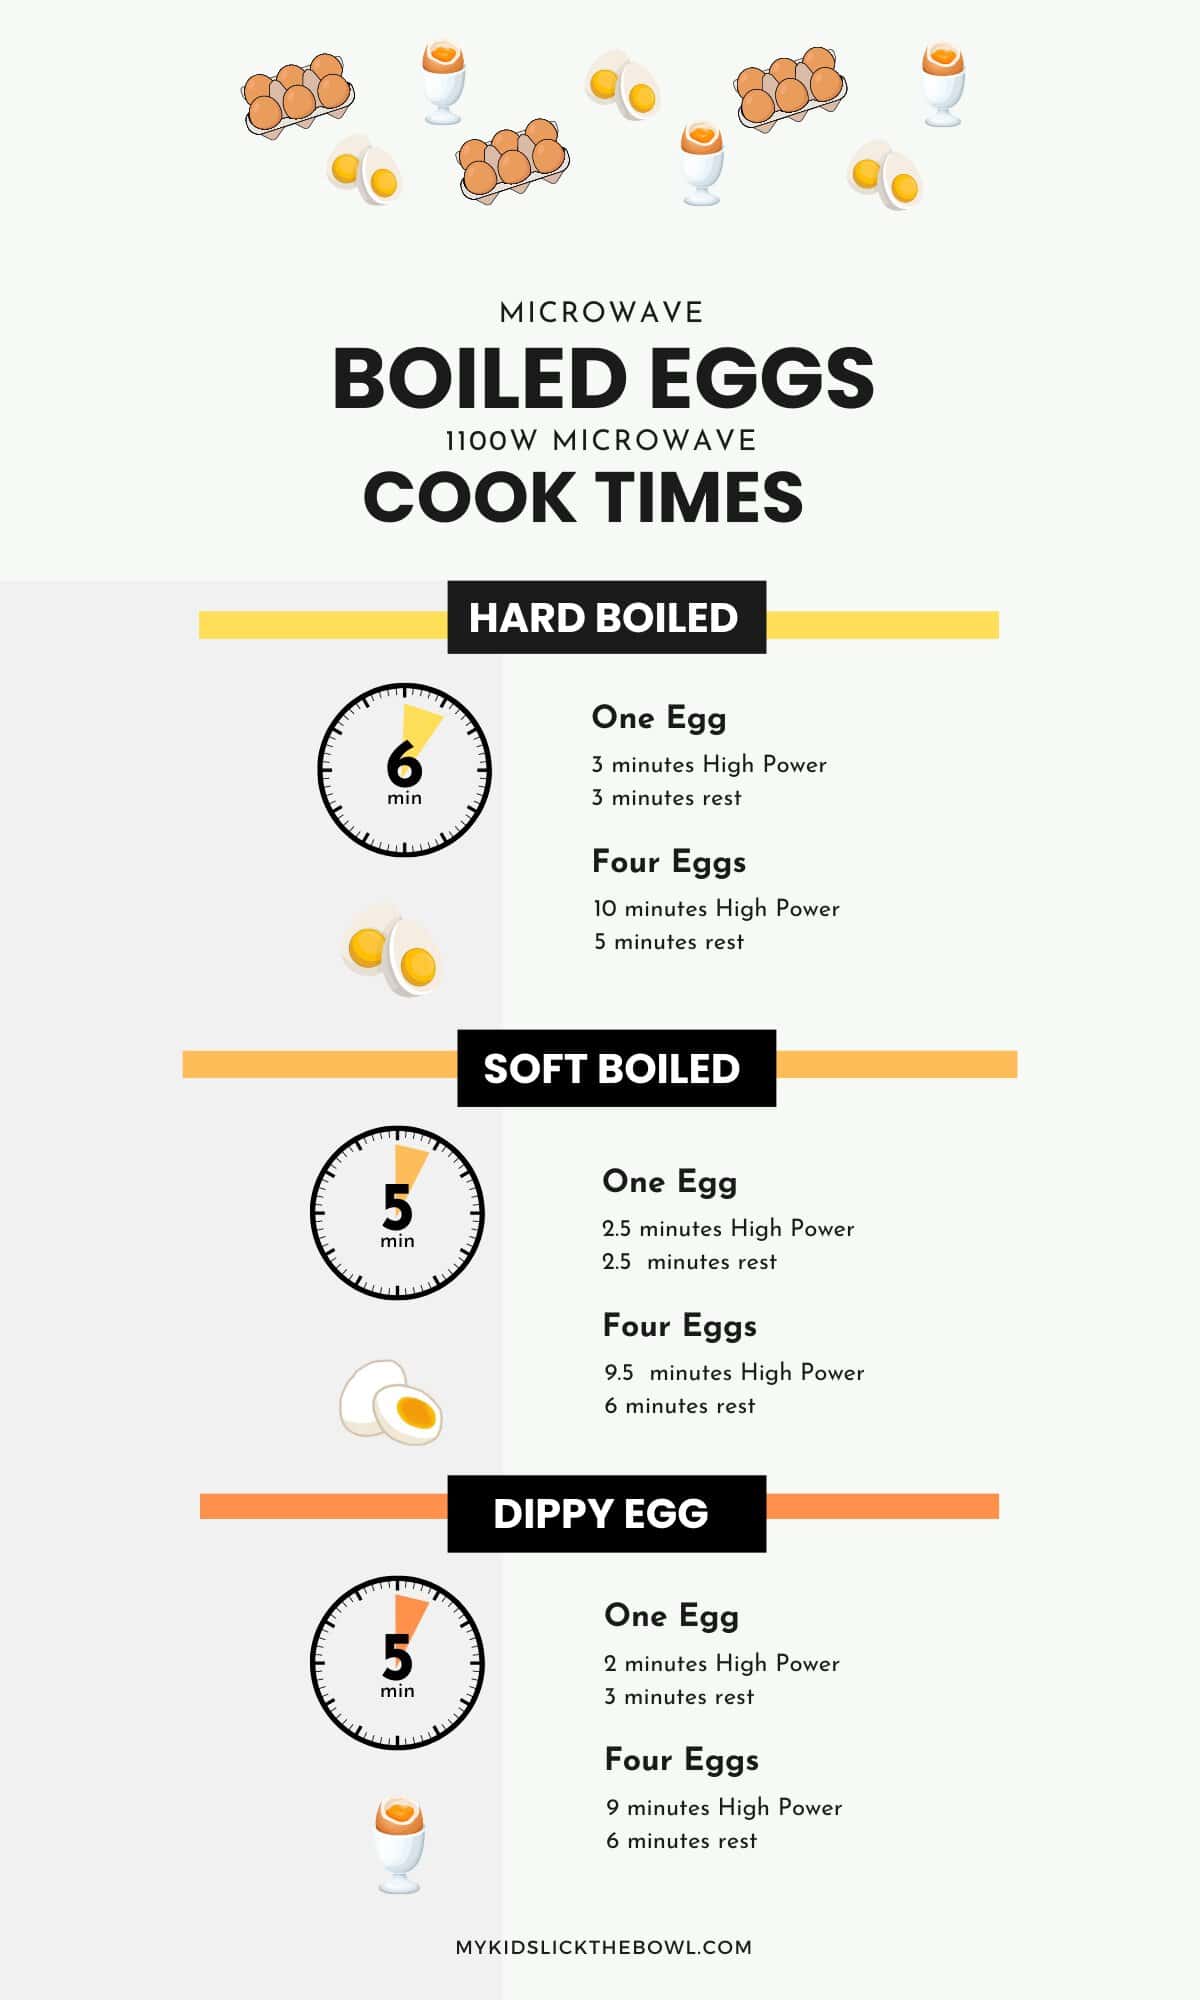
Standard Full-Power Baseline
Seal the lid completely over snapped compartments and microwave at 100% power for exactly 60 seconds. This timing works for most standard 800-1000W units, yielding set whites with slightly runny yolks. Never exceed 75 seconds initially—eggs continue cooking from residual heat after removal.
Wattage-Specific Timing Adjustments
- 1000W+ microwaves: Start with 50-55 seconds
- 700-900W microwaves: Use 60-75 seconds
- 600W microwaves: Begin testing at 90 seconds
Incremental Testing for Perfect Doneness
If eggs appear undercooked, add time in 10-second bursts rather than larger increments. After each interval, gently shake the cooker—perfect eggs show slight jiggle in the center while whites remain fully opaque. Overcooking happens in seconds, turning delicate eggs rubbery.
Verify Cooking Completion Accurately
Visual Doneness Indicators
Open the cooker away from your face—escaping steam burns instantly. Perfectly cooked eggs display completely opaque whites with no translucent patches. The yolk surface should appear glossy and slightly domed, not flat or cracked. If whites look cloudy, add 10 seconds immediately.
Expected Texture Standards
Achieve true poached-egg consistency: tender, fully set whites encasing a warm liquid yolk. The bottom surface may appear slightly wrinkled—this is normal and corrects during flipping. Avoid overcooked eggs that feel firm to the touch or release excessive liquid when plated.
Troubleshoot Common Cooking Failures

Fix Undercooked Eggs Immediately
If whites remain runny or translucent after initial cooking, reseal the lid and microwave for 10-15 seconds more. Check doneness after each interval—residual heat means eggs cook further off-heat. Never restart full timing; incremental bursts prevent rubbery texture.
Stop Explosive Yolk Disasters
Unpricked yolks guarantee explosive pops and egg shrapnel coating your microwave. If this occurs, unplug the unit immediately and wipe interior surfaces with a damp cloth before residue hardens. Always prick yolks next time—this single step prevents 95% of failures.
Correct Uneven Cooking Issues
When one egg cooks faster than others, verify two critical factors: water was added to every compartment, and the lid snapped shut completely across all edges. Uneven microwave turntable rotation also causes inconsistencies—ensure nothing blocks its movement during cooking.
Elevate Presentation Like a Pro
Flipping Technique for Flawless Appearance
Gently slide a silicone spatula under each egg and invert it onto your plate. This reveals the smooth underside that cooked against the compartment base—transforming wrinkled tops into picture-perfect domes. Perform this while eggs are hot for clean release.
Optimal Seasoning Timing
Apply salt, pepper, or specialty seasonings immediately after flipping while eggs are piping hot. Heat helps flavors adhere rather than pooling at the plate bottom. Try everything bagel seasoning or smoked paprika for instant gourmet appeal without extra prep time.
Serve Eggs Creatively for Any Meal
Streamlined Breakfast Sandwiches
Slide flipped eggs onto toasted English muffins with ham or bacon for instant Eggs Benedict-style breakfasts. The microwave’s consistent cooking ensures eggs hold shape during assembly—no collapsing or sliding off like traditional poached eggs.
Protein-Packed Salad Toppers
Chop cooled eggs over spinach or arugula salads. The runny yolk creates an instant creamy dressing when mixed with greens—eliminating bottled dressings and added calories. Ready in under 2 minutes for weekday lunches.
Gourmet Avocado Toast Upgrade
Place a whole flipped egg atop mashed avocado toast. As the yolk breaks, it mingles with creamy avocado for a rich, restaurant-quality bite. The microwave’s precise timing prevents overcooked yolks that ruin this simple dish.
Clean and Store Your Cooker Properly
Immediate Post-Cooking Rinse Protocol
Rinse compartments with warm water within 2 minutes of cooking while residue is soft. Dried egg proteins bond tenaciously to plastic—delayed cleaning requires aggressive scrubbing that damages non-stick surfaces over time.
Dishwasher Safety Best Practices
Place the cooker on your dishwasher’s top rack only, facing downward to prevent water pooling. Remove visible egg fragments before starting the cycle—dishwasher filters aren’t designed to handle protein buildup, which causes odors in future loads.
Mold-Prevention Storage Method
Air-dry compartments completely before stacking. Store with the lid slightly ajar to circulate air—trapped moisture between stacked containers breeds mold within 48 hours, especially in humid climates.
Microwave Egg Cooker Troubleshooting Cheat Sheet
| Problem | Root Cause | Immediate Fix |
|---|---|---|
| Explosions during cooking | Unpricked yolks | Prick each yolk once before cooking |
| Watery, undercooked tops | Insufficient water | Add exactly 1 tbsp water per egg |
| Rubbery, overcooked texture | Excessive timing | Reduce in 10-second increments |
| Uneven cooking between eggs | Improper lid closure | Ensure lid snaps shut completely |
Mastering your microwave egg cooker takes just three practice runs. Start with the 60-second baseline, adjust for your microwave’s wattage, and never skip the yolk-prick. Within days, you’ll produce perfect poached eggs faster than your coffee brews—transforming morning chaos into a 90-second gourmet ritual. The key isn’t fancy technique but precise adherence to these manufacturer-verified steps: exact water measurement, strategic timing, and that one critical poke. Your microwave isn’t just for reheating anymore—it’s your secret weapon for effortless, impressive breakfasts.


