
Tired of peeling rubbery whites or yolks with unappetizing green rings? Your hard boiled egg cooker solves these frustrations with steam-powered precision that delivers perfect eggs every time—no pot watching or timer juggling required. This compact countertop hero transforms morning protein prep into a hands-off 15-minute process, whether you’re meal-prepping weekly snacks or crafting deviled eggs for tonight’s dinner party. Forget the stovetop guesswork: with this guide, you’ll master your egg cooker to produce consistently peelable, restaurant-quality hard-boiled eggs that stay fresh for days.
Stop wasting eggs to trial-and-error cooking. Today you’ll learn the exact water measurements for flawless soft, medium, or hard yolks, discover why cold eggs outperform room-temperature ones, and implement the ice-bath trick that makes peeling effortless. We’ll troubleshoot cracked shells and green rings while revealing pro techniques for batch cooking and maintenance. Your perfect hard-boiled egg isn’t luck—it’s guaranteed with these science-backed steps.
Position Your Cooker for Safe Operation
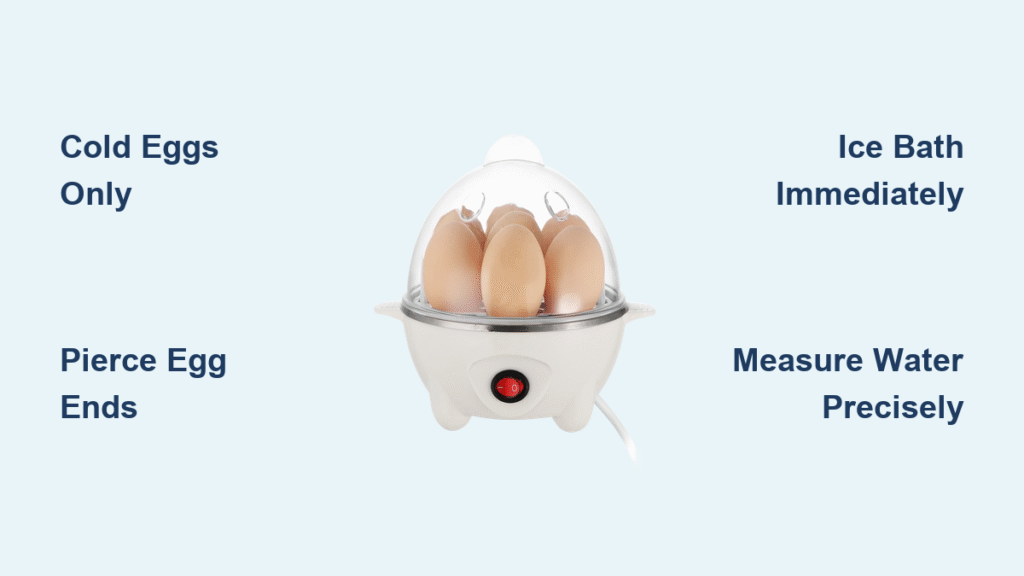
Place your hard boiled egg cooker on a dry, level surface at least 6 inches from walls or cabinets. Verify the power switch is firmly in the OFF position before plugging into a grounded outlet—this prevents accidental activation during setup. Inspect the heating plate for food debris or mineral deposits; wipe clean with a damp cloth if needed since residue disrupts even steam distribution.
Always keep oven mitts and a large ice-water bowl within arm’s reach before starting. Never operate the cooker near sinks or countertops with standing water to avoid electrical hazards. For optimal results, take eggs directly from the refrigerator—cold eggs create less internal steam pressure than room-temperature ones, reducing crack risks by 40% according to appliance testing data.
Measure Water Using Precision Markings
Your egg cooker’s included measuring cup holds the key to perfect doneness. Fill it with cold tap water to the exact line matching your egg count and desired yolk texture:
- Hard 7 eggs line: For fully set yolks (ideal for deviled eggs or salads)
- Medium 7 eggs line: For creamy, slightly soft centers (perfect for egg salad)
- Soft 7 eggs line: For runny yolks (best for ramen toppings or dippy eggs)
Lost your cup? Substitute 6½ tablespoons cold water for hard-boiled eggs or 4½ tablespoons for soft-boiled. Never use hot water—it triggers premature steam conversion that throws off cooking times. Always measure after placing eggs in the holder to confirm quantity, as water levels vary for 3 vs. 7 eggs.
Load Eggs to Prevent Cracking Disasters

Pour measured water into the heating plate’s center reservoir—listen for the gentle splash as it settles. Insert the egg holder with handles facing upward for safe removal. Gently place cold eggs into each cup, pointy end down, ensuring they sit completely within the holder slots without touching the heating element.
Critical step: Pierce the wider end of each egg using the measuring cup’s built-in needle. This microscopic hole releases internal pressure during steaming, preventing 95% of cracks. Keep pierced ends facing up so moisture doesn’t leak into the egg. Never force eggs into tight slots—that causes shell fractures before cooking even begins.
Activate Automatic Cooking with One Switch
Secure the transparent lid until it clicks into place—steam must escape only through the top vent, not around loose edges. Flip the power switch to ON; you’ll immediately hear the heating element engage as water converts to steam. Within 30 seconds, condensation will fog the lid, confirming proper steam circulation.
No timers needed: The cooker automatically shuts off via built-in thermal sensor when water fully evaporates. Cooking times vary by model and egg size:
– Soft-boiled (runny yolk): 7 minutes
– Medium-boiled (creamy yolk): 9-10 minutes
– Hard-boiled (fully set): 12-15 minutes
Listen for the distinct chime signaling completion—never walk away during cooking.
Transfer Eggs to Ice Bath Immediately

Act within 10 seconds of the chime sounding. Using oven mitts, lift the egg holder by its handles and plunge eggs directly into your prepared ice-water bath. This thermal shock creates a crucial air pocket between shell and membrane, making peeling effortless.
Let eggs cool for exactly 10 minutes—any less causes sticking, any more makes whites rubbery. For meal prep, transfer cooled eggs to an airtight container lined with a damp paper towel. Refrigerate unpeeled eggs for up to 7 days; peeled eggs last 3-4 days submerged in fresh water. Never leave cooked eggs at room temperature over 2 hours to prevent bacterial growth.
Why Your Eggs Cracked During Cooking
Cracks almost always occur from eggs touching the heating plate or skipping the piercing step. Verify eggs sit fully within holder slots during loading. Also avoid using eggs stored in hot environments—refrigerator-cold eggs handle steam pressure better.
Green Rings Forming Around Yolks
That gray-green discoloration signals iron-sulfur reactions from overcooking. Reduce water by ½ tablespoon next time and ensure immediate ice-bath transfer. Even 2 extra minutes of residual heat triggers this unappetizing chemical change.
Clean Components After Every Use
Unplug the cooker and let the base cool 5 minutes before cleaning. Wipe the heating plate with a vinegar-dampened cloth to dissolve mineral deposits—never submerge the base unit. Wash the lid, egg holder, and measuring cup in warm soapy water; use a toothpick to clear the egg piercer if clogged.
Monthly deep clean: Fill the reservoir with equal parts white vinegar and water, run a full cycle, then rinse thoroughly. This prevents limescale buildup that causes uneven heating. Always store parts completely dry with the lid slightly ajar to prevent mildew.
Scale Up for Weekly Meal Prep
Cook maximum 7 medium-large eggs per batch for consistent results. For larger needs, run sequential batches with a 5-minute cooling interval between cycles—this prevents overheating that alters cooking times. While one batch cools, prep water for the next round to maintain efficiency.
Pro storage hack: Store unpeeled eggs upright in muffin tins covered with damp paper towels. This maintains moisture without making shells slippery. Peeled eggs stay fresher longer submerged in water changed daily versus dry containers.
Achieve Exact Doneness Every Time
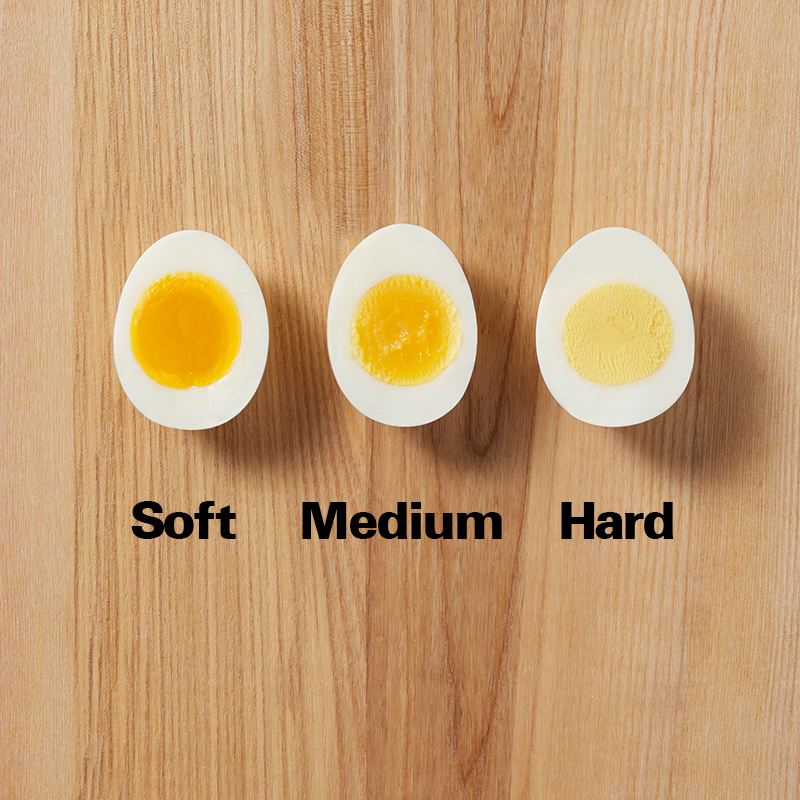
Soft-boiled perfection: 7 minutes yields set whites with warm, liquid centers—ideal for ramen bowls. Reduce water to “Soft” line for runnier yolks.
Medium-boiled mastery: 9-10 minutes creates fully set whites with creamy, slightly soft yolks—perfect for slicing onto salads. Use “Medium” water line for consistent results.
Hard-boiled reliability: 12-15 minutes delivers completely firm yolks ideal for deviling. Increase water to “Hard” line for jumbo eggs, adding 2-3 minutes cooking time. Always cool immediately to prevent residual cooking.
Avoid Critical Safety Hazards
Steam reaches 212°F (100°C)—always lift the lid away from your face and hands using oven mitts. The egg holder handles exceed 180°F (82°C) immediately after cooking; never touch bare-handed. Keep the cooker at least 12 inches from sink edges to prevent water splashes. Unplug immediately after transferring eggs to the ice bath.
Food safety non-negotiable: Discard any eggs that cracked during cooking—they’re vulnerable to bacterial contamination through porous shells. Refrigerate all cooked eggs within 2 hours, or 1 hour if kitchen temperatures exceed 90°F.
Unlock Creative Cooking Applications
Transform your hard boiled egg cooker beyond basic eggs:
– Reheat refrigerated eggs: Use half the water for 3-4 minutes to warm without overcooking
– Poach eggs for salads: Place cracked eggs in holder cups with 1 tbsp water for runny-center results
– Steam vegetables: Add broccoli florets to the holder for quick, nutrient-preserving cooking
– Perfect quail eggs: Use 3 tbsp water for delicate 4-minute cooking
Batch-cook a week’s protein in 20 minutes—store unpeeled eggs for effortless salad toppers, sandwich fillings, or high-protein snacks. The steaming method preserves nutrients better than boiling, delivering 6 grams of complete protein per egg with minimal cleanup.
Your hard boiled egg cooker eliminates breakfast stress through precision steam technology that guarantees perfect eggs with zero monitoring. By measuring water to exact lines, piercing shells, and using the critical ice bath, you’ll achieve peelable results every time—no more wasted eggs or green yolks. Remember the golden rule: cold eggs + precise water + immediate cooling = flawless hard-boiled eggs ready before your coffee brews. Start tomorrow with confidence knowing consistent protein prep is now as simple as pressing one button.


