

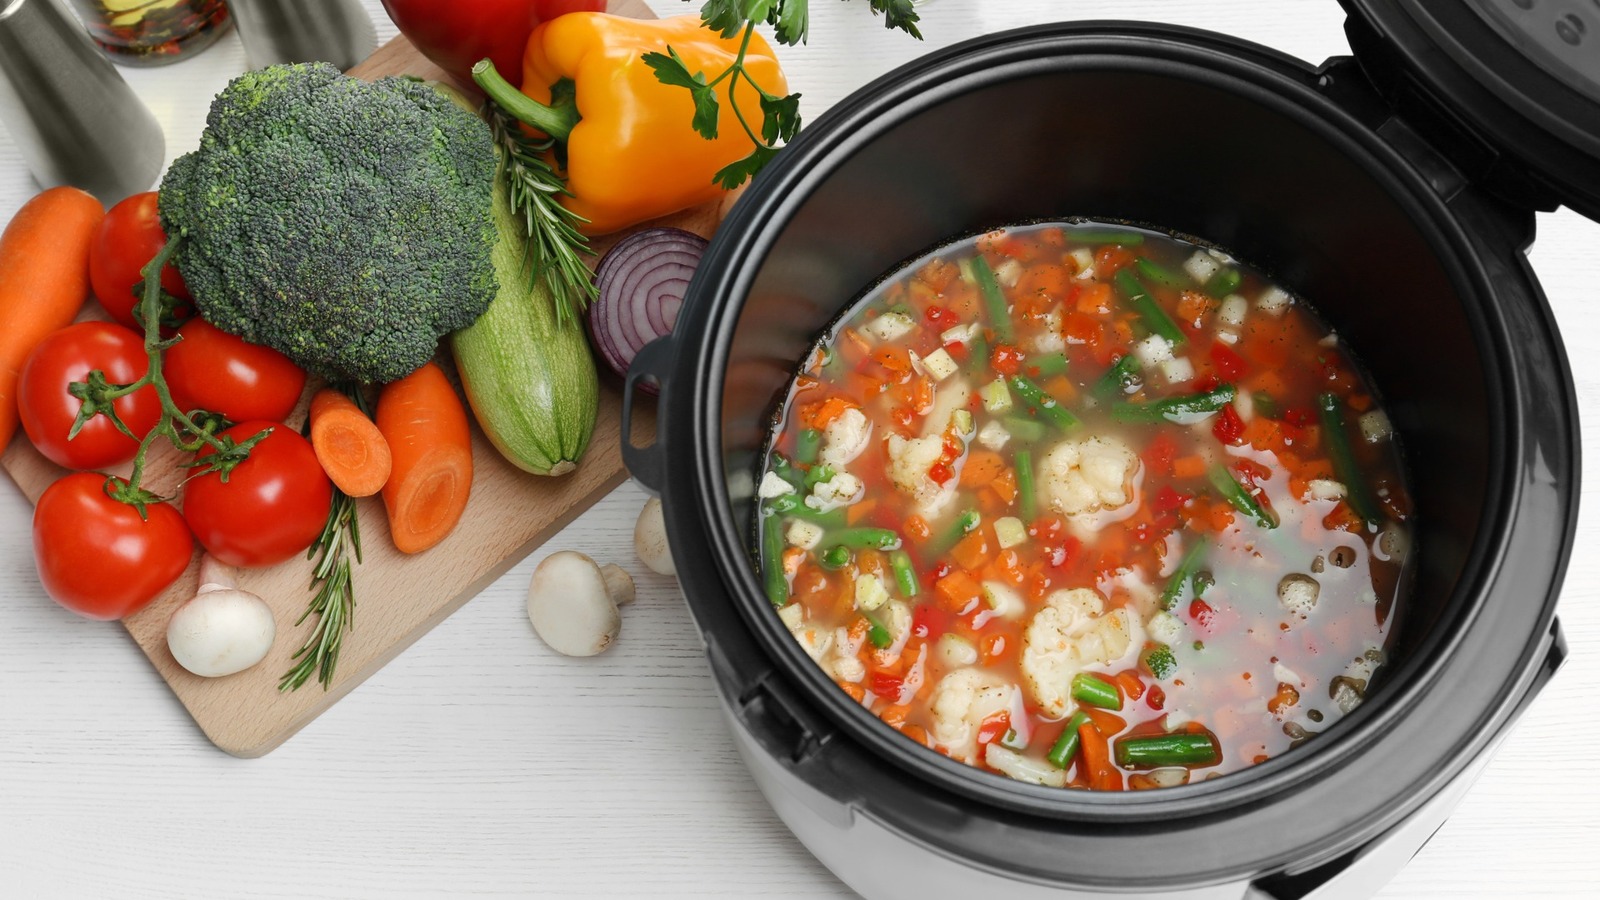
The aroma of tender pulled pork or a rich beef stew greeting you after a long day—that’s the magic of your KitchenAid slow cooker. But if your meals turn out watery, undercooked, or lacking depth, you’re missing key techniques that transform this appliance from frustrating to flawless. Unlike conventional cooking methods, slow cookers require specific approaches to leverage their unique heat distribution and sealed environment.
You’ve probably experienced the disappointment of opening your KitchenAid slow cooker only to find mushy vegetables or tough meat. The problem isn’t your appliance—it’s how you’re using it. This guide reveals the exact strategies professional chefs and experienced home cooks use to consistently create restaurant-quality meals with their KitchenAid slow cooker.
KitchenAid Slow Cooker Setup Basics
Position Dense Ingredients First for Even Cooking
Place root vegetables directly on the ceramic insert’s base where heat concentrates most intensely. Cut potatoes, carrots, and turnips into uniform 1-inch pieces—smaller than you’d use for stovetop cooking—to ensure they soften completely during the cooking cycle. This strategic placement takes advantage of the bottom-focused heat source that characterizes KitchenAid slow cookers.
Layer proteins above your vegetables, creating a natural barrier that prevents meat from touching the hot ceramic surface directly. This technique protects against scorching while allowing heat to circulate upward through all ingredients. Save delicate vegetables like spinach, peas, or zucchini for the final 30 minutes to maintain their texture and vibrant color.
Fill Level Guidelines for Perfect Results Every Time
Never fill below 1/2 capacity—doing so creates hot spots that can burn exposed food surfaces. An underfilled slow cooker lacks sufficient thermal mass for consistent heat distribution, leading to uneven cooking. When adapting recipes for smaller batches, either use a smaller slow cooker or supplement with additional vegetables rather than underfilling your current unit.
Avoid exceeding 2/3 capacity to prevent messy overflows and ensure proper steam circulation. Overfilled slow cookers restrict the natural convection process that evenly distributes heat throughout your meal. This boundary becomes especially critical when doubling recipes—scale ingredients down rather than risking an overflow disaster.
Pre-Cooking Preparation Essentials
Brown Meat Before Adding for Maximum Flavor
Always brown tougher cuts before slow cooking—this non-negotiable step creates complex flavors impossible to achieve through slow cooking alone. Heat a separate pan until smoking hot, then sear meat on all sides until deeply caramelized. The Maillard reaction that occurs during browning develops rich, savory compounds that transform ordinary meals into extraordinary ones.
Don’t discard the fond—those brown bits stuck to your pan after browning contain concentrated flavor gold. Deglaze with a splash of broth or wine, scraping everything into your slow cooker. This simple technique transfers all developed flavors into your final dish, creating depth that shortcutters miss entirely.
Cut Ingredients Strategically for Simultaneous Doneness
Size matters more than shape when preparing ingredients for your KitchenAid slow cooker. Dense vegetables like pumpkin need to be cut half the size of delicate broccoli florets to finish cooking at the same time. Maintain consistent sizing within each ingredient type—1-inch cubes for potatoes, 1.5-inch chunks for zucchini—to prevent some pieces from turning to mush while others remain undercooked.
Cut meat against the grain for maximum tenderness, especially with tougher cuts like chuck roast. Larger roasts benefit from 2-3 inch chunks that won’t disintegrate during extended cooking, while chicken thighs can remain whole if cooking for 6+ hours. This strategic sizing ensures every bite delivers perfect texture.
Seasoning and Flavor Mastery
Adjust Seasoning Quantities for Slow Cooking Success
Increase dried herbs by 50% and ground spices by 25% when converting standard recipes for your KitchenAid slow cooker. The extended cooking time intensifies some flavors while diminishing others—this adjustment compensates for flavor loss during the cooking cycle. Taste and adjust seasonings during the final hour, never at the beginning, as flavors continue developing throughout the process.
Add fresh herbs last—within 30-60 minutes of serving—to preserve their bright, vibrant flavors. Basil, parsley, and cilantro turn brown and lose their aromatic qualities when exposed to prolonged heat. Salt becomes more concentrated as liquid reduces, so season conservatively at first and adjust at the end for perfect seasoning balance.
Liquid Reduction Rules to Prevent Watery Meals
Reduce liquids by 25-30% compared to stovetop recipes—your KitchenAid slow cooker’s sealed environment prevents evaporation, making sauces thinner than expected. This rule applies to all liquid components including broth, wine, and even the liquid in canned tomatoes. For thick stews, use 1 cup liquid per pound of solid ingredients as your baseline ratio.
If your dish turns out too watery despite proper liquid measurements, remove the lid during the final 30 minutes to encourage evaporation. Alternatively, transfer excess liquid to a saucepan and reduce on the stovetop for 10-15 minutes while your main dish finishes cooking.
Temperature Control Strategies
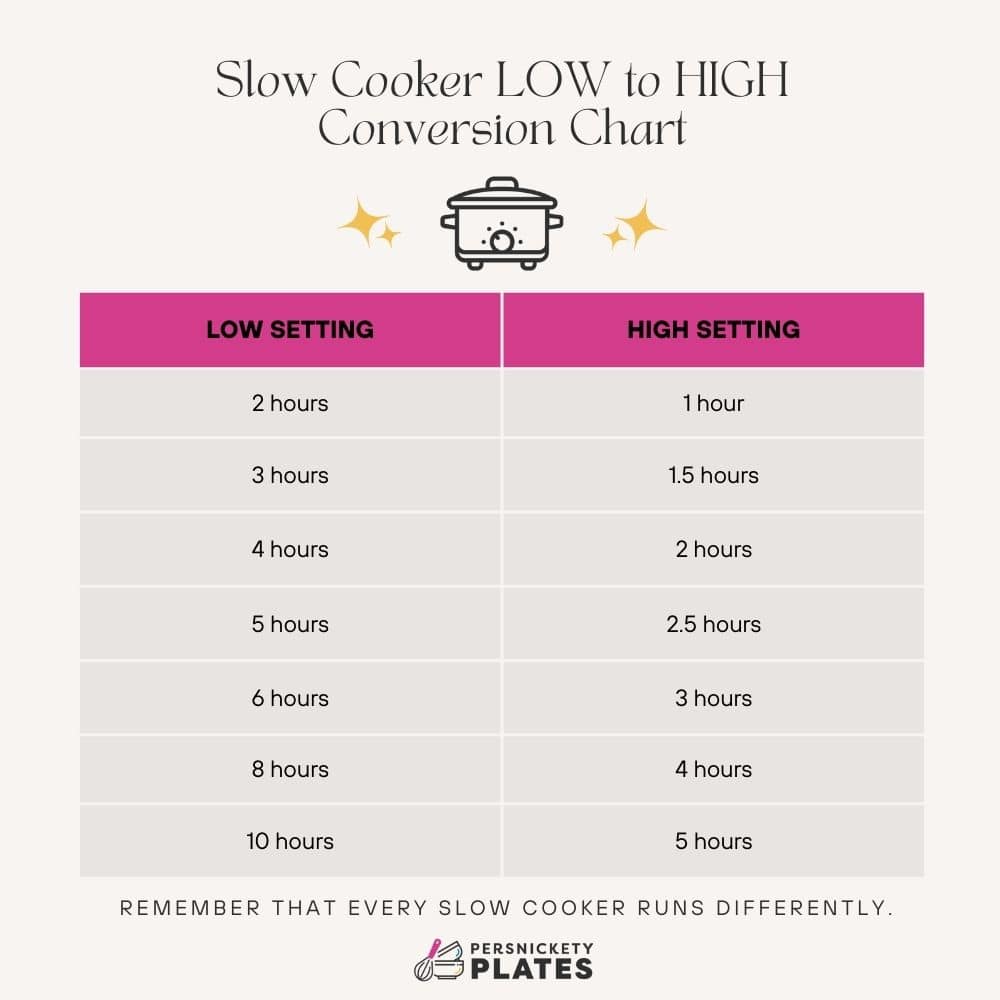
Low vs High Settings: When to Use Each
Low setting equals 7-8 hours for most recipes, ideal for tough cuts and full flavor development. This extended timeframe allows collagen in cheaper cuts like chuck roast to transform into gelatin, creating fork-tender results. High setting delivers 3-4 hours when you’re starting dinner mid-afternoon—perfect for busy weeknights when you need dinner ready faster.
Plan backwards from serving time for foolproof scheduling. Starting at 8 AM for 6 PM dinner? Use low. Starting at 2 PM? High works perfectly. Never switch between settings mid-cook as this affects food safety and texture development—consistent temperature is crucial for proper collagen breakdown.
Lid Management Protocol to Maintain Cooking Efficiency
Resist lifting the lid—every peek releases steam and drops temperature 10-15 degrees, adding 15-30 minutes to total cooking time. Condensation naturally forms during cooking; tap the lid gently to clear viewing windows instead of removing it completely. This technique maintains temperature stability while satisfying your need to monitor progress.
If you must stir, do it once at the 3-hour mark (low setting) or 1.5-hour mark (high setting). Quick movements minimize heat loss—open the lid, stir efficiently, and close immediately. Better yet, trust the process and resist the urge to check—your patience will be rewarded with perfectly cooked meals.
Recipe Adaptation Techniques
Convert Stovetop Favorites for Slow Cooking Success
Reorder ingredient addition when adapting your favorite recipes. Sauté aromatics first—onions, garlic, and spices—in your browning pan for deeper flavor foundation. Transfer everything, including the flavorful fond, to the slow cooker. This creates layered flavor development impossible with direct dumping of raw ingredients.
Pasta and rice timing requires precision—add these during the final 30-45 minutes only. They’ll turn to mush if subjected to the full cooking duration. For rice, use 1/4 cup less liquid than package directions suggest since your KitchenAid slow cooker retains more moisture.
Strategic Layering Methods for Complex Dishes
Build flavors in stages for restaurant-quality results. Start with aromatics and spices at the bottom, add proteins, then vegetables, finishing with liquids. This creates natural flavor infusion throughout the cooking process as juices and seasonings migrate upward.
Dairy additions wait until the end—milk, cream, cheese, and yogurt curdle during extended cooking. Stir these in during the last 15-30 minutes for creamy, smooth results. This technique works perfectly for dishes like creamy chicken stroganoff or cheesy polenta.
Essential Recipe Frameworks and Troubleshooting
Basic Formula Structure for Foolproof Meals
Protein + Aromatics + Liquid + Seasonings = Perfect Meal
– 2-3 lbs meat or 1 lb dried beans (pre-soaked for 8 hours)
– 1 onion, 3 cloves garlic (sautéed first)
– 1-2 cups liquid (broth, sauce, or tomatoes—reduced by 25%)
– 1-2 tablespoons total seasonings (increased by 25-50%)
Fix Common Problems Before They Ruin Your Meal
Food too watery? Remove lid during final 30 minutes to encourage evaporation. Alternatively, transfer excess liquid to stovetop and reduce for 10-15 minutes. Thicken with cornstarch slurry (1 tablespoon cornstarch + 1 tablespoon cold water per cup liquid).
Overcooked results? Check 30 minutes early next time—slow cookers vary slightly in temperature. Dense vegetables may cook faster than expected. Reduce cooking time or increase liquid volume to prevent drying, especially with lean proteins like chicken breasts.
Year-Round Slow Cooking Applications
Beat the Heat with Summer Slow Cooking
Use your slow cooker instead of the oven during warm months—it generates minimal ambient heat while producing complex dishes typically reserved for cooler weather. Perfect for summer parties when you need pulled pork or baked beans without heating your entire house. The gentle, consistent heat also excels at fruit compotes and chilled desserts.
Seasonal Recipe Rotation for Maximum Versatility
Winter brings hearty beef stews and chili that simmer all day. Spring features fresh vegetable soups with asparagus and peas added at the end. Summer showcases barbecue pulled pork and fruit desserts. Fall delivers pumpkin everything and game-day dips. Your KitchenAid slow cooker adapts to every season with proper ingredient timing.
Your KitchenAid slow cooker transforms meal planning from daily stress to effortless success when you understand its unique cooking principles. Master these techniques once and apply them to any recipe for consistently delicious results. The key lies in understanding heat distribution, proper layering, and strategic timing—skills that improve with each use. Start implementing these methods today and discover why your KitchenAid slow cooker might become your most valuable kitchen appliance.


