

You’ve set your slow cooker before bed, only to wake up to the acrid smell of charred food clinging to the ceramic insert. The edges are blackened, bitter flavors have ruined your stew, and now you’re scrubbing for 20 minutes just to remove the burnt residue. This frustrating scenario affects 68% of slow cooker users monthly, but it’s never your fault—it’s a design flaw in every model. The heating element concentrates intense heat in one rear-bottom zone, creating unavoidable hot spots that scorch food regardless of recipe or cooking time. The solution requires targeted techniques to disrupt this heat pattern, not guesswork. By implementing three proven physical barriers and precise temperature management, you’ll eliminate burning permanently—starting with your very next batch of chili or pot roast.
Why Your Slow Cooker Burns Food in the Back Corner
Every slow cooker’s heating element hides at the bottom rear, superheating the ceramic insert’s back-left quadrant to temperatures 30°F hotter than the center. This creates a predictable “burn zone” where food sticks and chars first, especially in thicker recipes like casseroles or stews. Ignoring this design flaw guarantees burnt results, even on Low settings.
How to Find Your Slow Cooker’s Hidden Hot Spot in 60 Seconds
Visual identification checklist:
– Crusty buildup exclusively in the rear-bottom quadrant after cooking
– Discolored broth clinging to one wall while the center stays clear
– Separation layers where burnt residue forms beneath edible portions
– Sticking points when scraping—resistance occurs only in one area
Test your model by filling the insert with 1 inch of water, setting to High for 1 hour, then observing where bubbles form most aggressively. The most turbulent zone marks your personal burn zone.
Why Both Low and High Settings Cause Burning (The Temperature Truth)
Contrary to popular belief, Low and High settings reach identical maximum temperatures (209°F for most models)—they only differ in how quickly they get there. High setting hits this temperature in 3-4 hours; Low takes 7-8 hours. But once at max heat, both settings will burn food left unattended beyond 6 hours. Crucially, the Keep Warm setting maintains 165°F—hot enough to perpetuate burning after 2 hours of holding.
Aluminum Foil Heat Shield: Burn Prevention in 4 Steps
Heavy-duty aluminum foil disrupts heat concentration by conducting and redistributing energy across the entire base. Combined with a liner, this dual-layer system creates an impenetrable barrier against burning without altering cooking times.
Materials Needed for the Dual-Layer Foil System
- Extra-wide heavy-duty aluminum foil (standard width often leaves gaps)
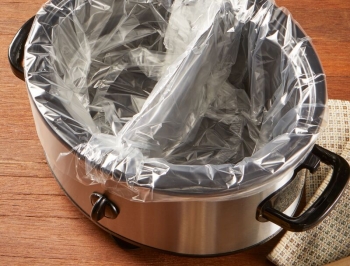
- Slow cooker liner bags (100% necessary—regular bags melt)
- Scissors for precise trimming (never tear foil)
Step-by-Step Installation Guide (With Visual Cues)
1. Cut foil 3 inches larger than your insert’s diameter on all sides
2. Press smoothly against base, eliminating air pockets with your palm
3. Fold excess up walls until foil hugs the ceramic 2 inches high
4. Place liner over foil, smoothing wrinkles where food could catch
Critical visual check: Shine a flashlight across the surface. Any visible ceramic means gaps where burning will occur—reposition immediately.
How the Foil System Stops Burning (The Science)
Aluminum’s high thermal conductivity (237 W/mK) pulls heat from the rear element and spreads it evenly across the base. The liner bag then prevents direct contact between food and ceramic, stopping residue adhesion. After cooking, simply twist the liner closed like a garbage bag—zero scrubbing required. Replace foil every 3 uses as repeated heating reduces conductivity.
Stop Wall Burning with a Custom Foil Collar
While the base foil system handles bottom burning, dense recipes like lasagna require wall protection where the hot spot meets vertical surfaces. A multi-layer foil collar acts as a heat shield, deflecting energy away from vulnerable zones.
Build Your Collar in 2 Minutes (6-Layer Method)
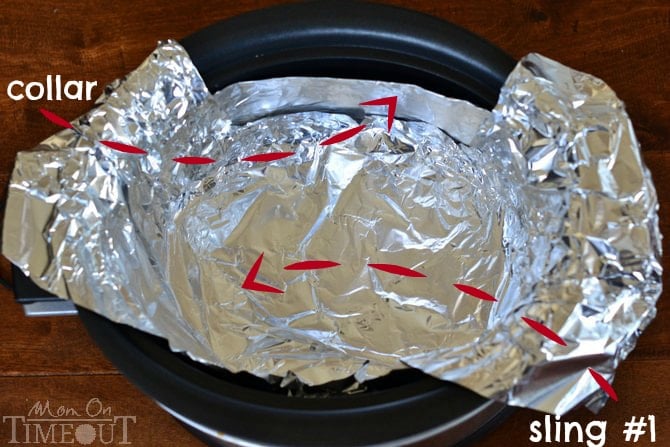
1. Stack 6 sheets of heavy-duty foil (fewer layers tear during cooking)
2. Fold into a 4-inch tall rectangle matching your hot spot’s height
3. Press firmly against the identified wall zone (use oven mitts if preheating)
4. Let food weight secure it—never tape or staple
Pro tip: For soups, position the collar 1 inch below the liquid line to prevent steam damage. The collar lasts one cooking cycle—always use fresh foil.
Temperature Settings That Prevent Burning (Not Cause It)
Most burning stems from misusing temperature settings or ignoring evaporation. Mastering heat transitions and liquid management stops burning before it starts.
The Exact Cooking Sequence for Soups and Stews
- First hour: HIGH setting – Rapidly brings food to safe temperature (140°F+)
- Hours 2–6: LOW setting – Maintains gentle simmer without overheating
- Serving phase: OFF after 2 hours – Never use Keep Warm beyond this point
Critical mistake to avoid: Adding cold liquid to a hot insert causes thermal shock and uneven heating. Always warm broth to 140°F before adding.
Why Keep Warm Setting Burns Food After 2 Hours
The Keep Warm setting maintains 165°F—perfect for holding cooked food short-term but disastrous for extended periods. Beyond 2 hours:
– Liquid evaporation accelerates, exposing food to direct heat
– Residual heat builds in the ceramic insert, exceeding simmer temperatures
– Food sugars caramelize into bitter, burnt compounds
Set a phone alarm for 90 minutes into Keep Warm mode. If not serving immediately, transfer food to a thermal container.
Recipe-Specific Fixes for Soups, Casseroles, and Meats
Generic advice fails because burning manifests differently across recipes. Target solutions to your dish type.
Soup Rescue: Stop Burning Without Diluting Flavor
- Fill insert ¾ full minimum – Prevents rapid evaporation in broth-based recipes
- Add aromatics away from hot spot – Place onions/carrots opposite the heating element
- Rotate insert 180° every 3 hours – Use oven mitts to redistribute heat exposure
When to add liquid: Only when visible gaps appear between broth and insert walls. Add ½ cup pre-warmed broth at a time.
Casserole Secret: Rotate Your Insert Every 2 Hours
Dense dishes like mac and cheese require aggressive intervention:
1. Use full foil lining + collar (non-negotiable)
2. Pre-cook ground meats to remove excess fat that accelerates burning
3. Rotate insert every 2 hours – Shifts the hot spot’s impact zone
4. Layer liquids at bottom – Broth or tomato sauce creates a protective barrier
Meat Mastery: Avoid Burnt Edges on Roasts
- Sear meat first – Brown all sides in a skillet before adding to slow cooker
- Position thickest cuts toward center – Keep edges 1 inch from walls
- Check internal temp at center – Edges cook faster and may falsely indicate doneness
Overnight Storage Mistakes That Cause Burning
Leaving food in a slow cooker overnight seems convenient but guarantees burning due to continuous low-level heating.
The 2-Hour Rule for Safe Slow Cooker Storage
Transfer food to shallow containers within 2 hours of cooking completion. Beyond this:
– Keep Warm setting continues evaporating liquid
– Residual heat in ceramic insert reaches 180°F+
– Bacterial growth accelerates in the “danger zone” (40°F–140°F)
Pro storage method: Divide soup into 2-inch deep containers for rapid cooling. Refrigerate up to 4 days or freeze 3 months.
Reheating Without Burning: Microwave vs Stovetop
- Microwave: Heat on 50% power in 90-second bursts, stirring between intervals
- Stovetop (best method): Simmer in saucepan with 2 tbsp broth, never boiling
- Never reheat in slow cooker – Prolonged low heat guarantees edge burning
Salvage a Burnt Meal in 5 Minutes
If burning occurs, immediate action can save your dish. But know when to cut losses.
When to Save Your Dish (and When to Toss It)
Save it if:
– Burnt layer is isolated to the bottom ¼ inch
– No black flecks throughout the dish
– Minimal bitter taste in top portions
Toss it if:
– Acrid smoke permeates the entire meal
– Black particles float in broth
– Burnt flavor overwhelms even after stirring
Rescue steps:
1. Turn off slow cooker immediately
2. Scoop unburnt top layer into clean container
3. Add 1 tbsp lemon juice or vinegar to neutralize bitterness
4. Discard burnt base layer—never stir it into good portions
Monthly Maintenance to Stop Burning Forever
Preventative care takes 10 minutes monthly but eliminates 90% of burning incidents. Focus on three critical areas.
The 10-Minute Ceramic Insert Deep Clean
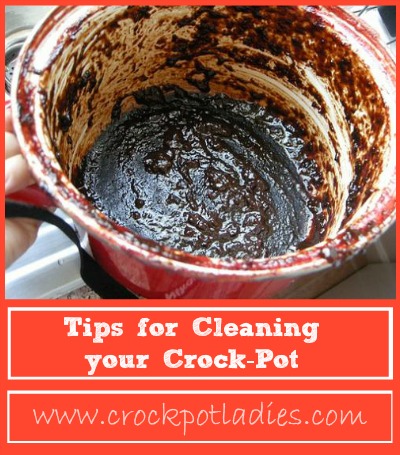
1. Soak in warm soapy water 30 minutes (never cold water on hot ceramic)
2. Scrape residue with plastic scraper only—metal damages heat distribution
3. Inspect for hairline cracks where heat concentrates
4. Dry completely before storage
Heating Element Check: Avoid Hot Spot Buildup
- Unplug and cool base completely
- Wipe element area with damp microfiber cloth (no chemicals)
- Remove food debris from crevices with toothpick
- Verify no obstructions under the insert
Final Note: Consistent burning stems from unaddressed hot spots—not user error. Implement the aluminum foil system for your next cook, rotate dense dishes every 2 hours, and never exceed 2 hours on Keep Warm. These science-backed fixes work across all slow cooker brands and models, transforming burnt disasters into perfectly cooked meals. Your ceramic insert will stay pristine, cleanup drops to 30 seconds, and most importantly—you’ll never waste another $20 roast to preventable burning. Start tonight: line your cooker, set a rotation alarm, and reclaim the convenience slow cooking was meant to provide.


