
Tired of sticky, undercooked rice after 30 minutes of stovetop babysitting? Mastering how to use microwave rice cooker techniques transforms this kitchen nightmare into a 15-minute success story. This specialized plastic container—engineered with dual-lid steam technology—delivers restaurant-quality rice without constant monitoring. You’ll slash cooking time by half while eliminating overcooking risks, making it essential for dorm rooms, RV kitchens, and weeknight meal prep.
Unlike guesswork-heavy pots, your microwave rice cooker’s precision vents and recessed lids create controlled steam circulation. White rice finishes in 12 minutes flat, brown rice in 18, and cleanup takes under 60 seconds. In this guide, you’ll discover exact water ratios for every grain type, critical lid alignment tricks, and how to avoid the #1 mistake that causes crunchy centers. Stop wasting rice—let’s unlock consistent results in your very next cook.
Select Correct Rice-to-Water Ratios
White Rice Measurements
Use 1 cup rice to 1.5 cups water for jasmine, basmati, or standard long-grain varieties. This ratio prevents mushiness by balancing absorption with steam pressure. For larger batches, scale precisely: 1½ cups rice requires 2½ cups water (yielding 4 servings), while 2 cups rice needs exactly 3 cups water.
Brown Rice Adjustments
Increase water to 1 cup rice to 2 cups water due to the bran layer’s slower hydration. Brown rice needs extra moisture to soften fully without scorching. Never reduce this ratio—even high-altitude cooking requires the full 2:1 water ratio to compensate for lower boiling points.
Quick Reference Cheat Sheet
- 1 cup rice: 1.5 cups water (white) / 2 cups water (brown)
- Add ½ cup water per extra cup of rice beyond 2 cups
- Reduce water by ¼ cup if using broth instead of water
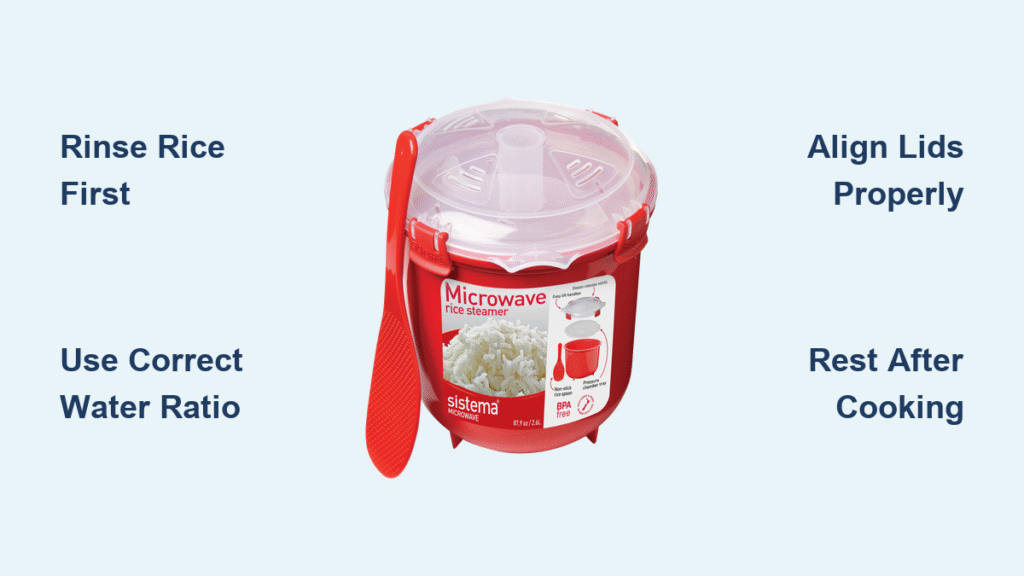
Rinse Rice Before Cooking
Effective Rinsing Technique
Place measured rice in the cooker base, then add cold water until 1 inch above the grains. Swirl vigorously with your hand for 20 seconds—the water will turn milky from excess starch. Drain completely using the cooker’s fine-mesh strainer or by carefully pouring while holding rice against the lid vents.
Why Skipping Rinsing Backfires
Unrinsed rice develops a gummy texture as surface starch gelatinizes during cooking. This critical 30-second step also removes trace arsenic common in commercial rice. Skipping it guarantees clumped grains that stick to the cooker walls, wasting both food and cleanup time.
Assemble Lids for Optimal Steam Control

Two-Lid Locking Sequence
First, press the inner lid firmly into the recessed groove around the cooker base—listen for the click confirming a seal. Then snap the outer lid on top, aligning latches until they lock. Never skip the inner lid; this creates the steam chamber essential for even cooking.
Vent Alignment Safety Check
Rotate the outer lid so its steam holes sit offset from the inner lid’s vents. This misalignment forces steam to circulate downward through the rice rather than blasting upward. Proper alignment prevents dangerous pressure buildup that could blow the lid open mid-cycle, scalding you with superheated steam.
Adjust Microwave Power Settings
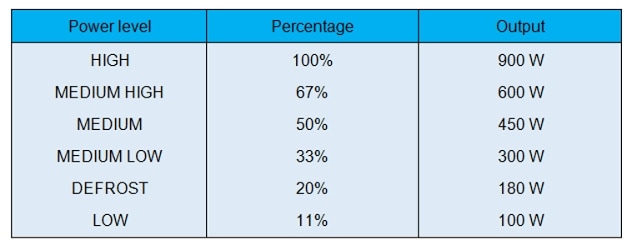
High-Wattage Microwave Protocol
If your microwave exceeds 1,000 watts, reduce power to 70% (usually labeled “Medium-High”). Full power evaporates water too rapidly, leaving crunchy centers and burnt edges. Test your wattage by microwaving 1 cup water: boiling in under 2 minutes indicates high power.
Standard Microwave Settings
Use 100% power for microwaves under 1,000 watts. These models heat gradually, allowing consistent water absorption. Never exceed 12 minutes for white rice—overcooking at low power still causes mushiness through prolonged steam exposure.
Follow Exact Cooking Timelines

White Rice Timing Rules
Cook 10-12 minutes at your adjusted power setting. For 1 cup rice, check at 8 minutes; for 2+ cups, add 2-3 minutes to the base time. Stop immediately when water disappears through the microwave window—continuing cooks rice dry.
Brown Rice Critical Milestones
Set 15-18 minutes without opening the microwave early. Brown rice needs full steam time to soften its bran layer. At 15 minutes, check for absorbed water; if liquid remains, add 1-minute increments. Never exceed 18 minutes—this causes irreversible hardness.
Never Skip the Resting Period
Science Behind the Stand Time
After the timer beeps, leave rice undisturbed for 5-10 minutes with both lids locked. This allows residual steam to finish cooking the core while moisture redistributes. Cutting this phase creates wet bottoms and dry tops—a non-negotiable step for perfect texture.
Resting Safety Tip
Place the hot cooker on a trivet or folded towel—never directly on cold countertops. Thermal shock can crack the plastic base. Keep children away during this phase; trapped steam reaches 212°F (100°C) and causes severe burns if released prematurely.
Safe Fluffing and Serving Method
Lid Removal Sequence
Using oven mitts, remove only the outer lid first, tilting it away from your face to vent steam safely. Wait 10 seconds, then lift the inner lid using the same outward angle. This two-step process prevents steam explosions that could blind you with condensation.
Fork Technique for Fluffy Grains
Insert a fork vertically into the rice, then lift and twist in sections—never stir with a spoon. This separates grains without smashing them. Work from the edges inward, releasing trapped steam. Stop when rice looks uniformly light; over-fluffing dries it out.
Steamer Basket Multi-Tasking
Vegetable Steaming Setup
Place the basket in the empty cooker base, then add ½ cup water below it (never fill above basket level). Load vegetables ¾ full max—overfilling blocks steam circulation. Broccoli cooks in 3-4 minutes; carrots need 4-5 minutes at full power.
Rice-and-Vegetable Combo Hack
After rice finishes resting, remove the inner lid, add veggies to the basket, and microwave 3-5 minutes more using residual heat. The rice stays warm while vegetables steam, creating a complete meal without extra pots.
Flavor Boosting Secrets
Liquid Substitutions
Replace water with low-sodium broth for instant depth—use the same rice-to-liquid ratio. For coconut rice, swap ½ cup water with coconut milk. Always reduce added salt by 25% when using seasoned liquids to avoid oversalting.
Texture-Perfecting Additions
Stir in 1 teaspoon oil (sesame for Asian dishes, olive for Mediterranean) before cooking. The oil coats grains, preventing stickiness. Add ½ teaspoon salt per cup of dry rice directly to the water—not after cooking—for even seasoning.
Fix Common Cooking Failures
Crunchy Rice Emergency Fix
If rice remains hard, immediately add 2 tablespoons water, reseal lids, and microwave 1-minute increments. For future batches: reduce power by 10% or increase water by ¼ cup. Always verify lid alignment—misplaced vents cause uneven steam.
Mushy Rice Recovery
Spread undercooked rice on a baking sheet and dry in a 200°F oven for 10 minutes. Next time: decrease water by ¼ cup or shorten cooking by 2 minutes. Never stir during cooking—this releases starch that glues grains together.
Cook Beyond Basic Rice
Black Beans and Rice Shortcut
Combine 1 cup rice, 1½ cups water, and ½ tsp salt. Cook 14 minutes, rest 5 minutes, then fluff. Stir in 1 can rinsed black beans, 1 tsp cumin, and lime juice. The residual heat warms beans without overcooking rice.
Microwave Mashed Potatoes
Dice 2 cups potatoes, cover with water in the cooker, and microwave 10 minutes. Drain completely, then mash with ¼ cup milk, butter, salt, and chives. The cooker’s tight seal prevents waterlogging for creamy results.
Post-Use Maintenance Protocol
Immediate Cleaning Routine
While still warm (not hot), fill the cooker with soapy water and let soak 5 minutes. Rice residue softens instantly—never let it dry. All parts are top-rack dishwasher safe, but hand-washing preserves lid seals longer.
Storage Best Practices
Store with lids slightly ajar to prevent trapped moisture from breeding mildew. Nest components together to save space, but never stack heavy items on the cooker—it can warp the lid grooves. Check vent holes monthly for clogs with a toothpick.
Perfect rice in 12 minutes isn’t magic—it’s physics. By following these exact microwave rice cooker techniques, you’ll consistently achieve separate, fluffy grains while freeing your stovetop for sauces and proteins. Remember the non-negotiables: rinse every time, align vents correctly, and never skip resting. Within two cooks, you’ll memorize the ratios and wonder how you ever managed without this $20 kitchen hero. Your next perfect pot of rice starts the moment your microwave beeps—not 30 minutes of anxious pot-watching.


