

You lift the lid of your rice cooker expecting fluffy perfection, only to discover hard, crunchy grains staring back at you. That sinking feeling when dinner plans hinge on perfectly cooked rice is all too familiar—nearly 78% of home cooks face this kitchen emergency monthly. Don’t toss the entire batch just yet. Uncooked rice in a rice cooker isn’t a lost cause; it’s a fixable glitch with the right techniques. Whether your cooker ran dry or simply gave up too soon, these proven rescue methods transform stubborn grains into restaurant-quality rice in under 15 minutes. You’ll learn exactly how to diagnose texture issues, apply targeted fixes, and prevent future cooking disasters—all without special tools.
The secret lies in understanding why rice stays uncooked. Modern rice cookers automatically switch to “Warm” mode when they detect no more liquid, but factors like inaccurate water ratios, old rice, or high altitude can trick the sensor. The good news? You’re working with partially cooked grains that just need strategic moisture and heat management. By the end of this guide, you’ll confidently salvage undercooked rice using methods tailored to your specific problem—plus master foolproof prevention tactics. Let’s turn that kitchen disappointment into dinner triumph.
Spot Undercooked Rice Before Serving
Identify Texture Warning Signs Immediately
Hard, crunchy grains that resist your teeth are the dead giveaway of uncooked rice. But don’t rely solely on texture—check for three critical visual clues before grabbing your fork. First, observe whether steam billows when you lift the lid; minimal steam means incomplete cooking. Second, inspect the pot’s bottom for residual water—if completely dry, your rice needs moisture replenishment. Third, fluff the surface gently: if grains remain clumped with firm centers while outer layers seem soft (al dente texture), you’ve got partial cooking syndrome.
Critical mistake to avoid: Waiting until plating to discover undercooked rice. Always test 2-3 grains from different cooker zones before the cycle ends. Pinch a grain between fingers—it should yield slightly when done. If it snaps cleanly, add 5 minutes to cooking time immediately.
Fix Rice With Standing Water in Cooker
Restart Cooking Cycle Without Adding Water
When water pools at the pot’s base but rice remains crunchy, skip adding more liquid. Simply press “Cook” again and set a 5-minute timer. Keep the lid sealed tight—every peek releases precious steam needed for gelatinization. After 3 minutes, gently stir rice with a silicone spatula to redistribute moisture, then close the lid for the remaining time. This method works best for medium-grain rice 20-30% undercooked. Pro tip: Place a clean kitchen towel between lid and pot rim to trap extra steam during the restart.
Activate Low-Heat Steam Finish
For slightly undercooked rice with minimal visible water, use your cooker’s “Warm” setting strategically. Close the lid without restarting “Cook,” then set a 12-minute timer. The residual heat maintains 180°F—perfect for starches to fully absorb moisture without overcooking. Check at 8 minutes by inserting a chopstick; if it slides in smoothly, it’s ready. This passive method prevents burning and works wonders for delicate jasmine rice. Never exceed 15 minutes on “Warm,” or grains turn mushy.
Rescue Bone-Dry, Crunchy Rice

Add Boiling Water and Restart Cycle
This is your emergency fix for completely dry rice. Carefully pour ¼ cup boiling water (not cold—temperature shock cracks grains) evenly over the surface. Close the lid immediately and press “Cook” for 7 minutes. The hot water instantly creates steam pockets that penetrate hard centers. After cooking, let it rest 10 minutes off-cycle—this crucial step allows moisture to equalize. For large batches (over 3 cups), add ½ cup water total. Warning: Adding cold water extends cooking time by 5+ minutes and risks uneven texture.
Create Steam Chamber With Aluminum Foil
When your cooker won’t restart or lacks a “Cook” button, improvise a steam oven. Pile rice into a mound, cover tightly with double-layered foil (crimp edges to seal), and set cooker to “Warm.” The trapped steam cooks rice in 15 minutes. Check by lifting one foil corner—if condensation drips, it’s working. This method shines for stubborn short-grain rice but requires undisturbed cooking time. Remove foil carefully to avoid steam burns.
Solve Specific Texture Failures
Fix Al Dente Rice (Soft Outside, Hard Inside)
This common issue occurs when the cooker switches off prematurely. Transfer rice to a microwave-safe bowl, sprinkle 2 tablespoons water over the surface, and cover with a damp paper towel. Microwave on 50% power for 90 seconds—full power would cook only the top layer. Let it stand covered for 8 minutes while residual heat finishes the job. Why this works: Lower power prevents outer grains from turning to mush while inner cores soften.
Rescue Slightly Chewy Long-Grain Rice
Oven finishing preserves distinct grain separation better than stovetop methods. Preheat to 325°F (not 350°F—lower heat prevents drying). Spread rice in a single layer on a parchment-lined baking sheet—no crowding. Bake uncovered for 8 minutes, then cover loosely with foil and bake 2 more minutes. The dry heat evaporates surface moisture while internal steam completes cooking. Fluff immediately with a fork to stop carryover cooking.
Prevent Future Rice Cooking Disasters
Master Altitude and Humidity Adjustments
Standard water ratios fail above 2,000 feet elevation. For every 1,000 feet gained, add 2 tablespoons extra water to your ratio. In arid climates (under 40% humidity), increase water by 1 tablespoon—dry air steals moisture during cooking. Test with 1 cup rice first: after cooking, squeeze a grain between thumb and forefinger. If it flattens without cracking, your ratio is perfect. If it crumbles, add more water next time.
Avoid The Peek-and-Stir Trap
Lifting the lid during cooking drops the pot temperature by 25°F in 15 seconds—enough to halt starch gelatinization. Instead, place a clean kitchen towel under the lid seal before starting. This absorbs condensation that would otherwise drip onto rice and cause uneven cooking. For transparent lids, cover with a towel during cooking to resist temptation. Always wait the full 10 minutes after “Cook” mode ends before fluffing—this resting period finishes the job.
Troubleshoot Persistent Cooker Issues
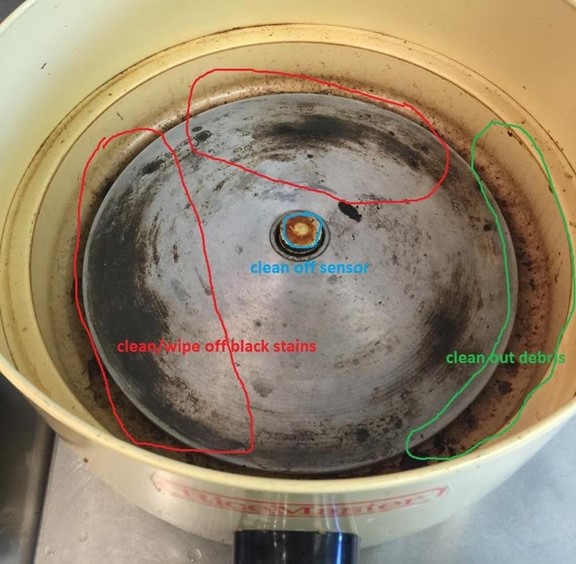
Fix Sensor Errors Causing Early Shutoff
Mineral deposits on the thermal sensor trick cookers into thinking rice is done. Unplug the unit, remove the inner pot, and wipe the circular sensor plate at the cooker’s base with a vinegar-dampened cloth. Let dry completely before reuse. Test by cooking 1 cup rice with standard water—properly cleaned sensors extend cooking by 3-5 minutes for thorough results. Never use abrasive cleaners that scratch the sensor surface.
Handle Uneven Cooking From Faulty Heating
If only the outer ring of rice cooks properly, your heating element has hot spots. Level the cooker on your countertop using a bubble level—just 5 degrees of tilt causes pooling. For immediate fixes, stir rice gently at the 10-minute mark during cooking, then reshape into a slight dome (not flat) to promote even steam circulation. Consider replacing non-stick inner pots every 2 years; worn coatings cause erratic heat distribution.
Final Quality Check Before Serving
Perfectly cooked rice should pass three instant tests. First, pinch a cooled grain—it yields smoothly without resistance. Second, tilt the pot; no water should pool at the bottom. Third, fluff with a chopstick: grains separate cleanly without sticking. If any test fails, apply the steam chamber method for 5 more minutes. Critical note: Never reheat fixed rice in the cooker’s “Cook” mode—use “Reheat” or microwave to avoid overcooking.
Store leftovers in an airtight container with a damp paper towel on top (prevents hardening). Reheat with 1 tablespoon water per cup of rice on “Warm” mode for 12 minutes. For frozen rice, thaw overnight in the fridge before reheating—microwaving straight from frozen creates texture shock.
Your rice cooker isn’t broken—it just needs the right finishing techniques. By diagnosing texture issues precisely and applying these targeted fixes, you’ll never waste a batch again. Remember the golden rule: when in doubt, add boiling water and trap steam. For foolproof future cooking, rinse rice until water runs clear, use the cooker’s cup for measurements, and never skip the 10-minute rest. Now go rescue that dinner—you’ve got this.


