
Your rice just turned into a gluey disaster—clumping in wet balls or sitting in a soggy pile that sticks to the spoon like paste. That sinking feeling when dinner plans collapse because of overcooked rice? It happens to everyone. The good news is you can rescue sticky rice after cooking in minutes using techniques that transform gummy grains into perfectly fluffy results. Whether you’re dealing with slightly tacky basmati or Instant Pot mush, this guide delivers proven fixes that actually work.
Stop throwing out ruined rice. Within 10 minutes, you’ll learn how to fix sticky rice after cooking using tools you already own. Discover why starch turns grains into glue, immediate fixes for different textures, and smart repurposing tricks when rescue attempts fail. Most importantly, you’ll master prevention strategies to guarantee fluffy rice every single time.
Why Your Rice Turns Gluey Mid-Cook
Sticky rice happens when two invisible forces team up: excess surface starch and over-hydration. As rice cooks, starch on the grain surface gelatinizes in hot water, acting like edible glue. When grains absorb too much water or cook too long, they swell, split, and release even more starch—creating a vicious cycle of gumminess. This explains why your rice might start fluffy but turn into one solid mass as it sits.
Three common mistakes guarantee sticky results every time. Rinsing rice only once leaves starch residue that blooms during cooking. Using the “pasta method” (boiling in excess water) traps steam that continues hydrating grains after they’re done. And lifting the lid mid-cook disrupts steam levels, causing uneven cooking that forces you to add extra water later. The solution starts with understanding these triggers before they strike.
Refrigerator Rescue for Slightly Sticky Rice
Why Cold Air Fixes Gummy Grains
Refrigeration works because cold, dry air pulls surface moisture from rice without overcooking it. This method rescues rice that’s tacky but still holds shape—perfect for last-minute dinner saves.
Time needed: 20-60 minutes
1. Spread hot rice in a thin, even layer on a plate or parchment-lined baking sheet (no thicker than ¼ inch)
2. Place uncovered in refrigerator for 20-60 minutes—thinner layers dry faster
3. Reheat in 1-minute microwave bursts covered with a damp paper towel
Critical detail: Never skip spreading the rice thinly. Thick layers trap moisture, turning your rescue into a harder-to-fix clump. For best results, break up lumps with a fork before chilling—this exposes more surface area to the dry air. After reheating, add 1 tablespoon of oil or butter while fluffing to create a protective barrier between grains.
Oven Drying for Soggy, Mushy Rice
When Refrigeration Isn’t Enough
If your rice resembles wet cement, oven drying delivers dramatic results by evaporating excess moisture through controlled heat. This technique works wonders for Instant Pot disasters or rice cooked with too much water.
Time needed: 5-10 minutes
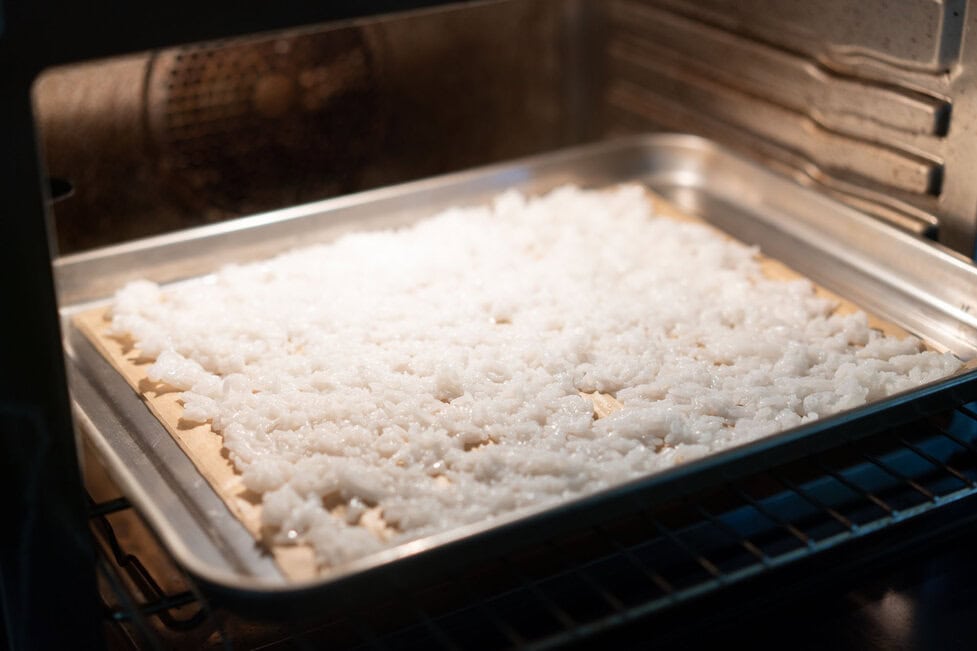
1. Preheat oven to exactly 325°F (163°C)—higher temps scorch grains
2. Optional but crucial: Rinse mushy rice under cold running water while gently swishing to remove surface starch
3. Spread rice in an ultra-thin layer (⅛ inch max) on a parchment-lined baking sheet
4. Bake in 5-minute intervals, stirring once with a fork, until grains separate when touched
Pro tip: Place the baking sheet on the oven’s middle rack for even drying. Check after 5 minutes—over-drying creates hard, brittle grains. For sticky brown rice, add 1 teaspoon of rice vinegar to the rinse water; the acidity helps break down excess starch. Stop when grains feel firm but not hard when pressed between fingers.
Instant Pot Sticky Rice Emergency Fixes
Pressure Cooker-Specific Solutions
Instant Pots often create sticky rice due to trapped steam. Don’t despair—these targeted techniques rescue pressure-cooked disasters without extra tools.
Immediate action: After natural pressure release, open lid and assess texture. If rice is clumped:
– Add 1-2 tablespoons hot broth (not water—it dilutes flavor)
– Switch to Sauté mode on low, stirring constantly with a silicone spatula for 60 seconds
– Remove pot from heat, cover with lid, and let rest off the base for 10 minutes
– Fluff gently with a fork while adding 1 tablespoon melted coconut oil
For wet rice: Spread cooked rice on a rimmed baking sheet, cover loosely with foil, and place in a 200°F oven for 10 minutes. The gentle heat evaporates moisture while keeping grains intact—ideal prep for next-day fried rice. Never use the Keep Warm function on mushy rice; it continues cooking and worsens stickiness.
Transforming Unsalvageable Rice into Gourmet Dishes

When Rescue Isn’t Possible
Rice beyond saving? Turn kitchen failures into intentional dishes that leverage excess starch. These methods waste zero food while creating restaurant-quality results.
Silky congee in 20 minutes:
– Combine 2 cups mushy rice + 4 cups broth + 1-inch ginger slice
– Simmer uncovered 15 minutes until porridge-like
– Top with scallions, soft-boiled egg, and toasted sesame oil
No-waste rice pudding:
– Mix 3 cups overcooked rice + 1 can coconut milk + ¼ cup maple syrup
– Simmer 10 minutes until thickened
– Chill for creamy dessert (add cinnamon or cardamom)
Crispy fried rice cakes:
– Combine 2 cups rice + 1 beaten egg + 2 tbsp flour + green onions
– Form ½-inch patties, pan-fry 4 minutes per side until golden
Pro chef move: Spread unsalvageable rice on a tray, refrigerate uncovered overnight, and use for fried rice. The slight drying creates perfect clumping texture with veggies and protein.
Prevent Sticky Rice Before It Starts
Pre-Cook Protocol That Guarantees Fluffiness
Avoid rescue missions entirely with these non-negotiable prep steps. Proper rinsing alone solves 80% of stickiness issues.
Rinse like a pro:
– Swirl rice in cold water for 15 seconds (use bowl, not colander—it traps broken grains)
– Drain cloudy water immediately—don’t let rice soak in starchy liquid
– Repeat 3-4 times until water runs almost clear (short-grain needs 1 extra rinse)
Perfect water ratios:
– White long-grain: 1 cup rice : 1¼ cups water
– Sushi rice: 1:1 ratio (add 1 tsp rice vinegar after cooking)
– Brown rice: 1:1½ cups water + 5 minute extra cook time
Critical mistake to avoid: Never stir rice after adding water. Agitation releases starch—set a timer instead. For stove-top cooking, bring water to full boil first, add rice, then immediately reduce to lowest possible heat with tight-fitting lid.
Post-Cook Techniques for Perfect Texture
The 10-Minute Rest That Makes All the Difference
What you do after cooking matters as much as the cook itself. Most home cooks skip this phase, guaranteeing sticky results.
Essential post-cook sequence:
1. Remove pot from heat immediately after timer ends
2. Place clean kitchen towel under lid to absorb condensation (prevents steaming)
3. Rest undisturbed for 10 minutes—no peeking!
4. Fluff only once with fork using upward motion to lift grains
Troubleshooting tip: If rice still feels damp after resting, place lid slightly ajar for 2 minutes. Never return to heat—this causes hard bottoms. For rice cookers, unplug immediately after cycle completes to stop residual cooking.
Sticky Rice Troubleshooting Cheat Sheet
| Problem You See | What’s Really Happening | Fix Within 5 Minutes | Prevention Next Time |
|---|---|---|---|
| Grains stick together in clumps | Surface starch bloomed during cooking | Rinse under cold water, fluff with fork, add 1 tbsp oil | Rinse 3-4x until water clears |
| Rice sits in watery pool | Excess water absorbed during cooking | Spread on baking sheet, bake at 325°F for 5 min | Measure water precisely; use timer |
| Lumps that won’t separate | Steam caused clumping during rest | Break lumps gently, add 1 tbsp hot water, cover 2 min | Rest 10 min with towel under lid |
| Burnt bottom but sticky top | Uneven heat distribution | Scrape unburnt rice into new pot, add broth, simmer 5 min | Use heavy-bottomed pot; medium-low heat |
Storing Leftovers Without Creating More Sticky Rice
Reheating improperly turns perfectly cooked rice into gloop. Follow these steps for restaurant-quality leftovers every time.
Cool rice within 2 hours by spreading on a baking sheet—never leave in the cooking pot. Break large clumps with a fork while warm to prevent hardening. Store in airtight containers with a paper towel on top to absorb moisture. When reheating:
– Microwave method: Sprinkle 1 tsp water per cup, cover, heat 90 seconds
– Stovetop method: Add 1 tbsp broth, cover, steam 3 minutes on low heat
Critical safety note: Rice left at room temperature over 2 hours breeds Bacillus cereus bacteria. Never reheat rice that’s been sitting out all day—even if it looks fine.
Sticky rice isn’t a kitchen failure—it’s a fixable texture issue. With these targeted techniques, you’ll rescue gummy batches in minutes while preventing future disasters. Remember the golden rule: rinse thoroughly, measure precisely, and never stir after covering. Your next pot of rice will be perfectly separate, fluffy grains that hold their shape from pot to plate. When sticky rice strikes again (and it will), you’ll know exactly how to fix sticky rice after cooking—no takeout required.


