
That stubborn rice crust clinging to your Aroma lid isn’t just unsightly—it’s actively ruining your next batch of jasmine rice with stale flavors. When dried starch traps odors from last night’s coconut curry or creates mold hotspots in the rubber seal, your appliance’s performance plummets. This guide delivers the exact sequence to deep-clean every component of your Aroma rice cooker lid, transforming it from grimy to spotless in under 20 minutes. You’ll learn specialized techniques for the steam vent, rubber gasket, and inner lid that prevent damage while eliminating odors for consistently fresh-tasting rice.
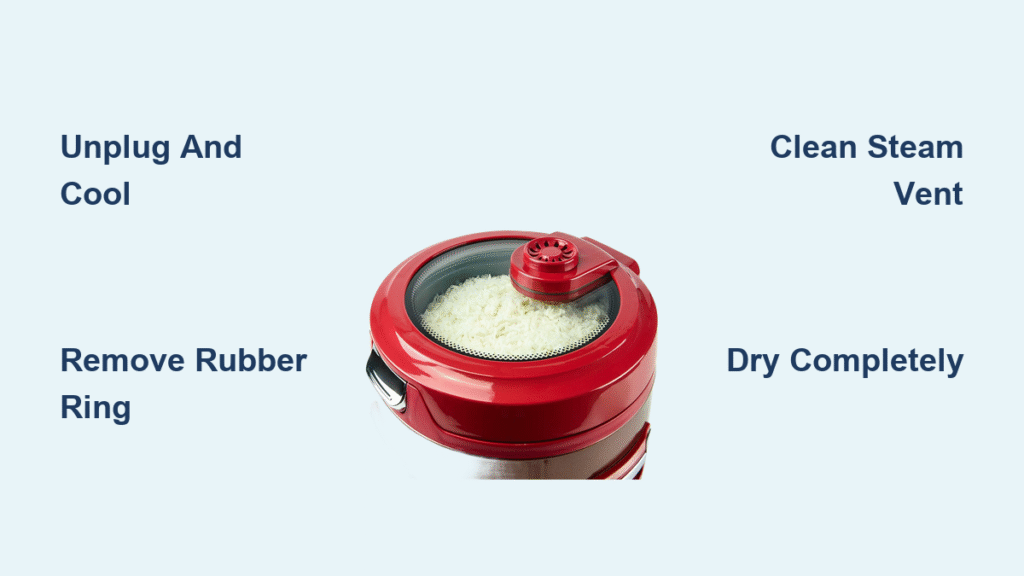
Unplug and Cool Before Touching Any Components
Never skip this critical safety step—attempting to clean a warm lid risks severe burns and thermal shock damage. After cooking, immediately unplug your Aroma rice cooker and move it away from heat sources. Keep the power cord clear of warm surfaces during cooling to prevent insulation damage. Wait 30-45 minutes until the lid feels completely room temperature to the touch; rushing this process can crack plastic components from sudden temperature changes.
Check readiness by placing your palm flat on the main lid surface. If you feel any warmth, wait another 10 minutes. This patience prevents microfractures that harbor bacteria in hidden crevices. Only proceed when all components have reached ambient temperature—your safety and appliance longevity depend on it.
Identify All Removable Lid Parts Before Disassembly

Your Aroma lid contains five distinct components requiring individualized cleaning approaches:
- Main outer lid – The stainless steel or plastic housing containing electrical elements
- Inner lid plate – The removable cooking-facing surface that collects starch buildup
- Rubber sealing ring – The flexible gasket creating the pressure seal (mold magnet)
- Steam vent assembly – Small openings or covered ports on the lid’s edge
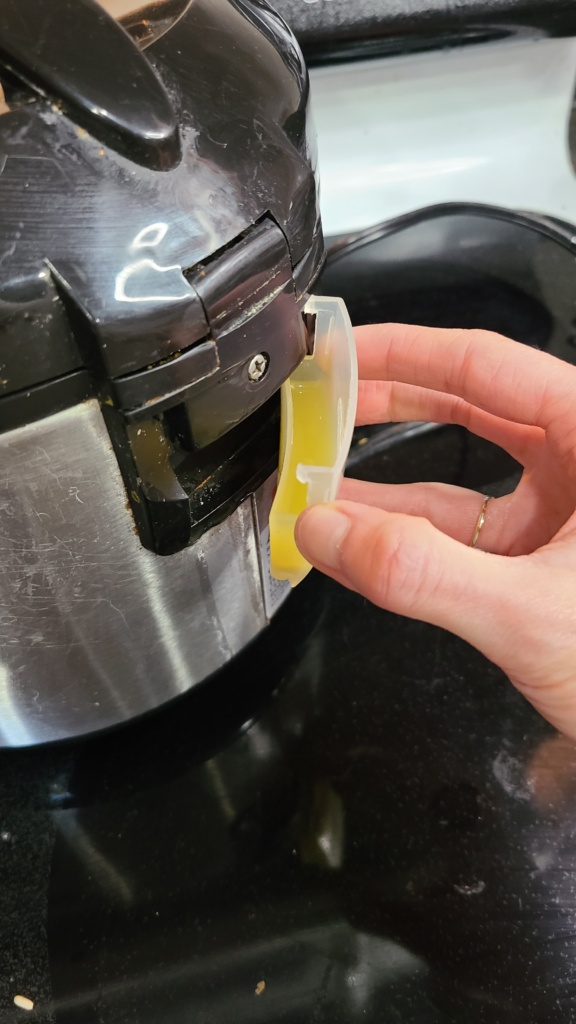
- Condensation collector – The cup-shaped reservoir catching cooking moisture
Critical disassembly sequence: First remove the inner cooking pot to access lid components. Gently squeeze the condensation collector’s sides and pull straight out—it should release with light pressure. For the inner lid, lift vertically (some models require a quarter-turn twist). Consult your manual if resistance occurs—forcing parts causes costly damage.
Remove Lid Components Without Causing Damage
Start disassembly only after confirming all parts are cool. Pull the condensation collector straight outward with even pressure on both sides; wiggling can crack its plastic tabs. For the inner lid, lift straight up from the hinge points—never twist unless your model specifically requires it (check manual). If stuck, run a damp cloth around the seam to loosen residue before retrying.
For steam vents, locate the small cap covering the openings (usually on the lid’s edge). Gently pop it off using your fingernail—some twist counterclockwise. Never use metal tools here; even a slight scratch compromises pressure regulation. Keep all parts organized on a clean towel to prevent misplacement during cleaning.
Deep Clean Inner Lid Plate to Remove Starch Crust
The inner lid bears the brunt of cooking residue, especially after sticky rice or quinoa. Remove it completely from the main assembly before cleaning. Hand wash only with warm water, mild dish soap, and a non-abrasive sponge—never use steel wool or harsh scrubbers that scratch non-stick coatings.
For baked-on starch:
– Mix 2 tbsp baking soda with 1 tbsp lemon juice into a paste
– Apply to crusty spots and let bubble for 10 minutes
– Gently scrub with a soft-bristle toothbrush
– Rinse under warm water until runoff runs clear
– Dry immediately with a microfiber towel
Pro tip: Check the hinge grooves where the lid attaches to the main unit—these trap residue that causes sticking. Use a cotton swab dipped in vinegar solution to clean these hidden areas.
Eliminate Mold from Rubber Sealing Ring
The rubber gasket’s grooves collect moisture and food particles, creating perfect mold conditions. Wipe the entire ring with a vinegar-soaked cloth (equal parts white vinegar and water), focusing on the inner groove where it meets the lid. This area hides the most residue.
For stubborn mold:
1. Remove the ring completely by gently stretching it from the lid channel
2. Soak in vinegar solution for 30 minutes
3. Scrub with soft toothbrush using circular motions
4. Rinse thoroughly under running water
5. Dry completely with lint-free cloth before reinstalling
Never leave the ring damp—trapped moisture accelerates mold regrowth. Replace rings showing cracks or permanent discoloration (typically every 6-12 months).
Unclog Steam Vent Without Damaging Components
A blocked steam vent causes pressure issues and inconsistent cooking. Never insert metal objects—they scratch vents and create permanent leaks. Instead:
- Remove vent cap using fingernail pressure
- Dislodge debris with a straw brush or pipe cleaner
- Dip cotton swab in warm soapy water and rotate inside vent opening
- For mineral deposits: Soak swab in vinegar solution for 5 minutes before cleaning
- Rinse with clean damp cloth
- Dry thoroughly with paper towel (moisture causes electrical issues)
- Reattach cap with firm downward pressure
Check for blockages monthly, especially after cooking starchy grains. If steam doesn’t release during cooking, stop immediately and clean the vent—continued use risks dangerous pressure buildup.
Clean Main Lid Exterior Without Harming Electronics
Water near electrical connections can fry your cooker’s circuitry. Use a barely damp microfiber cloth (wring until no moisture drips) to wipe the main lid surface. Focus on steam vent areas and edges where residue accumulates from condensation runoff.
Critical avoidance zones: Never wet the hinge mechanisms or any visible electrical contacts. Work from the center outward, finishing with dry cloth passes to prevent water spots. For stainless steel models, wipe with the grain to avoid scratches. Complete this in under 2 minutes to minimize moisture exposure.
Neutralize Lingering Odors With Vinegar Steam Cycle
Persistent curry or garlic smells mean odor molecules are trapped in plastic components. Never pour liquids directly on the lid. Instead:
- Mix 1 cup white vinegar with 1 cup water in the inner pot
- Close the lid and run a full cooking cycle
- Let cool completely (45+ minutes) before opening
- Hand wash all removable parts with soapy water
This steam penetrates microscopic pores in plastic and rubber. For extreme odors, repeat the cycle and leave an open baking soda container inside the closed cooker overnight. Warning: Skip this if your cooker shows electrical issues—moisture could worsen damage.
Remove Stubborn Stains With Baking Soda Paste
Discolored inner lids or rubber rings respond to this non-toxic treatment:
– Mix 3 parts baking soda with 1 part water into thick paste
– Apply to stained areas and wait 30 minutes
– Gently scrub with soft sponge (no circular motions on rubber)
– Rinse until water runs clear
– Dry completely before reassembly
Important: Some discoloration is normal and doesn’t affect performance. Avoid bleach or abrasive cleaners—they degrade plastic integrity. Baking soda reduces but won’t eliminate all stains on older units.
Daily Maintenance That Prevents Deep Cleaning
Spend 90 seconds after every use to avoid weekly scrubbing:
– Wipe lid surface with damp microfiber cloth
– Empty and rinse condensation collector under tap
– Run dry cloth along rubber ring groove
– Store with lid slightly ajar overnight to evaporate moisture
This routine prevents starch from hardening into cement-like residue. Never skip emptying the condensation cup—standing water breeds bacteria and creates foul odors within 48 hours.
Weekly Deep Clean Checklist
Every 7 days, perform this 15-minute refresh:
– Remove and hand wash inner lid plate
– Deep clean steam vent with vinegar swab
– Inspect rubber ring for mold spots
– Wipe main lid exterior thoroughly
– Check all components for cracks before reassembly
Set phone reminders until it becomes habit. Consistent weekly cleaning extends your cooker’s lifespan by 3+ years compared to sporadic deep cleans.
Dishwasher Safety: What You Can and Can’t Clean
Safe for top rack:
– Inner lid plate
– Condensation collector
– Steam vent cap
Hand wash only:
– Rubber sealing ring (dishwasher heat warps it)
– Main lid assembly (electronics will short-circuit)
– Any part with visible wiring
Proven fact: Dishwasher use accelerates discoloration in plastic components but doesn’t affect functionality. For longest lifespan, hand wash everything except the condensation cup.
Reassemble Components Without Errors

Bone-dry parts are non-negotiable—moisture causes mold in 48 hours. Start reassembly by snapping the inner lid into place until you hear a click. Reattach the steam vent cap with firm downward pressure. Insert the condensation collector until it locks with an audible snap.
Final seal test: Close the lid and press gently around the edges. The rubber ring should sit flush with no gaps. If you feel uneven pressure, disassemble and check component alignment—improper sealing causes steam leaks and undercooked rice.
Troubleshoot Common Lid Problems Immediately
Mold on rubber ring: Soak ring in vinegar solution 30 minutes, scrub gently, and dry completely. Replace if mold returns within 2 weeks.
Vent blockage causing overflow: Soak vent cap in hot soapy water 15 minutes before cleaning. Verify cap orientation matches original position during reassembly.
Persistent odors after cleaning: Run two consecutive vinegar steam cycles with 12 hours between treatments. Place open baking soda container inside cooker overnight.
Stiff lid movement: Apply food-safe mineral oil to hinge points—never use cooking oil (it turns rancid).
Regular lid maintenance transforms your Aroma rice cooker from a flavor-contaminating liability into a precision kitchen tool. By dedicating just 90 seconds after each use and 15 minutes weekly, you’ll prevent 95% of common issues like mold growth and odor transfer. Remember: that faint curry smell isn’t “just how rice cookers smell”—it’s residue actively ruining your next meal. Implement these steps today for rice that tastes as fresh as your ingredients, batch after batch. For long-term reliability, replace rubber rings annually and inspect steam vents monthly—your perfect rice texture depends on these small habits.


